 [1]
[1]
Our third Gen F-Body falls into the Rodney Dangerfield respect range when it comes to earning cool points on the street or at the track. Seeking to improve it’s image, we’ve taken on the task of restoring some awe to the denigrated GM platform. Recent additions of a Moser 12-bolt rearend and Spohn Performance suspension upgrades have put project Respect back on the charts (you can almost hear Aretha Franklin belting out “R-E-S-P-E-C-T, find out what it means to me”). Ride along with us as we take the next step by adding a TCI Automotive [2]700R4 Transmission upgrade, complete with billet convertor and even some much needed Spohn suspension goodies to support the TCI components. With concessions to Miss Aretha, we ain’t asking for a little respect, we’re going to take it.
You may be wondering why we would want to upgrade a stock 700R4 transmission. After all, many auto enthusiasts already claim the the stock 700R4 is one of the finest overdrive automatic transmissions ever produced by the factory boys. This may be true… for stock applications, but if you want R-E-S-P-E-C-T, you gotta go with stronger internals. According to TCI Transmission’s Scott Miller, TCI Product Manager, “the stock OEM transmission is reliable to about 350 horsepower.” For applications where there are some more horses under the hood, you should marry up drivetrain components that have the strength to handle the horsepower and be durable enough for the application.
This 700R4 can handle up to 850 horsepower and is designed to fill the gap between the Street Fighter Transmission and a full out race competition transmission -Scott Miller

History of the T700
The Turbo 700 was introduced by GM in 1982, replacing the Turbo Hydromatic 350 in rear wheel drive cars and trucks. The highlight of the T700 was it’s 30% overdrive feature. A lower 3.06:1 first gear made it a favorite for off the line acceleration and torquey low speed for the off roaders. Tow vehicles found that the 700R4 had exceptional pulling power and these transmission would often find their way into trucks.
There were some overheating problems and durability issues in the beginning, which, “gave it a bad rap” said Miller, “but through later revisions and improvements, the 700R4s became a reliable transmission.”
 [3]
[3] [4]
[4]
“We use a ten vane billet style front pump assembly, which is a major upgrade over the stock 7 vane cast pump. Ours are machined from 8260 billet steel to exact tolerances. This is a big deal for proper fluid circulation and consistent line pressures,” says Miller.
The 700R4 was redesignated as the 4L60 in 1990, which referred to 4-speed, longitudinally positioned, 6,000 lbs GVW, and was a change in designation only with no significant mechanical changes.
Problems with the OEM 700R4
As mentioned earlier by TCI’s Scott Miller, the OE 700R4 got something of a bad rap initially. The first issue was overheating. Many of these overheating issues were the result of hard use that exceeded the transmissions capabilities. The transmission was also blamed for improper shifting which generally was the result of an improperly installed throttle valve cable (TV Cable). Correct placement of the cable usually eliminated these problems.
 [5]
[5]We brought our anemic, smog legal, early 90's Gen III Camaro into the shop to restore some respect to the iconic nameplate.
Our Upgrade
The 700R4 has earned it’s place at the table in performance vehicles. TCI Transmissions have upgraded the OE unit in a line of transmissions based on horsepower rating that extends the capabilities of this tried and true gearbox. The Street Rodder version, which is made for street cruising with a little extra for those times when you want to show off, fits into the 350-525 horsepower range.
TCI’s Street Fighter version is beefed up even more and has manual or auto shift capabilities. The Street Fighter is designed for a street/strip car with a little more engine muscle. Something that tops out in the 450-550 horsepower range depending on the model.
For Respect, we chose the Super Street Fighter model of TCI’s 700R4 transmission (Part #371100). Miller explained that the Super Street Fighter “was designed for a naturally aspirated car with a horsepower range between 750 to 850, depending on the package,” which fits our plans for the Gen 3 Camaro perfectly.
The project car was already equipped with the OEM version so a swap of components was a breeze. TCI’s 700R4 shares the same external dimensions as the OE version and the 4L60/4L60E making it a natural selection for this project car upgrade. As an added note, it’s also a great transmission selection to retrofit an older car because of the gear ratios and improved strength.
 [6]
[6]By using components with modern technology built in, like a hardened output shaft, the TCI 700R4 can handle higher horsepower applications.
Miller explained that the Super Streetfighter 700R4 improved upon the OE stock versions, and many other similar aftermarket replacements, by “installing components that are manufactured using the latest technology.” One area where TCI’s Super Streetfighters take advantage of modern technology is with the gears. “The gears are treated cryogenically which strengthens the components. The process of cryogenic hardening of metal is a process where the component is cooled to a very low temperature. This process has a profound effect on steel by removing residual stresses in the metal that improves wear resistance,” said Miller.
In The Clutch
Another area where component selection and modern technology have aided in improving the transmissions durability lies within the clutch and steel plates. “We use Red Eagle Clutches that are manufactured with friction plates of phenolic resin with a top layer of silicate. The silicate is added to resist heat,” Miller explained.
 [7]
[7] [8]
[8]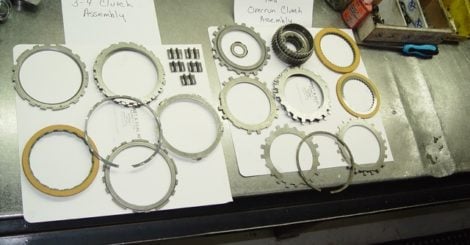 [9]
[9]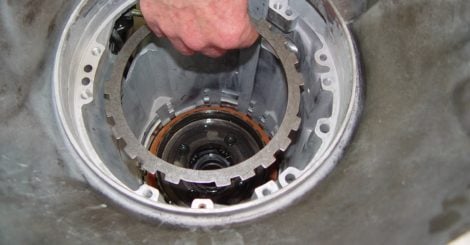 [10]
[10]
“We use Red Eagle Clutches that are manufactured with friction plates of phenolic resin with a top layer of silicate. The silicate is added to resist heat,” says TCI's Scott Miller..
The steel plates in the clutch pack are Kolene-treated, which has become a popular treatment process to enhance wear and fatigue resistance. According to the Kolene corporation, the Kolene treatment is a salt bath nitriding process that can improve wear from 200% to 500% in many cases. “We are also using the Red Eagle extra wide heavy duty bands for holding power. Combine that with the larger diameter servos and enhanced hard parts and improved lubrication system, and you have a pretty stout transmission that can easily handle this power range for a long time,” Miller states.
According to the data from Alto, the company that manufactures the Red Eagle line of clutches and transmission bands, the Red Eagle line is designed to cause less wear against the opposing steel plates and reduce the incidence of steel plates burning and warping. All this is accomplished by the company without having an oil groove in the clutches to help dissipate oil. This means to us that there is more friction surface. TCI also includes their constant pressure valve body to ensure that the clutches and bands “are firmly applied to help eliminate slippage.”
90% of all transmission failures are caused by heat – Scott Miller
One of the weak areas with the stock OE transmission was cooling. TCI has addressed weaker areas in the OEM transmission throughout by paying attention to component selection.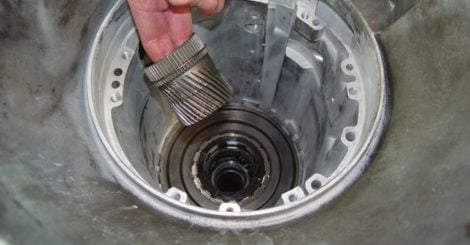 [11]
[11] [12]
[12]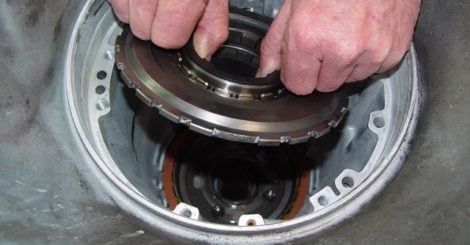 [13]
[13]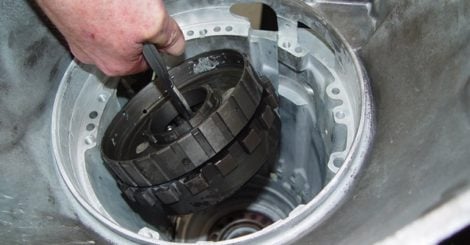 [14]
[14]
“We use a ten vane billet style front pump assembly, which is a major upgrade over the stock 7 vane cast pump. Ours are machined from 8260 billet steel to exact tolerances. This is a big deal for proper fluid circulation and consistent line pressures,” says Miller. He also explained that “the billet pump will not change in size with heat like the stock piece which means that it will pump more fluid.”
Capping off the transmission is a chrome plated transmission pan, that’s embossed with the TCI logo for a distinctive look if the front wheels ever come off the ground.
Our converter of choice consisted of TCI’s 10-inch package with their billet steel front cover (Part #243108). Miller explained that this converter was designed “with the street racer in mind. If you have a radically powered street machine, this converter is designed to help take advantage of the horsepower gains in higher rpm ranges.” Basically speaking, Miller told us that we can expect to be able to benefit from higher rpm launches, lower ET’s with better low and mid-range power. Obviously, TCI has paired this converter as part of the Super Streetfighter combination for power matching and strength.
 [15]
[15]Installing the new TCI transmission was a snap and proved to be a factory fit. Our shop dawgs even had smiles on their faces.
Putting the Super Streetfighter Combination into Respect
We were in a hurry to get our project car moving up on the respect scale but safety being paramount, we let the car cool down once we got it on the rack so our shop dawgs didn’t fry pieces of skin during the removal of the stock transmission.
Removing the stock transmission is a simple enough procedure, beginning with draining the old fluid, removing the dust cover to take out the converter bolts. After removing the driveshaft, speedometer cable, gear selector, throttle linkage and any other various vacuum and fluid lines, the dawgs removed the transmission to engine mount bolts and crossmember while supporting the transmission with a tranny jack. A quick check for any remaining attached components, then our shop dawgs lowered the transmission away from the engine.
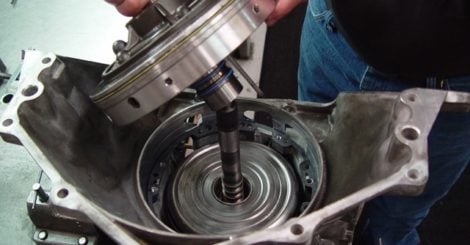
Installation of the TCI 700R4 was almost as simple as removing the stock transmission. After checking the flexplate for any irregularities, our skilled technicians filled the torque converter with TCI’s Max Shift transmission fluid and installed the converter onto the transmission’s input shaft.
Using an under hoist transmission jack, our techs raised the transmission into place and slid the assembly on the engine’s locating dowel pins. As we expected, the transmission slid into place with the transmission flange mounting flush against the rear of the engine. Installing two bolts on either side of the transmission to hold it into place, our techs checked the converter’s thrust and rotation freedom.
 [16]
[16]Getting the torque converter installed properly includes making sure that there is proper endplay.
Endplay
The key to installing the tranny and converter combination is ensuring that the converter has between 1/8- to 3/16-inch of end play. No more and no less. A strict warning on the TCI installation sheet explains if there is no existing endplay when the converter is installed, it is installed incorrectly and needs to be corrected. Ours went together properly with no problem. With converter installed properly we could apply thread locker to the converter bolts and torque them to the specified 30 lb-ft.
Taking another clue from TCI’s installation notes, next we installed our new TCI transmission cooler. If you purchase the Super StreetFighter package, the transmission, trans fluid, cooler and torque converter all come in the kit, making it a very complete upgrade. If you don’t get the complete Super StreetFighter package, it is seriously worth considering picking up a new transmission cooler. According to the folks at TCI, “90% of all transmission failures are caused by heat. The TCI universal Trans Cooler (Part #820500) is a good fit for any transmission upgrade.
 [17]
[17]The Super Streetfighter 700R4 was installed and ready to get the transmission jack out of the way.
Spohn Torque Arm upgrade
Our project car had ready been upgraded from the flimsy factory torque arm to a Spohn Performance [18] tubular version (Part #399), which was a pretty beefy replacement that mounts to the transmission extension housing. Torque arms that attach to the transmission housing are very good at increasing straight line traction and reducing wheel hop in cars rated around the 450-500 horsepower range. Above that and the cast transmission housing may be subjected to stresses that could cause cracks in the housing.
 [19]
[19]Spohn Performance's Pro-Series Adjustable Torque Arm comes with a transmission crossmember that removes the torque arm pivot point from the rear of the transmission to the supplied crossmember.
Get Shafted
All too often in the project car game, getting carried away on one aspect of the build can cause some tunnel vision. Ultimately, without warning you’ve neglected other key components of the build without even being aware of it. Sure, we all enjoy big engines with lots of extra power to play with and it’s easy to see how some builds can go one direction and completely disregard safety in the other.
 [20]
[20]Our custom ordered Driveshaft came shipped to our door with the correct, specified 28-spline configuration.
Moreover, how well will the vehicle stop, handle or soak up an aggressive launch on the drag strip? Chances are if you’ve only focused on one aspect of the build, a minor to catastrophic failure may be in your future.
Case in point, during our build of Project Respect, our engine was the last thing in our mind, literally. Although it had already been assembled, our focus remained on strengthening the suspension and chassis, decreasing our stopping distances, controlling bounce and rebound and fortifying our weakest leak in the drivetrain by upgrading the driveshaft.
In some cases, the driveshaft is often overlooked. Some builds go right for the gut by adding lots of power, firm shifts and a Posi rearend. However, skipping right over an adequate driveshaft setup. You’ll be happy to know we were here to squash such situations.
 [21]
[21]A beefed up yoke to handle the extra power was completely necessary for our future 600HP engine. Our shaft also came from the Driveshaft Shop fully balanced and ready to install.
While our third-gen Camaros steel driveshaft from the factory was still in pristine condition, its current state would not be able to handle the future power upgrades we had in store. Additionally, third-gen Camaros are known to endure harmonic issues.
 [22]Plus, our Camaros newly lowered ride height had drastically changed our pinion angle, which could further extenuate the harmonic issues with the steel driveshaft. To quench our proverbial thirst, we made a quick search of Driveshaft Shop’s easy-to-follow website [23].
It was there we found exactly what we were searching for in an aluminum driveshaft. All we had to do was print out their Driveshaft Measurement Sheet and fill it out with all of the necessary measurements.
At ride height, we first measured from the edge of the transmission seal (not the output shaft) to the centerline of the rear u-joint. Our total length was 44 1/8 inches. From there, we took measurements of the rear, 1350 yoke (between the two tabs), which came in at 3.625 inches. Each side of the yoke measured in at 1.186 inches.
 [24]
[24]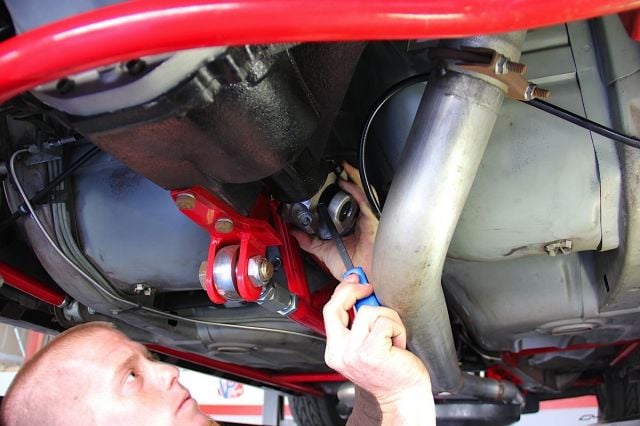 [25]
[25] [26]
[26]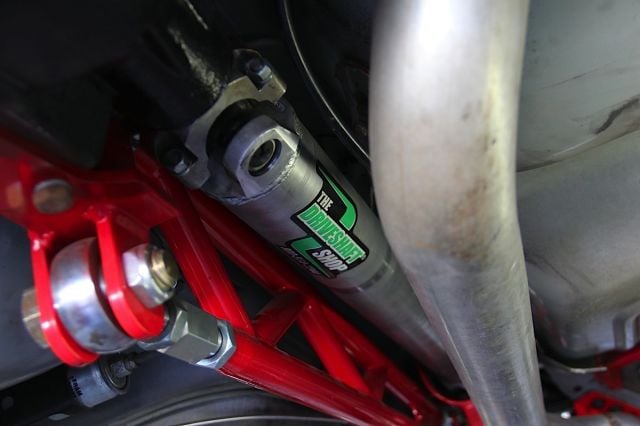 [27]
[27]
With some assistance from a small crowbar, Tim Obetz, our tech guru, lined up the u-joints into our rearend yoke and planted the shaft into its new home. From there, Obetz installed the u-bolts and tightened the whole assembly with a 14mm wrench.
The Driveshaft Shop will also need information on the transmission, differential, future or present horsepower and torque and how the vehicle will be used. In our case, Project Respect was running a 700R4 transmission with a 28-spline configuration and U-bolts to hold it into the u-joint.
Once our order was placed, Driveshaft Shop will custom build your shaft to spec and ship it to your door. Once we received our new shaft, it was only a matter of pulling the factory one out and installing the new unit.
When it was all said and done, we had our new shaft in the car in almost no time at all. To finalize the install, we locked the U-botls down with a 14mm wrench. Finally, even though Project Respect was still sporting the underwhelming 305ci small-block, we could take the car for a test drive. If you’re looking for a no-nonsense approach to obtaining a custom-built driveshaft, Driveshaft Shop should be on your radar. Give them a call or cruise their website and get set for a driveshaft that can take the twist!
 [28]
[28]Our new aluminum driveshaft was the last weak link in the powertrain.
Finalizing The Long Arm
Knowing that we were shooting for the 700 and better horsepower range, it was a smart move to upgrade to a cross member mounted torque arm so that the rear end and pinion angle could be set while we were doing the rearend upgrade. Spohn’s Pro-Series adjustable torque arm for 700R4 transmissions (Part #301PS) [29] was the optimal choice to mate with the heavy duty rear end and our future fire breathing powerplant. The Pro-Series kit includes the transmission crossmember required to support the transmission, complete with a driveshaft loop.
 [30]
[30]With the supplied crossmember bolted in, our shop dawgs installed the Spohn Performance Pro-Series adjustable torque arm.
By this point our technicians had the transmission to engine bolts completely torqued, the torque converter installed and a new oil cooler mounted. Now it was simply a matter of hooking up the shifter linkage and any other attaching cables like the speedometer cable and vacuum lines.
Once the shifter cable was installed and checked to ensure that there was proper movement between each gear with no tension on the shifter in any gear and the cable end moved in and out without resistance, we prepped for break in.
Adjusting Shift Points
With the shifter linkage attached to the shift arm on the transmission, place the transmission and the shifter in neutral and attach the cable to the transmission shift arm. Check for proper movement in each gear paying attention that there is no tension on the shift lever in any gear. Also check that the cable slides in and out of the lever with no resistance. We filled the transmission up with four quarts of TCI’s Max Shift Transmission fluid and prepared to start the engine to check the transmission.
Once we were satisfied that the cable was adjusted correctly by the adjustable knurled nut at the cable end, we elevated the project car off of the ground and started the engine to get the trans fluid pump turning and to check the shifter linkage. It’s important to check the fluid level and top it up to the full mark as quickly as possible when the engine is started. Remember that cavitation and heat are bad things for a transmission. When we were sure that the transmission was properly filled, we double checked the shift points by running the shifter through the complete range of gears with light throttle to ensure actuation in each gear.
 [31]
[31]When it comes to drivetrains, we are fans of upgrading with components in the same family line.
Final Steps and Analysis
 [32]
[32]While we were at it, we decided to stay with the TCI upgrades and change out our worn gear selector for TCI's Outlaw shifter.
We ran the gear selector through all the gears and made sure to check the fluid level often. It helps to have an extra set of eyes look for leaks when the engine is running. Checking for leaks around all the fittings, especially around the cooler lines, is much easier and safer with two people.
Our removal and installation was a breeze and we found it useful to order the entire Super Streetfighter package. Using components that are tested and manufactured in the same family makes pretty good sense so we even ordered the Streetfighter shifter kit. As we expected, all the parts ordered from a single manufacturer fit together well and posed no installation problems. Unless you like “redneck engineering” we highly recommend considering a complete kit versus individual parts from numerous manufacturers.
Our project car was back together in one afternoon and we were already looking at the calender for the next test and tune session. Nothing gets us to the track quicker than testing a major component upgrade. Look for the results of project Respect’s test and tune session coming in the near future.