
We’re getting close to the end of the build on our 1,000-horsepower, 1965 Mustang project car, dubbed Biting The Bullitt. In past articles we’ve done installations on an extensive parts list, one that is necessary to withstand the power this machine will be putting to the ground. We built a killer 427 cubic-inch Paxton-supercharged engine with the help of QMP Racing and Dart Heads, who supplied the foundation for our build with their Iron Eagle block and Pro 1 225cc CNC cylinder heads. We’ve also beefed up the suspension with the help of Strange Engineering and Calvert Racing Suspensions and put in a complete TCI front clip.
In the latest update on our project, we’re getting to the final stages of construction and in this article, we’ll be installing a complete fuel system with pumps and filters from FUELAB and lines and fittings from Aeroquip. We’ll also install an awesome aluminum radiator from the cooling experts at AFCO Racing and a fan package from the team at Derale Performance. We’ll cover the tech behind the products along with a number of installation notes, and we hope you’ll follow along with us as we get BTB ready for its debut soon.
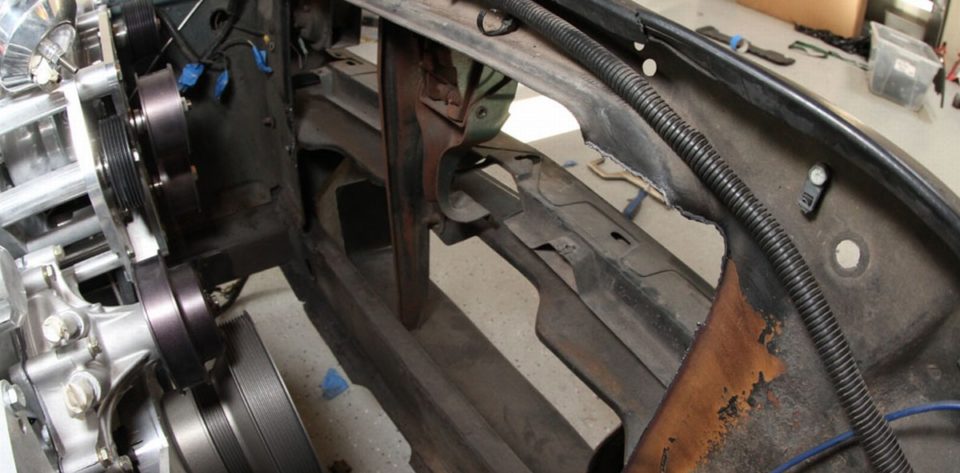
As you can see we don't have a ton of room to work with here. We had to stuff a radiator and fan into the space between the crank pulley and the body.
Cooling Off
Engines generate heat as a byproduct of their operation – this is a known fact. How to get rid of that heat effectively has been the challenge of hot rodders for years, as they have added horsepower, and as a byproduct, heat, to their machines. They’ve built air-dams, custom fan shrouds, cut extra holes in the nose of the car to aid airflow, and tried just about everything they can in the name of cooling efficiency.
We decided to get serious about cooling the car off and investigated the option of a custom radiator. Although there are often width and height limitations, those can be overcome by properly sizing the tanks, core sizes and quantities, according to AFCO Racing’s Eric Saffell. When it was time to tackle this part of the project, his knowledge and expertise were invaluable as he walked us through the process of ordering one of AFCO’s custom aluminum radiators.
Saffell explained, “It would be nice for me to be able to give a formula that says if you have X amount of horsepower then you need Y square inches of radiator. The issue with that is that there are so many different engines on the market and they all have different cooling requirements – a Ford engine in this project car may need more cooling than a similar engine combination in a different body style, or an LS engine – those are different in terms of cooling requirements also – then you throw in a power-adder and it becomes more complex. I’d love to be able to make it simple, but it would do everyone a disservice to suggest that.” Bigger isn’t always better, but in this case, cooling a 1000-horsepower engine in the older Mustang, we went with the largest radiator we could physically fit into the car.

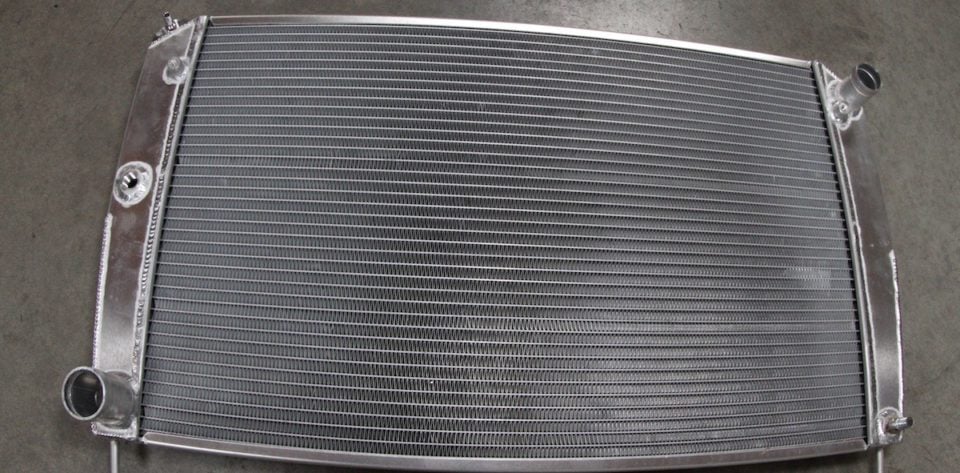
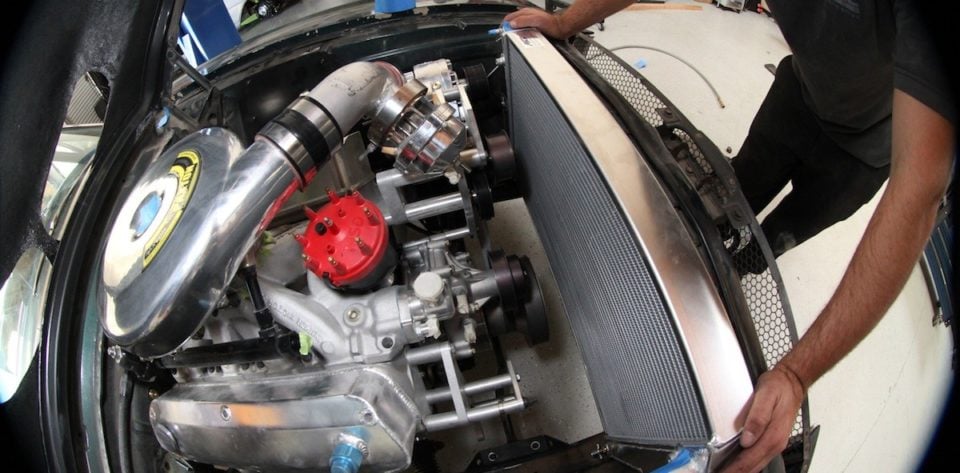
Prior to ordering our radiator, we needed to determine exactly how much real estate we had to work with. After going through their custom-build process, AFCO Racing sent us this beautiful radiator to solve our concerns. Like a glove, the radiator sits perfectly on top of our framerails. We had AFCO install dowels on each side in which we ran into the frame with a rubber grommet. Welded bungs on the front side of the end tanks secure to the core support.
This car will see time in the California heat and we wanted to make sure it would stay cool in those circumstances. – Eric Saffell

Once we had the dimensions we were working with, we calculated what kind of core we’d need – how many fins per inch we needed to achieve for what we believed the airflow would be over the radiator’s surface. “More fins are not necessarily better, either – if there are too many it can slow down the airflow to where the radiator is not effective as a cooling mechanism,” Saffell explained. We filled out the build sheet, talked more with Saffell about our goals, and a short time later the box arrived with a beautiful radiator inside.
 “Since the plan for this car is to be used in a street/strip application, we have to use a core configuration with a fin design that gives you a pretty wide array of cooling across all of the potential operating conditions. Although we do have many different direct-fit musclecar radiators to fit a wide range of vehicles already on the shelf, when we talk with someone with a specific need, we’ve got a build sheet that we use to come up with the right radiator for their project.
“We take the time, work with the customer, and nail down all of the critical data on the car – horsepower level, intended use, does the radiator need extra bungs welded in, how it needs to be mounted in the car, and then develop the radiator that will bolt in in the way the customer expects it to, and perform in the way that the customer expects it to,” said Saffell.
Picking our Derale Fans
With the heat transfer portion of the project down, we needed to ensure there was enough airflow through the radiator to maximize efficiency. When it came time to select the rest of the cooling system pieces, we went to the fan experts at Derale Performance, where Troy Wood was happy to help us select the proper cooling system enhancements to make our time on the street and at the track a worry-free experience.
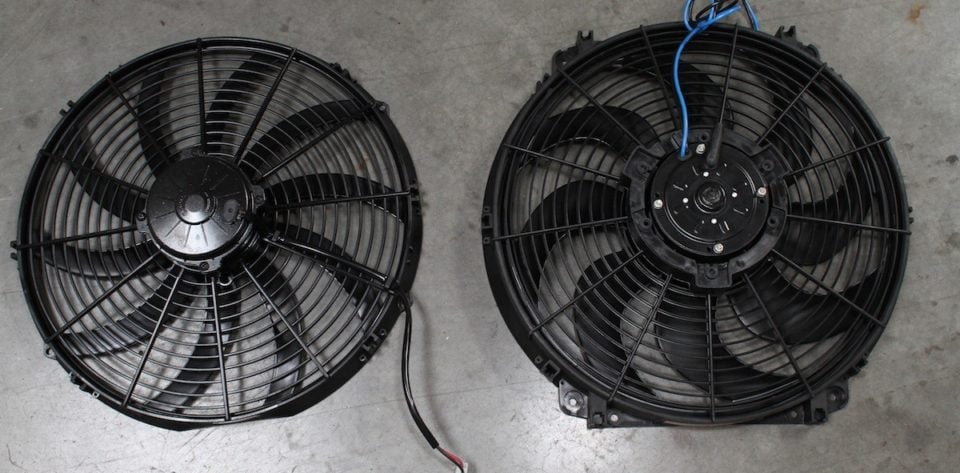
Derale Performance sent us a pair of radiators - a 16-inch unit for pushing, and a 12-inch unit for pulling behind the radiator. These two units allowed us to package everything neatly within the tight confines of our engine bay.
Much like the folks at AFCO, the team from Derale Performance tries to take a whole-car approach to cooling. Wood explained, “On an existing build, we ask the customer about their environment. Where do they live geographically, and what conditions are they seeing? How hot does the vehicle get under worse-case scenarios? What are their current cooling system components? This gives us an indication of the nature and severity of the issue. A Small-block Chevy 383 stroker motor in a Chevelle will run much hotter in a ’32 Ford as evacuating ambient heat is much more difficult.”
We try to do our best to analyze each combination and determine the best solution from a dollar-cost standpoint and the benefits of each. – Eric Saffell
A tougher issue is the enthusiast who’s building a car that has yet to be fired up. But going through the question process is much the same and we do have a pretty good idea based on past history what will likely make the most sense.
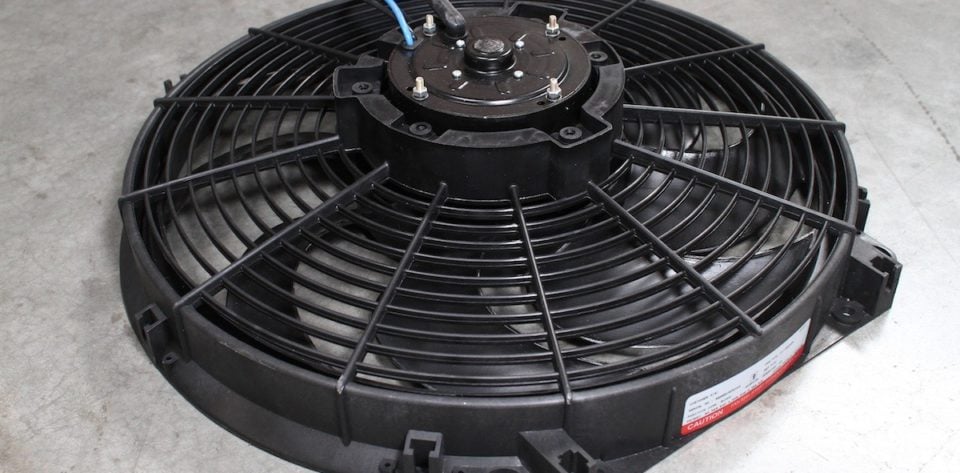
We are trying to keep a lot of horses cool and since that requires lots of air movement, Wood felt it was a good idea to run both a pusher fan on the front of the radiator, along with a puller fan on the back side to maximize heat transfer through the aluminum radiator core. Derale shipped out a 16-inch version of their reversible Tornado Series Fan [PN 16516] for us to use as a “pusher” in front of the radiator along with a 12-inch Tornado Series [PN 16012] fan to use as a ‘puller’ on the engine side, and one of their dual-fan thermostatic controllers [PN 16789].
On the front side of the radiator, we had a decent amount of room, but there’s also plenty of real estate taken up by our massive TCI transmission cooler. The 16-inch Tornado fan handled the job with just enough room to spare. It features a 225-watt, high-torque sealed motor and draws only 18.4 amps for operation. More importantly, it will push 2,175 cfm of air to help with cooling the radiator.
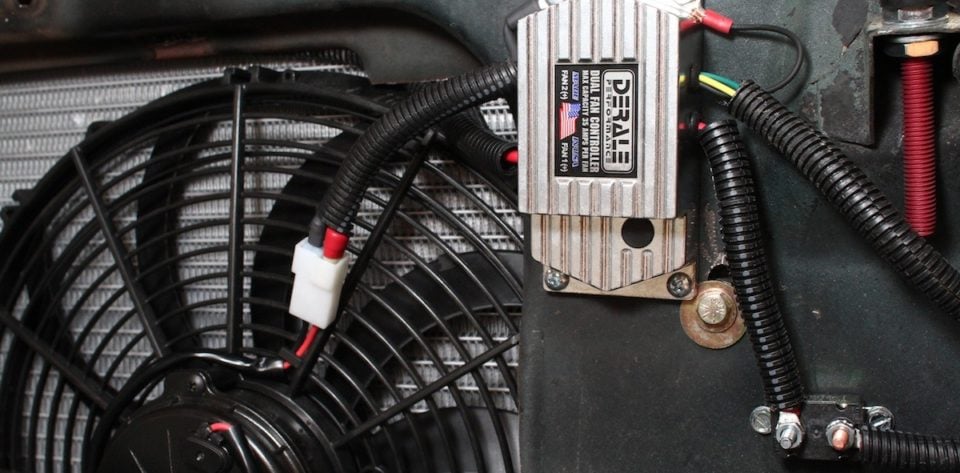
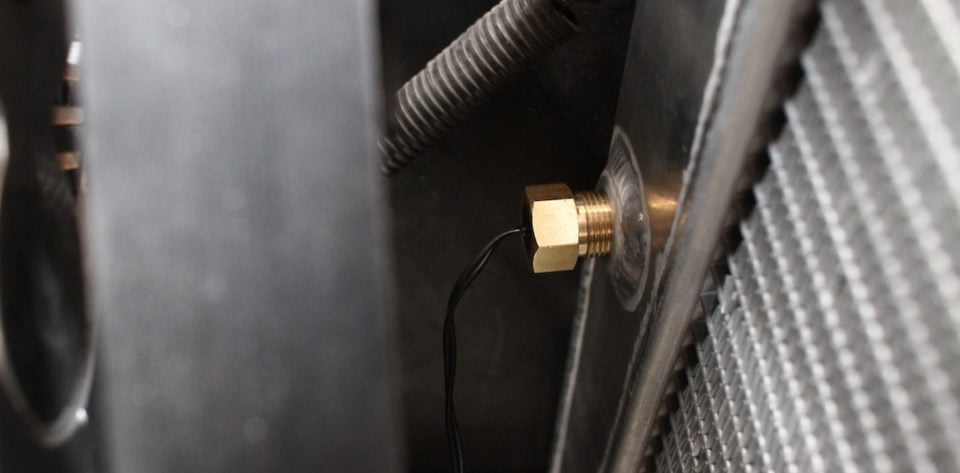
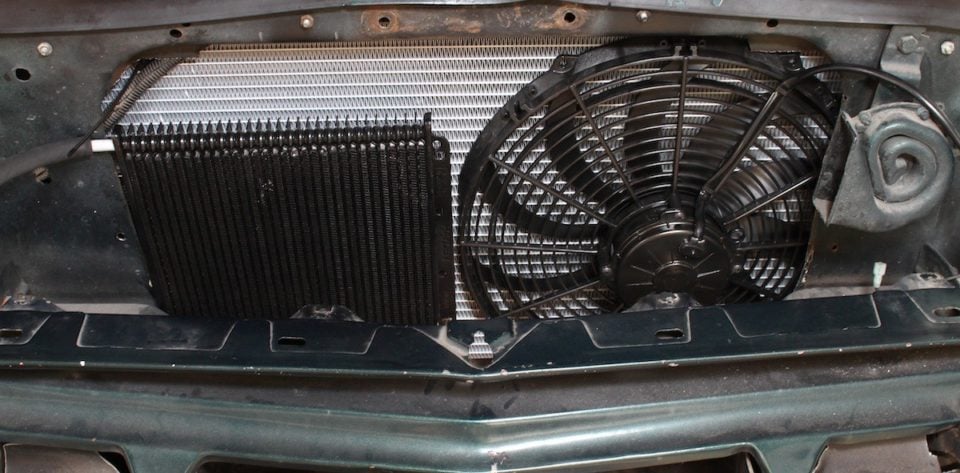
Derale offers a number of different fan options to fit nearly any application. We're going to have over 3,000 cfm of air movement with the two fans we selected. The Dual Fan controller has numerous features, including an adjustable thermostat that staggers the two fans at separate temperatures. Center: We used a thread-in fitting to measure temperature at the radiator tank. Right: You can see how limited our real estate is in the nose of the Bullitt.
With the tight confines of our engine bay, we were very limited as to what we could do on the engine side of the radiator. Initially we tried one of Derale’s 14-inch Tornado pullers for some extra reserve, but it was just too close to the crankshaft pulley assembly for our liking, so we installed the 12-inch version.
This fan can be reversed and used in a push or pull application and comes with a 180-degree ‘on’/165-degree ‘off’ thermostat kit. The thermostat kit has both a thread-in water jacket probe and a push-in radiator probe, wiring harness and all mounting hardware, although we did not use these items due to our installation of Derale’s fan controller. The Tornado electric fan in this configuration will flow 880 cfm, giving us nearly 3,000 cfm of airflow over our radiator’s cooling fins. Bring it on, SoCal heat!
We’ve also installed Derale’s High Amperage Adjustable Dual Fan Controller, which gives us great control over the pair of cooling fans. It has an adjustable turn-on temperature from 150 to 240 degrees and has a number of neat features. For instance, it will activate the first fan at the pre-set temperature, then turns on the second fan when the temperature rises ten degrees over the pre-set point for the first fan’s activation.
The turn-off temperatures are pre-set at 10 degrees below the turn-on temperatures for each fan, making operation effortless for the driver. There’s even an AC override circuit, and the controller will handle 35 amps per fan – plenty of juice for what we need.
At the end of our conversation, Wood wanted to add the following notes, “A large engine stuffed into a small engine bay is a recipe for excessive heat buildup. Add exhaust headers and the traditional array of performance products to the mix and you can quickly overwhelm any cooling system regardless of price – cooling claims by manufacturers notwithstanding. Under these circumstances, it’s better to focus on the entire drivetrain and systematically reduce heat when and wherever possible.”
A fan can only do so much when there is no place for the heat to go. – Troy Wood
Wood went on to explain, “An engine oil cooler, power steering cooler, fuel cooler and transmission cooler all work together to reduce ambient heat, and reduce the load on the cooling system. The best part is they are very inexpensive and the most cost effective insurance policy available.”
 The last item in our cooling system install is a simple one – Royal Purple’s Purple Ice Radiator Coolant Additive. Purple Ice works by reducing the surface tension of the coolant, allowing more heat to transfer through the radiator. It also helps prevent overheating and corrosion, and has the added benefit of helping to reduce hot spots that can occur in the engine. Purple Ice can be used with both 50/50 and straight water applications.
Heating Up
The reason engines generate the heat that needs to be cooled off, as we discussed in the previous few paragraphs, is that they are basically keeping eight tiny explosions in check – throwing fuel on the fire, lighting it, putting it out, and doing it all over again – thousands of times per minute, all in an effort to spin the engine harder and make more power. And without a high-quality pump to provide said fuel, there would be no fire, no heat, and thus, no power harnessed.
So when it came time for us to select fuel delivery components, we went straight to the team at FUELAB for one of their digital Prodigy fuel pumps [PN 41402] that features a brushless drive mechanism that provides a durable and efficient package that’s reasonably-sized.
We spoke with FUELAB’s Brian Paitz, who explained the hidden technology behind the Prodigy pump, “There are two distinctly different microprocessors in the electronics package of the Prodigy pump. One of them is designed to simply apply power to the motor so that it spins. The other processor is used only for pump speed control – which is a very unique feature our pumps have over other designs.”
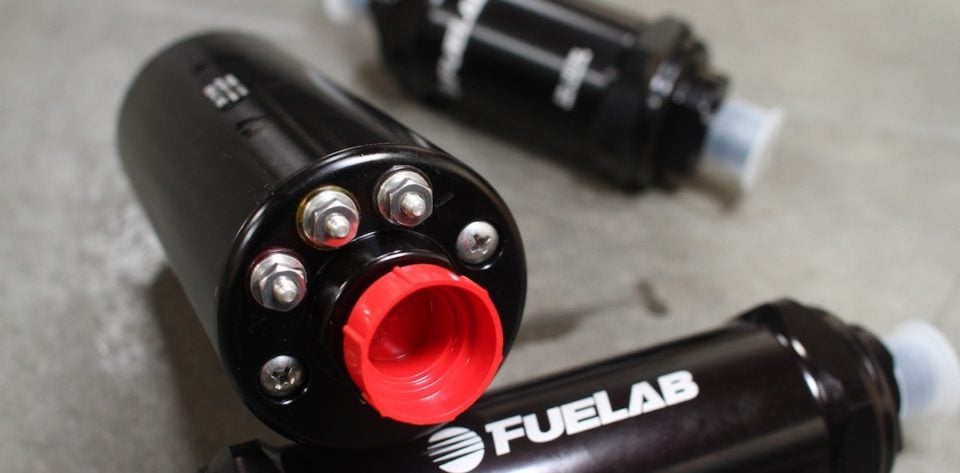
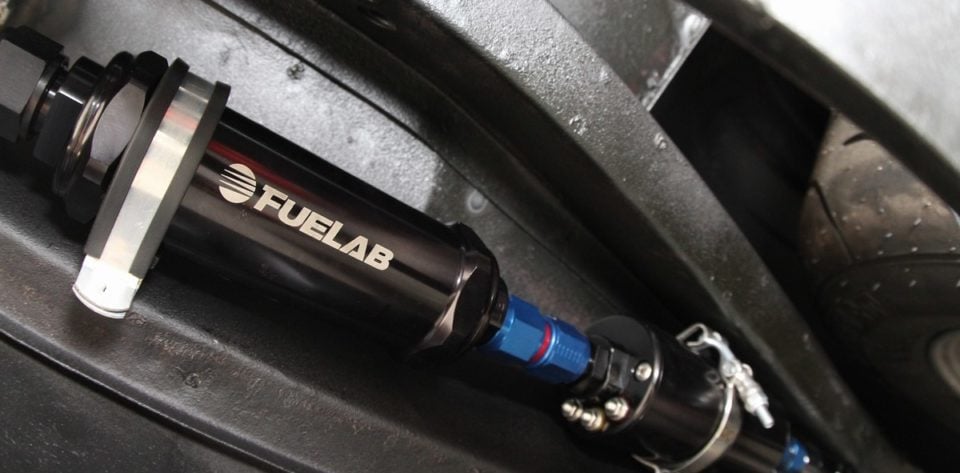
FUELAB's Prodigy High Efficiency Fuel Pump flows 140 gph at 45 psi. It will be perfect in our blow-through application. FUELAB also sent us a pair of filters, a 100-micron unit for pre-pump use and a 10-micron unit post-pump.
“You also have the possibility of multiple points of fuel flow thanks to that second microprocessor,” he explained. The pump speed controller is wired via the use of an input signal – if the speed input measures less than two volts of juice, the pump operates in reduced-speed mode. Give it three to 18 volts, and it operates in full-speed mode. The pump can also read a pulsed signal from some aftermarket engine management systems to operate variably. We are running the speed control option through our Racepak SmartWire to trigger once we get into boost.
The pump’s internals feature a high-efficiency, sling-vane, positive-displacement pump that relies on a carbon, low-mass, pressure-balanced rotor to supply enough fuel for our street-driven 1,000-horsepower machine. The housing has an internal shape that’s optimized to keep the pressure steady and in addition, helps to keep the pump’s operating noise to a minimum.
The speed-control option is very similar to a dimmer switch, as the pump doesn’t need to be fully-on or –off. – Brian Paitz
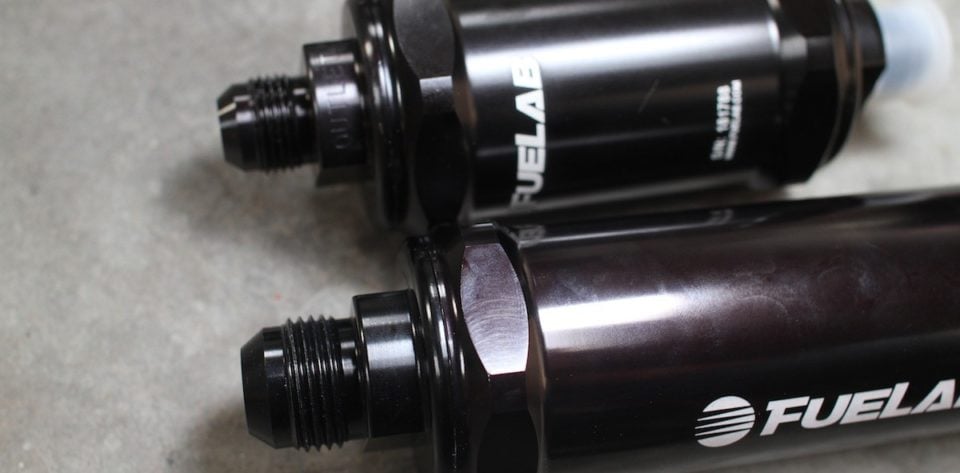
As we mentioned, the motor is a brushless design that won’t wear out, nor will it corrode, and the “wet” design of the pump keeps leaks away – there are no shaft seals to wear out and present you with problems down the road. The design of the pump lends itself to a small size – it’s less than three pounds, 6.9 inches long with a slim 2.63-inch diameter – you can fit one just about anywhere, and with its 140 gph rating at 45 psi, it will support up to 1,300 horsepower in the right application. The -12AN inlet and -10AN outlet on the pump means plenty of fuel volume can pass through these walls on the way to becoming fumes.
A blow-through application like ours makes fuel pump selection critical. In order to make sure there is adequate fuel delivery, there has to be an extra pound of fuel pressure for every pound of boost in order to get the fuel to flow past the needle and seat in the carburetor. That means that the fuel pump has to be able to provide higher pressure than a typical carbureted application.
In other words, a typical carbureted street car might see pressures in the 6-8 psi range, but our blow-through supercharged car will need fuel pressure to be somewhere in the 25 PSI range at full boost – thus our use of an EFI-style pump. It ensures that we’ll have the fuel we need at the pressure required in order to provide acceptable fuel flow and volume to make the supercharger sing.
Assisting us with the task of controlling fuel delivery is one of FUELAB’s return-style High Flow Fuel Pressure Regulators [PN 56502], which ensures that we won’t have any fuel-overheating issues by running the excess fuel back to the tank. The regulator features two -10AN inlet ports and one -10AN return port, maximizing fuel-processing capabilities, and it is set up to raise pressure at a 1:1 correlation with boost, ensuring that the flow will be there when necessary. This heavy-duty regulator has a fine-pitch adjusting screw to help get your fuel pressure exactly where you want it, along with a 1/8-inch gauge port and 1/8-inch pressure reference port to monitor boost and help the regulator raise pressure accordingly.

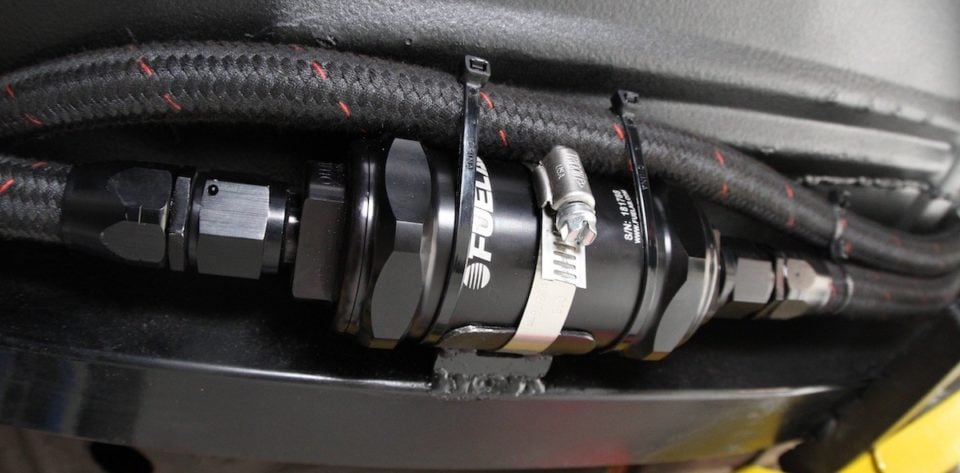
Left: FUELAB's High Flow Fuel Pressure Regulator is set up with a 1:1 rate of rise for boost and has -10AN inlets and a -10AN return. Middle - The 10-micron post-filter was installed on this nifty bracket on the frame. Right: We installed the pre-filter directly onto the pump assembly with a union fitting.
But you can’t have a fuel pump without having some way to filter the fuel, and with that in mind, Paitz recommended one of their Inline Filters [PN 82824] for us to install prior to the fuel pump. The 82824 supports 200 gph, has a 75-micron pre-filter, a -12AN port on each end and a stainless-steel, 5-inch filtration element that has an extremely low pressure drop. The housing is internally radiused to smooth out the flow and minimize the pressure drop as fuel flows from one end to the other. The stainless element is cleanable or replaceable, and it’s even compatible with all fuels including diesel and methanol.
On the aft side of the pump, we’ll be using another one of FUELAB’s Inline Filters, [PN 81803]. This -10AN in/-10AN out filter will support up to 200 gph, is also compatible with all fuels, and uses a cellulose 10-micron element. The element is commonly used and disposable, yet keeps the smallest, potentially harmful particles out of your engine. Both filters include low profile saddle-clamp brackets and are backed by FUELAB’s two-year warranty.
Transferring Liquid
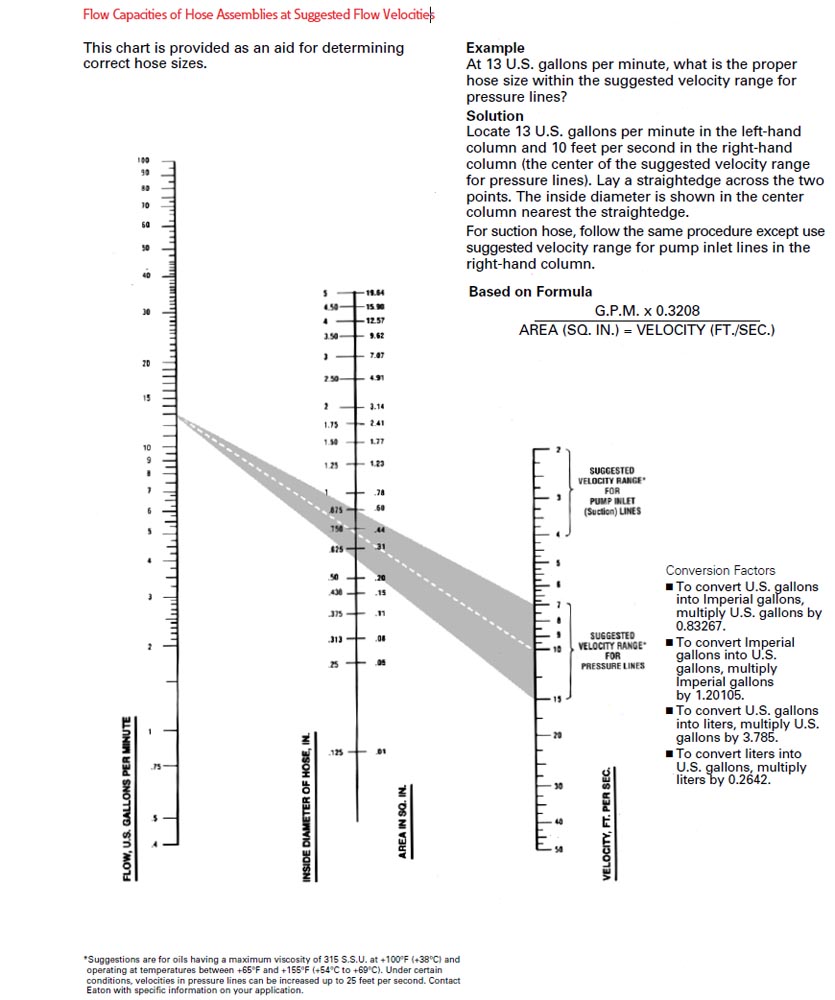
This handy chart from Aeroquip will assist you in selecting proper hose diameter for a given flow rate.
The last segment in our update on Biting The Bullitt covers sizing the fuel system’s plumbing components properly for our blow-through carburetor application.
We’re using hose and fittings from Aeroquip Performance Products. Their StartLite Racing Hose has a flame-resistant Nomex/Kevlar weave cover and can handle liquid transfer for fluids ranging from -45 degrees to over 300 degrees, making it perfect for most applications. It has a smooth-bore inner tube and is up to 45% lighter than a typical steel braided hose, helping us to save somewhere in the neighborhood of fifteen pounds over the entire length of the car when compared to stainless-braid. In addition, it will handle all fuels and is very flexible to aid in tight installations.
StartLite is also available in AN sizes from -4 to -20 to cover just about any fluid plumbing task you might have, not just fuel. According to Aeroquip Performance Products’ Mike Rasnick, “StartLite will handle all fuels – gasoline, methanol, E85, and even nitromethane. It will also handle lubrication, coolant, and air, basically any plumbing need. These are designed for weight savings; you’re going to start your project out light and this is the hose to do it with.”
On the connection side of things, we’re working with Aeroquip’s one-piece, reusable aluminum fittings in black finish, which when combined with the black woven StartLite hose, complements the look under the hood. The one-piece design allows for superior flow and eliminates two of the potential leak points that can occur on other styles of fittings.
They come in both a swivel and non-swivel design and are a compression-style fitting that is great for use in performance applications. There is a pilot nipple on the fitting that aids in installation and prevents damage to the inner tube as the fitting is put together. The nipple also helps to promote seal integrity between the fitting and the hose.
Aeroquip Performance Products is part of global automotive conglomerate Eaton Corporation, and is quite proud of the fact that they are the only fitting manufacturer that also produces their own hose products, which allows them to engineer every one of their fittings to fit their hose properly. Each style of racing hose they offer is tested for strength and durability befitting that of an OEM-level manufacturer.
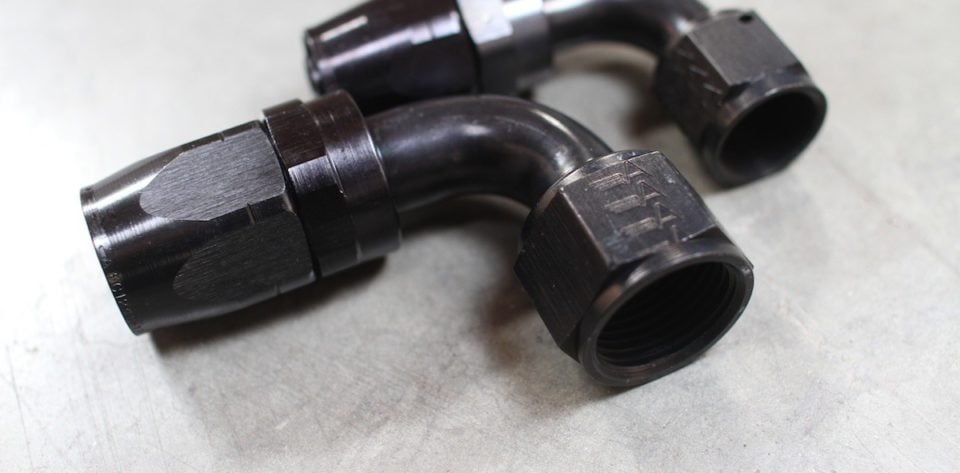
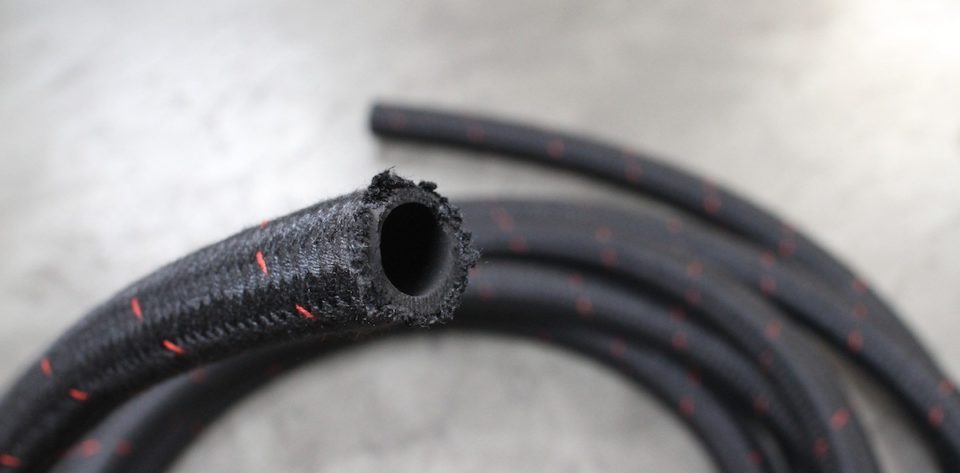
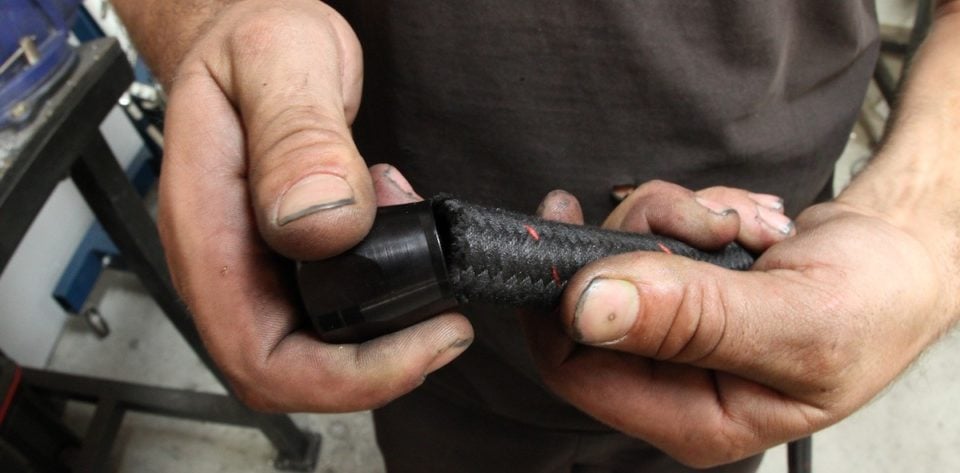
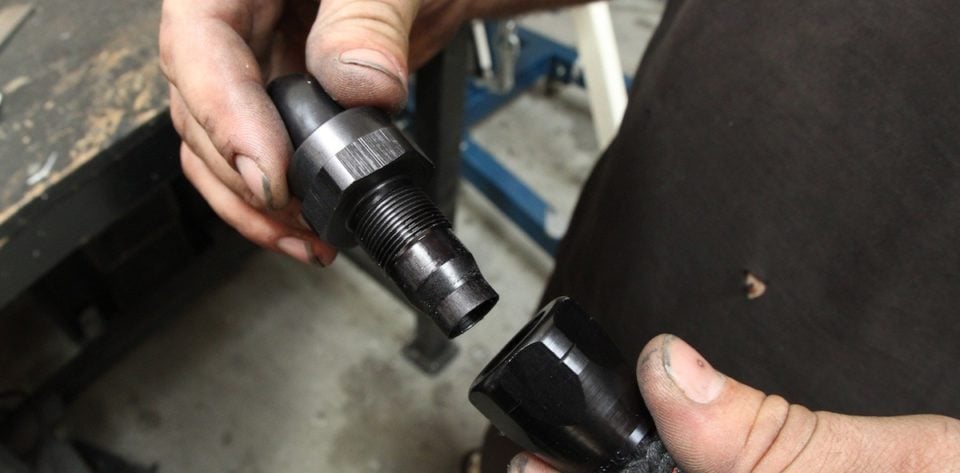
Top Left: Aeroquip's one-piece reusable aluminum fittings come in a variety of finishes and dimensions. Top Right: StartLite Racing Hose is manufactured with a Nomex/Kevlar woven cover that is flame-retardant and provides much better abrasion protection. Bottom Left: We found the hose and fitting assemblies easy to put together - say no to chewed-up fingertips! Bottom Right: The pilot nipple on the end of the fitting prevents damage to the end of the hose during construction.
Rasnick explained, “We are able to leverage all of the product knowledge throughout Eaton Corporation. We’ve got industrial division and an aerospace division that use hydraulic hose for everything in addition to our automotive customers – there is a large pool of knowledge within our companies. 100 percent of our product has been engineered, tested, and qualified. Since all of this hose and these fittings are connected to so much money, we need the enthusiast, our customers, to feel confident that our products will perform as required.” Since we’re looking for trouble-free when it comes time to drive BTB, we’re down with that.
In conclusion, we’ve learned that designing fluid transfer and cooling systems isn’t as easy as as just picking parts out of a catalog, at least not when you’re trying to make the kind of power we’re trying to make with our Bullitt project. The tech help from each manufacturer has been invaluable to ensuring this project works as advertised. At this point, the car is actually running, although the supercharger is not installed yet. We’ll have another update soon!