Street Muscle dives head-first into the Pro Touring scene with Project Payback, a 1968 Pontiac GTO built for autocross competition time trials. We’ve partnered with Schwartz Performance and Chevrolet Performance to give the classic muscle car modern performance.
Project Articles
- Hello Pontiac Faithful, Meet Our 1968 GTO Project
- Project Payback Gets A Facelift Courtesy Of National Parts Depot
- Four Reasons We Chose a Schwartz Performance Chassis for Pro Touring
- Better By Design: Bolting Up Ultimate Headers To Project Payback
- Simple Steering Shaft Install is One Small Step
- The Schwartz G-Machine Chassis Decision
- That’s The Brakes When It Comes To Road Racing
- The Pleasure and Pain of a GM Drivetrain Swap
- Project Payback Accessorizes With Holley’s LT4 Accessory Drive Kit
- Just Cool It: Project Payback Gets a Cooling System
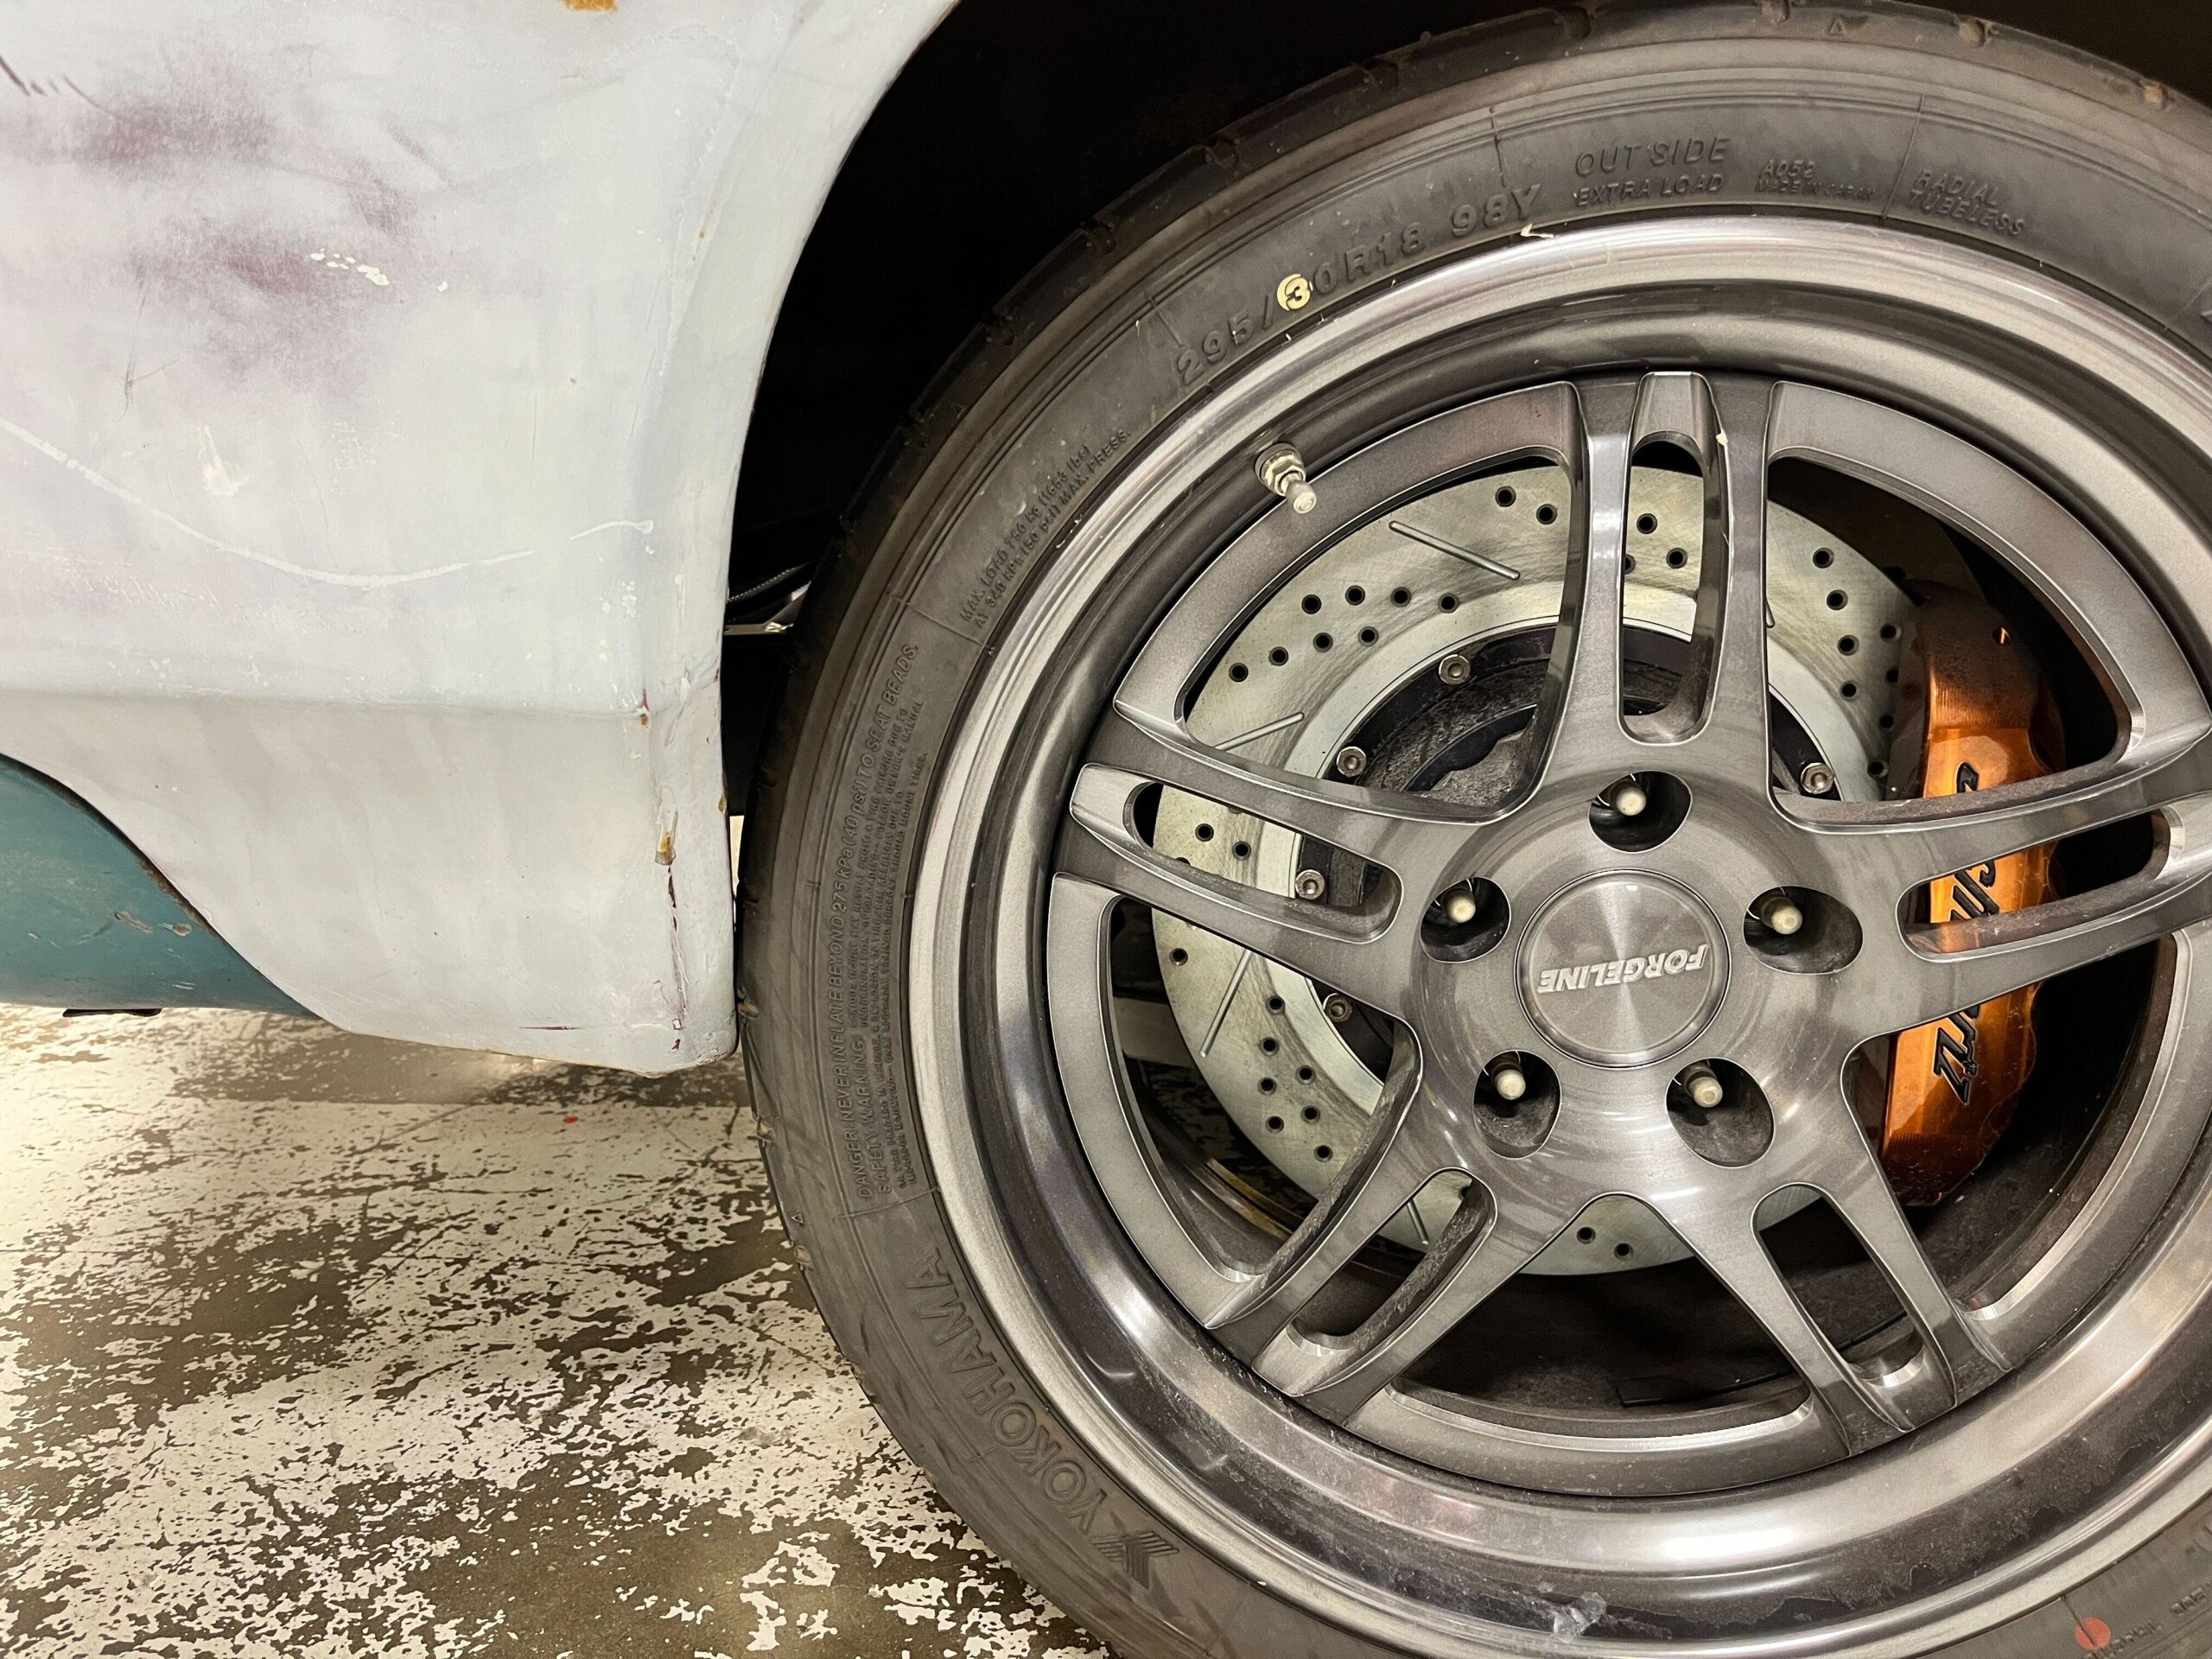
- Forgeline and Yokohama Suit Up “Project Payback” With New Shoes
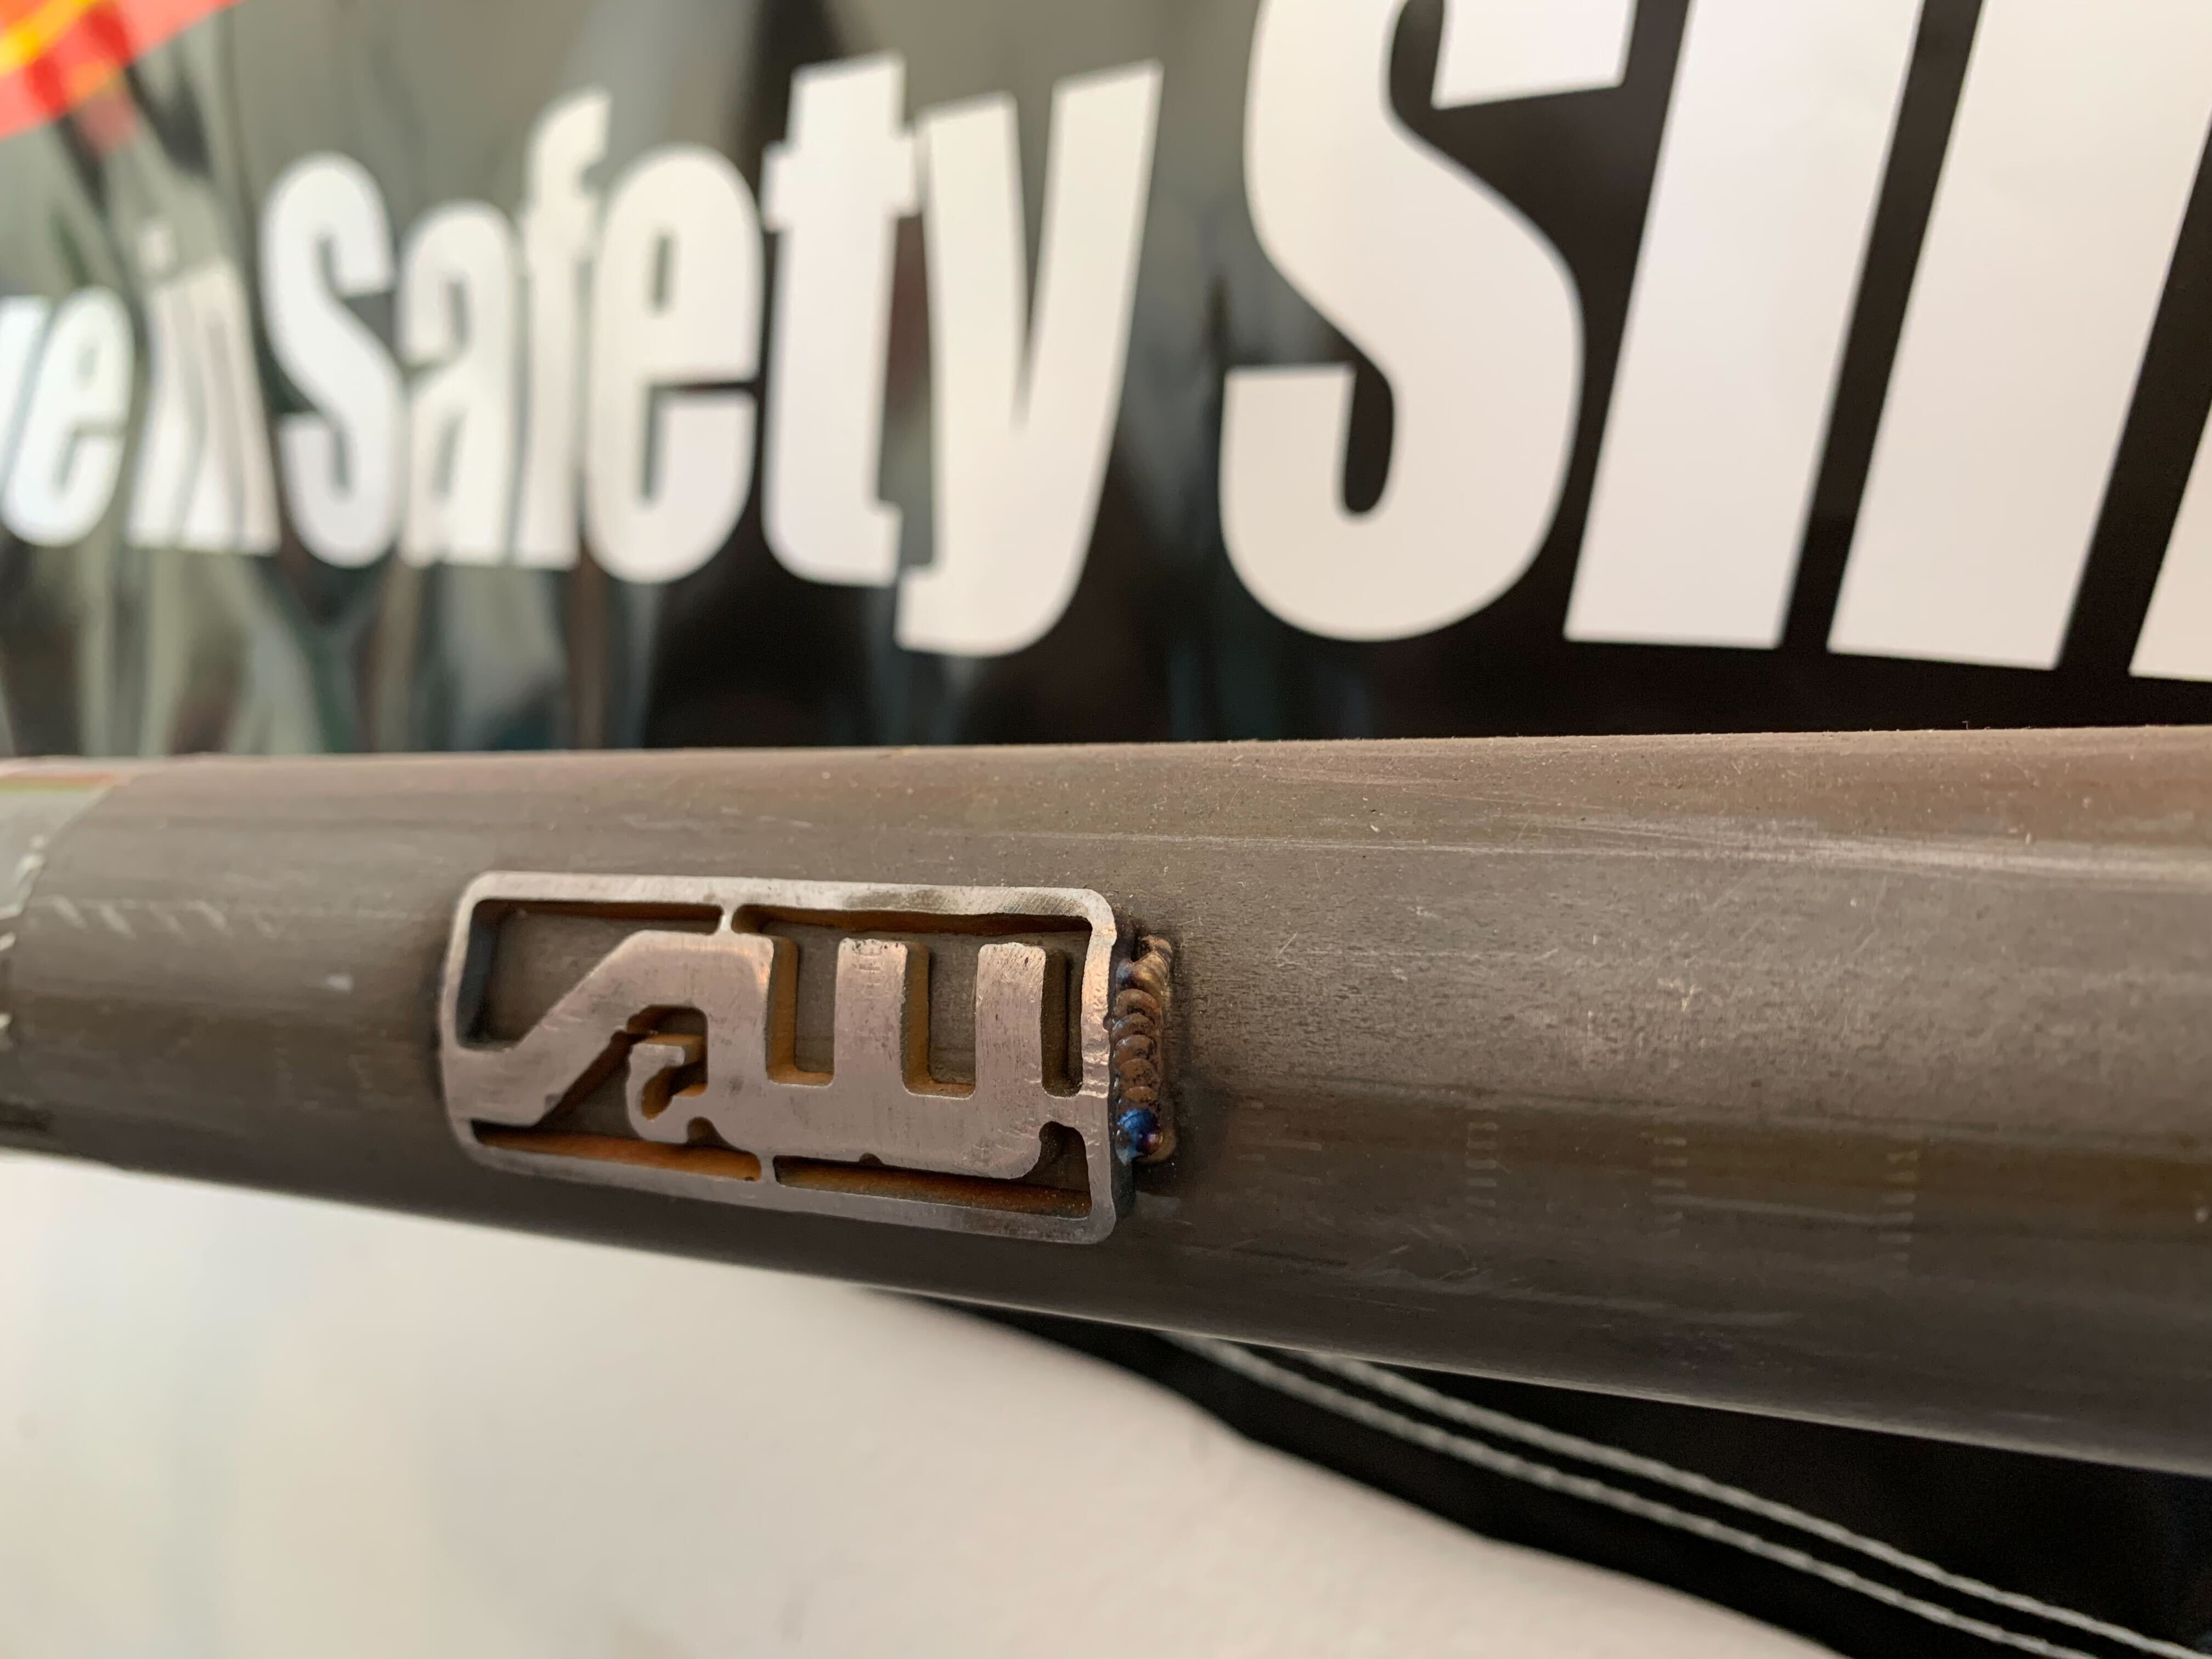
- Project Payback GTO Levels Up with a S&W Roll Bar and C&R Radiator
- Project Payback Gets Some New Body Parts And Hardware
- QA1 Carbon Driveshaft Keeps Our 1968 GTO on the Cutting Edge
April 4th, 2024 – Fresh Metal
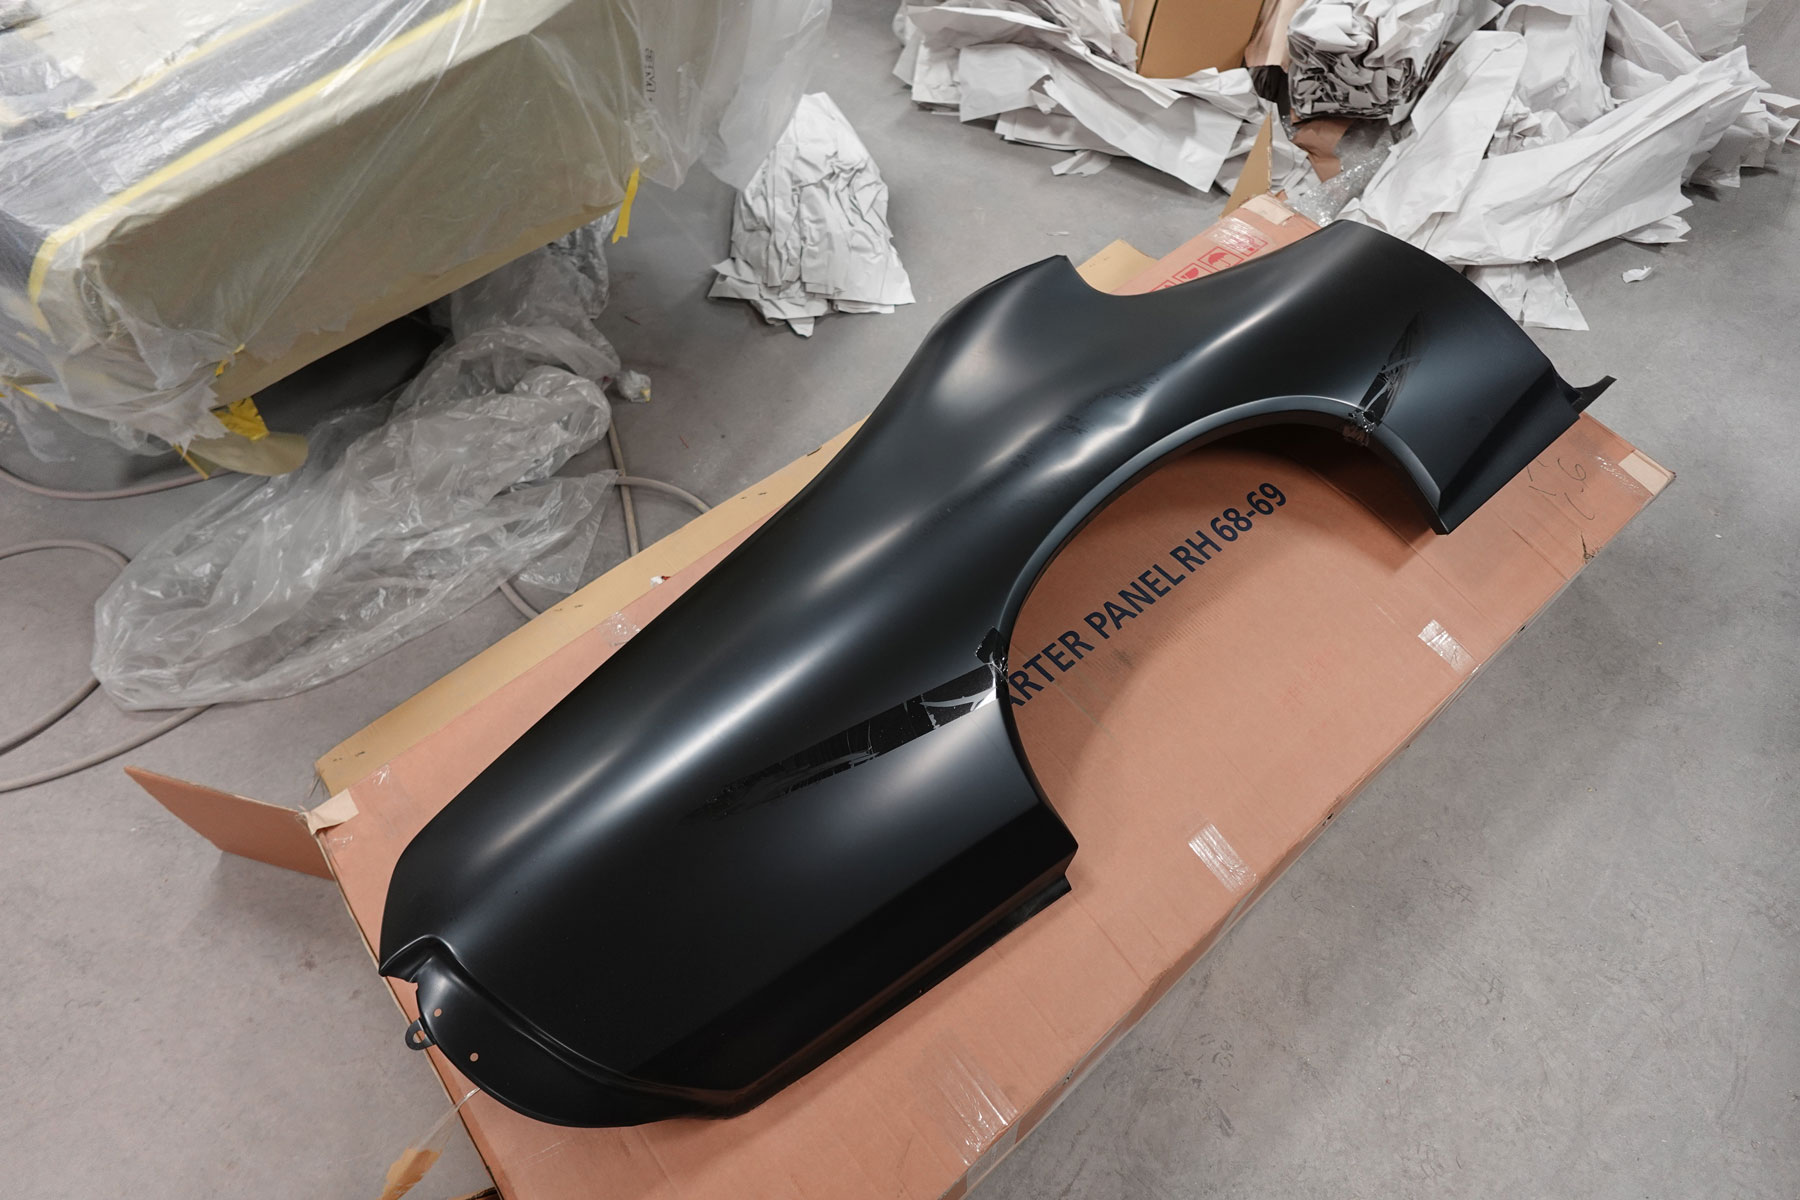
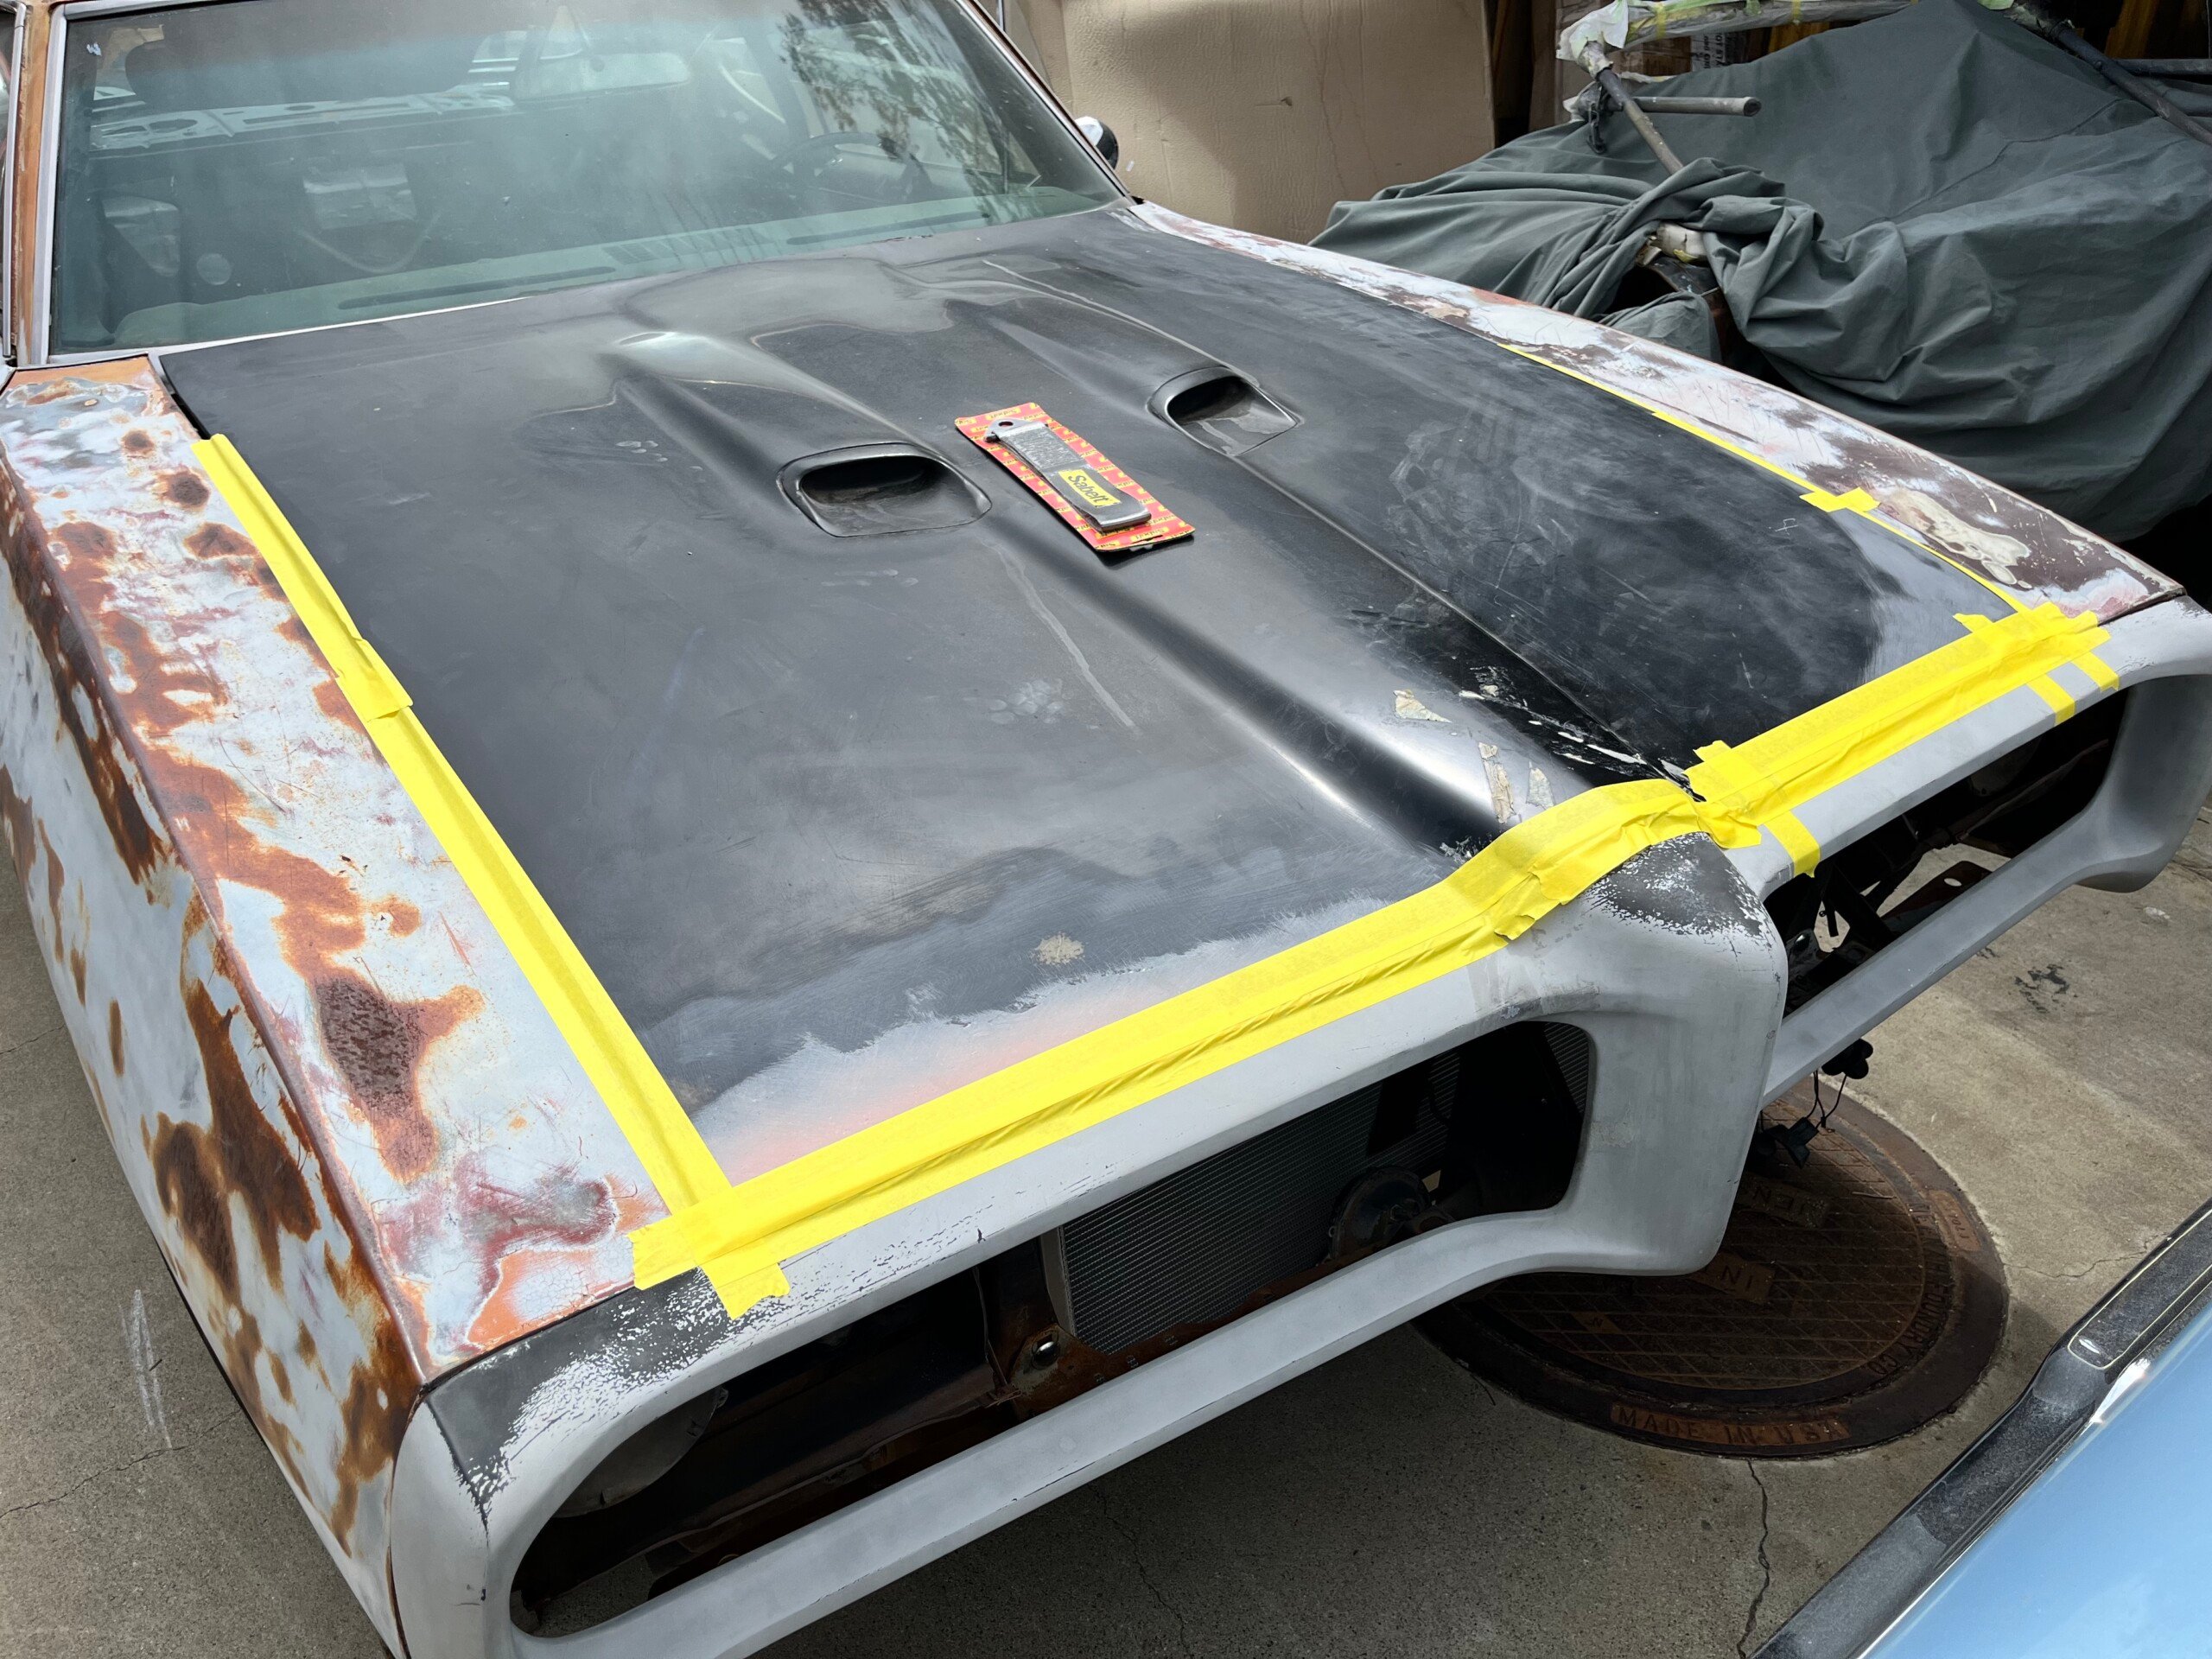
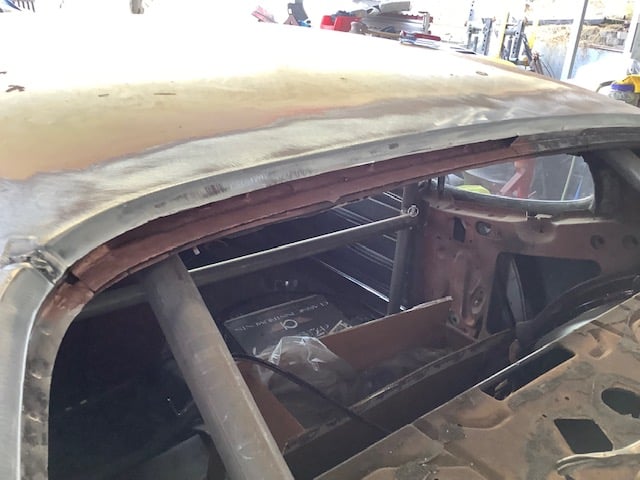
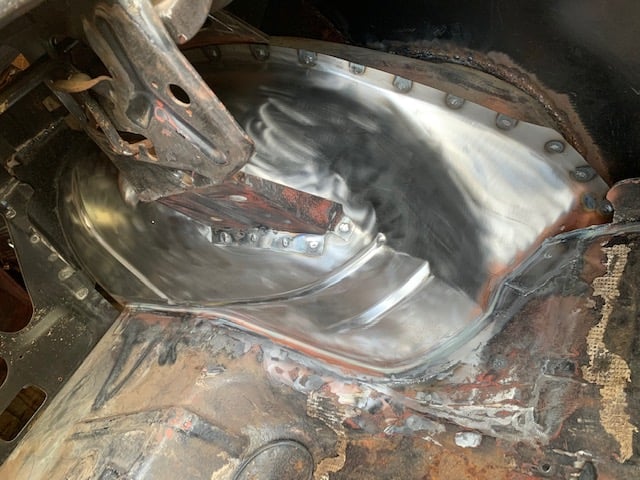
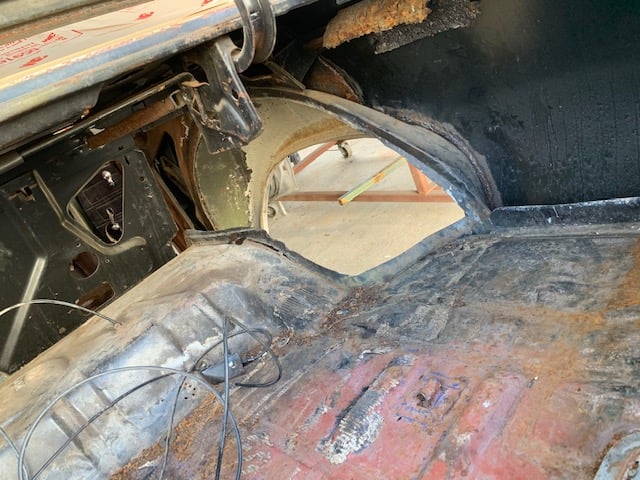
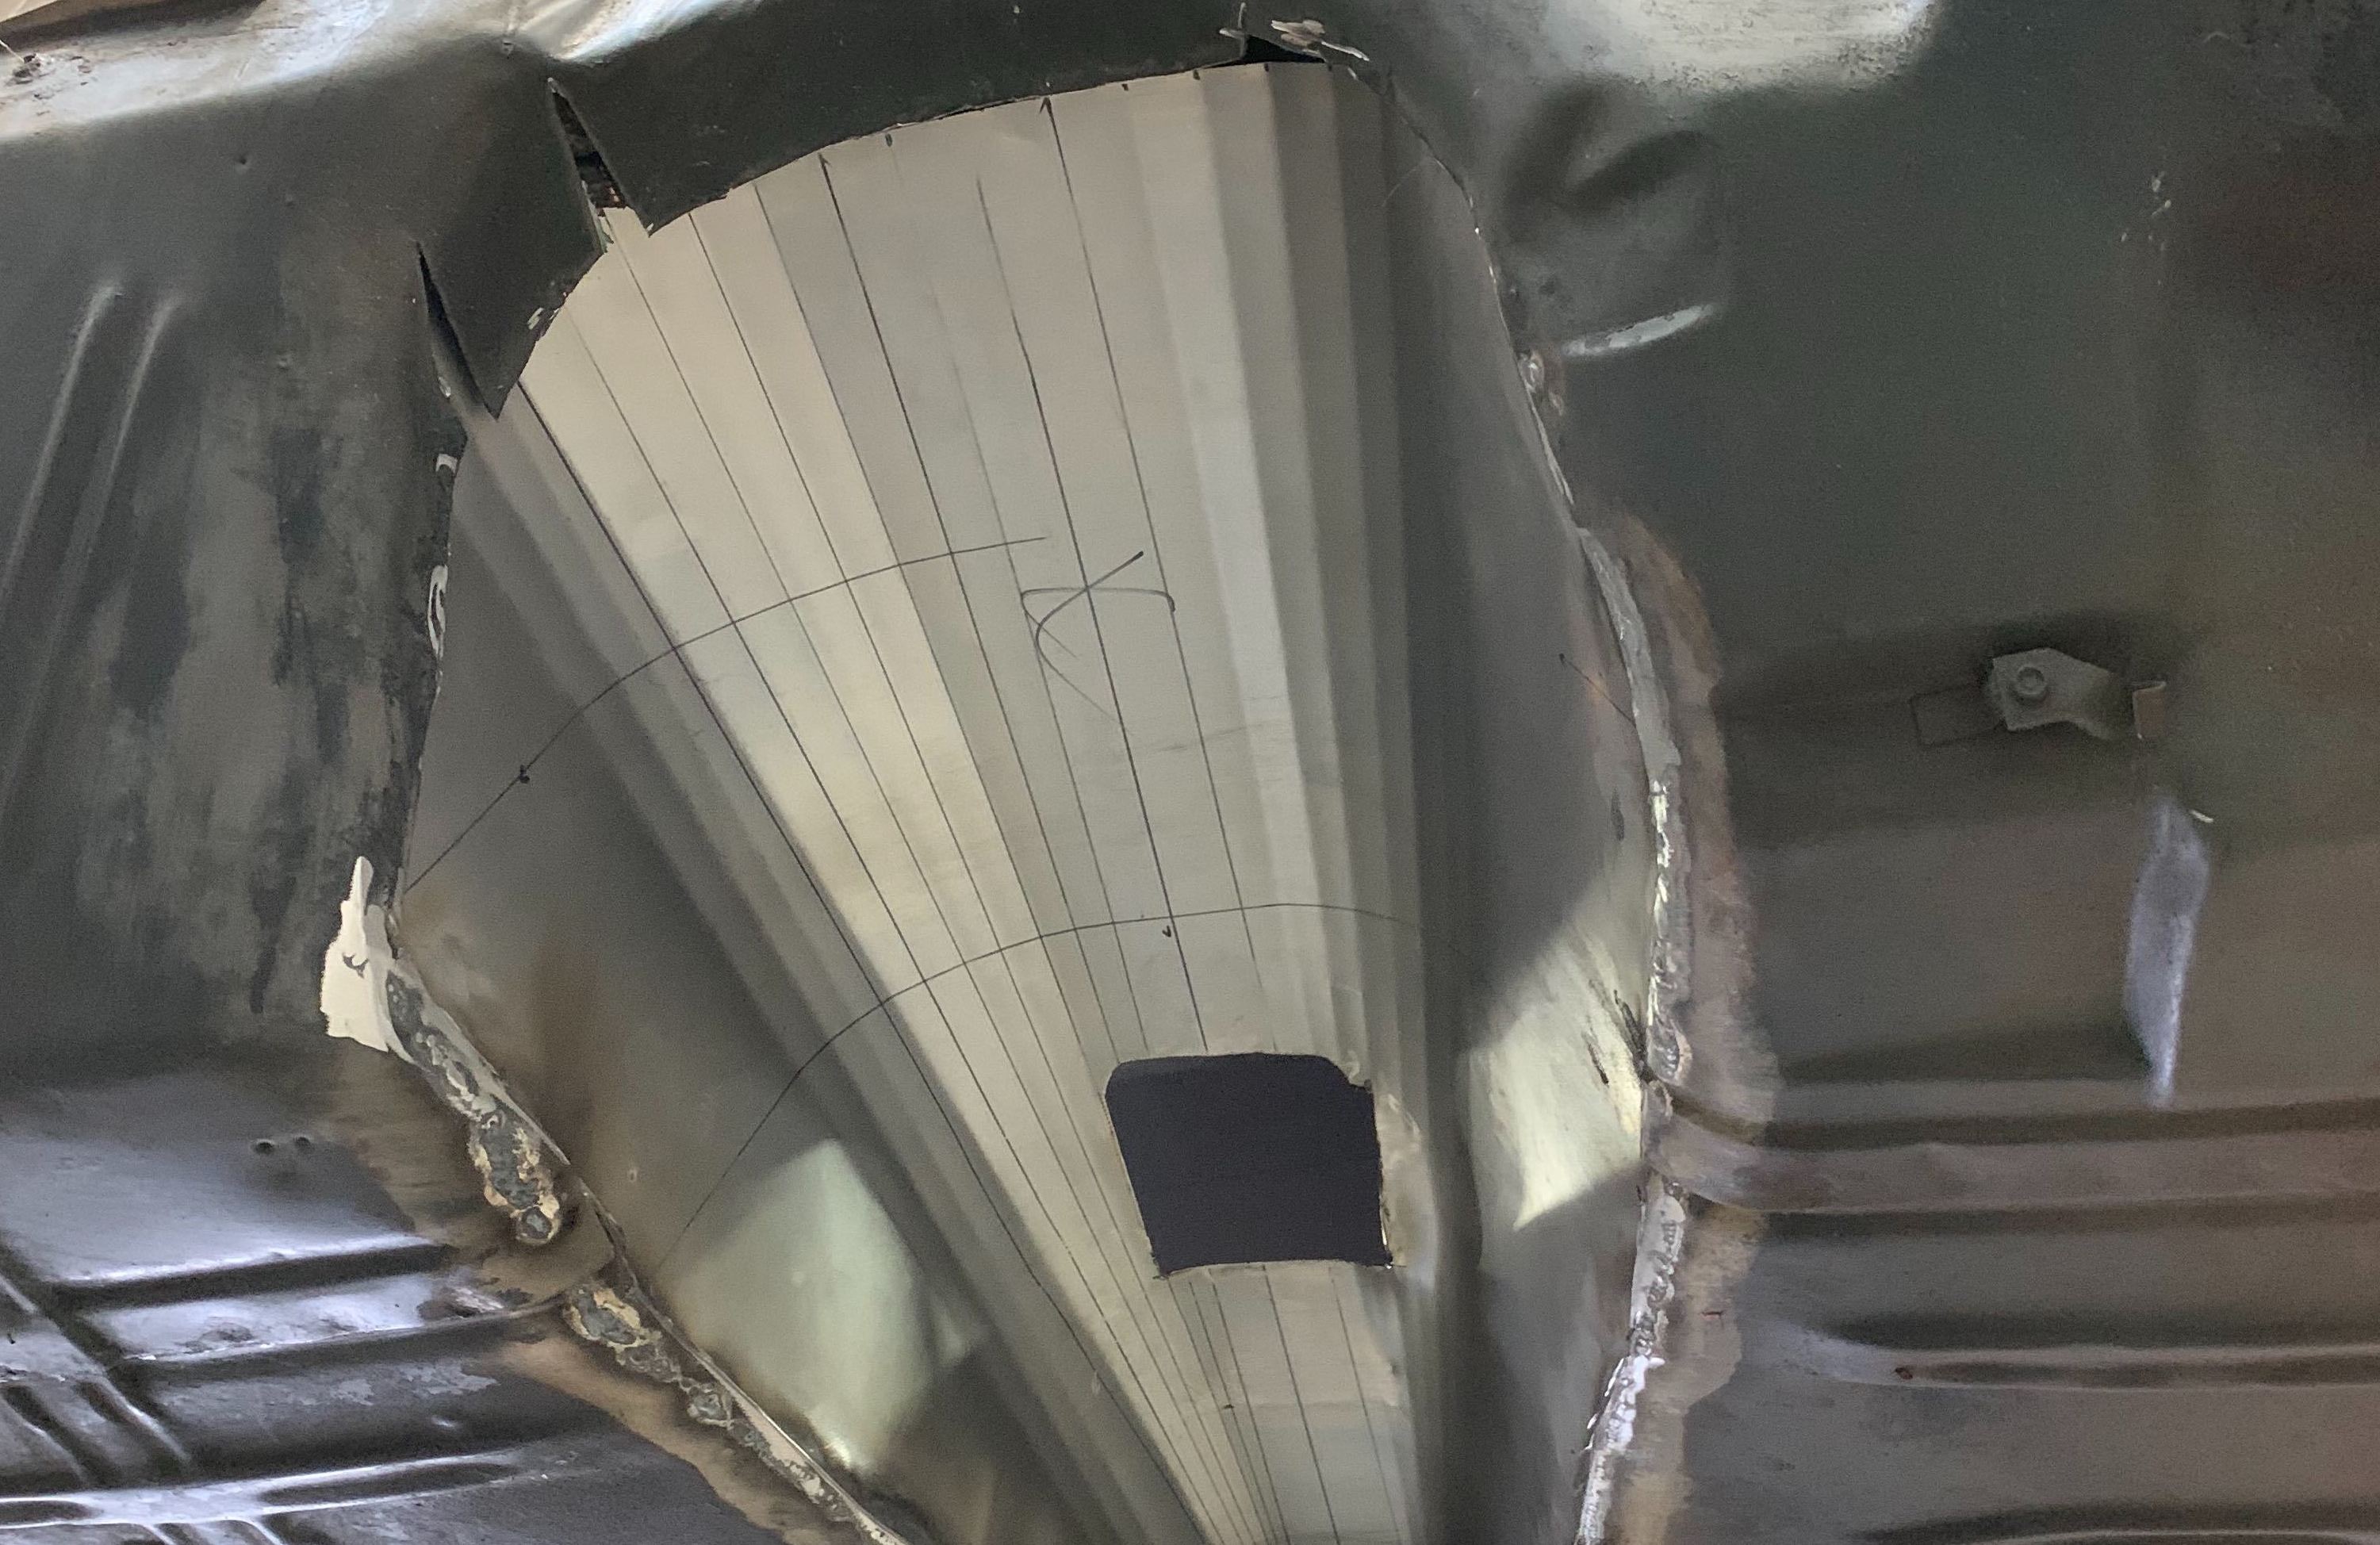
Things have been moving forward on the metal work for what we hope is a 1968 Pontiac GTO worthy of the term “GOAT.” Innovation Performance Technologies disassembled the body and separated it from the frame. The doors, hood, deck lid, and bumpers were removed. The body/shell was taken offsite to be acid dipped, while the other items are being stripped mechanically. When the body returned, we found additional pinholes in the floor as well as more rot in the roof and windshield area. For a closer look at the stripped body and new parts check out this video on Facebook. We’re working with Original Parts Group to help bring the GTO back to life with all-new sheet metal, starting with the quarter panel and passenger door.
December 19th, 2023 – New Direction
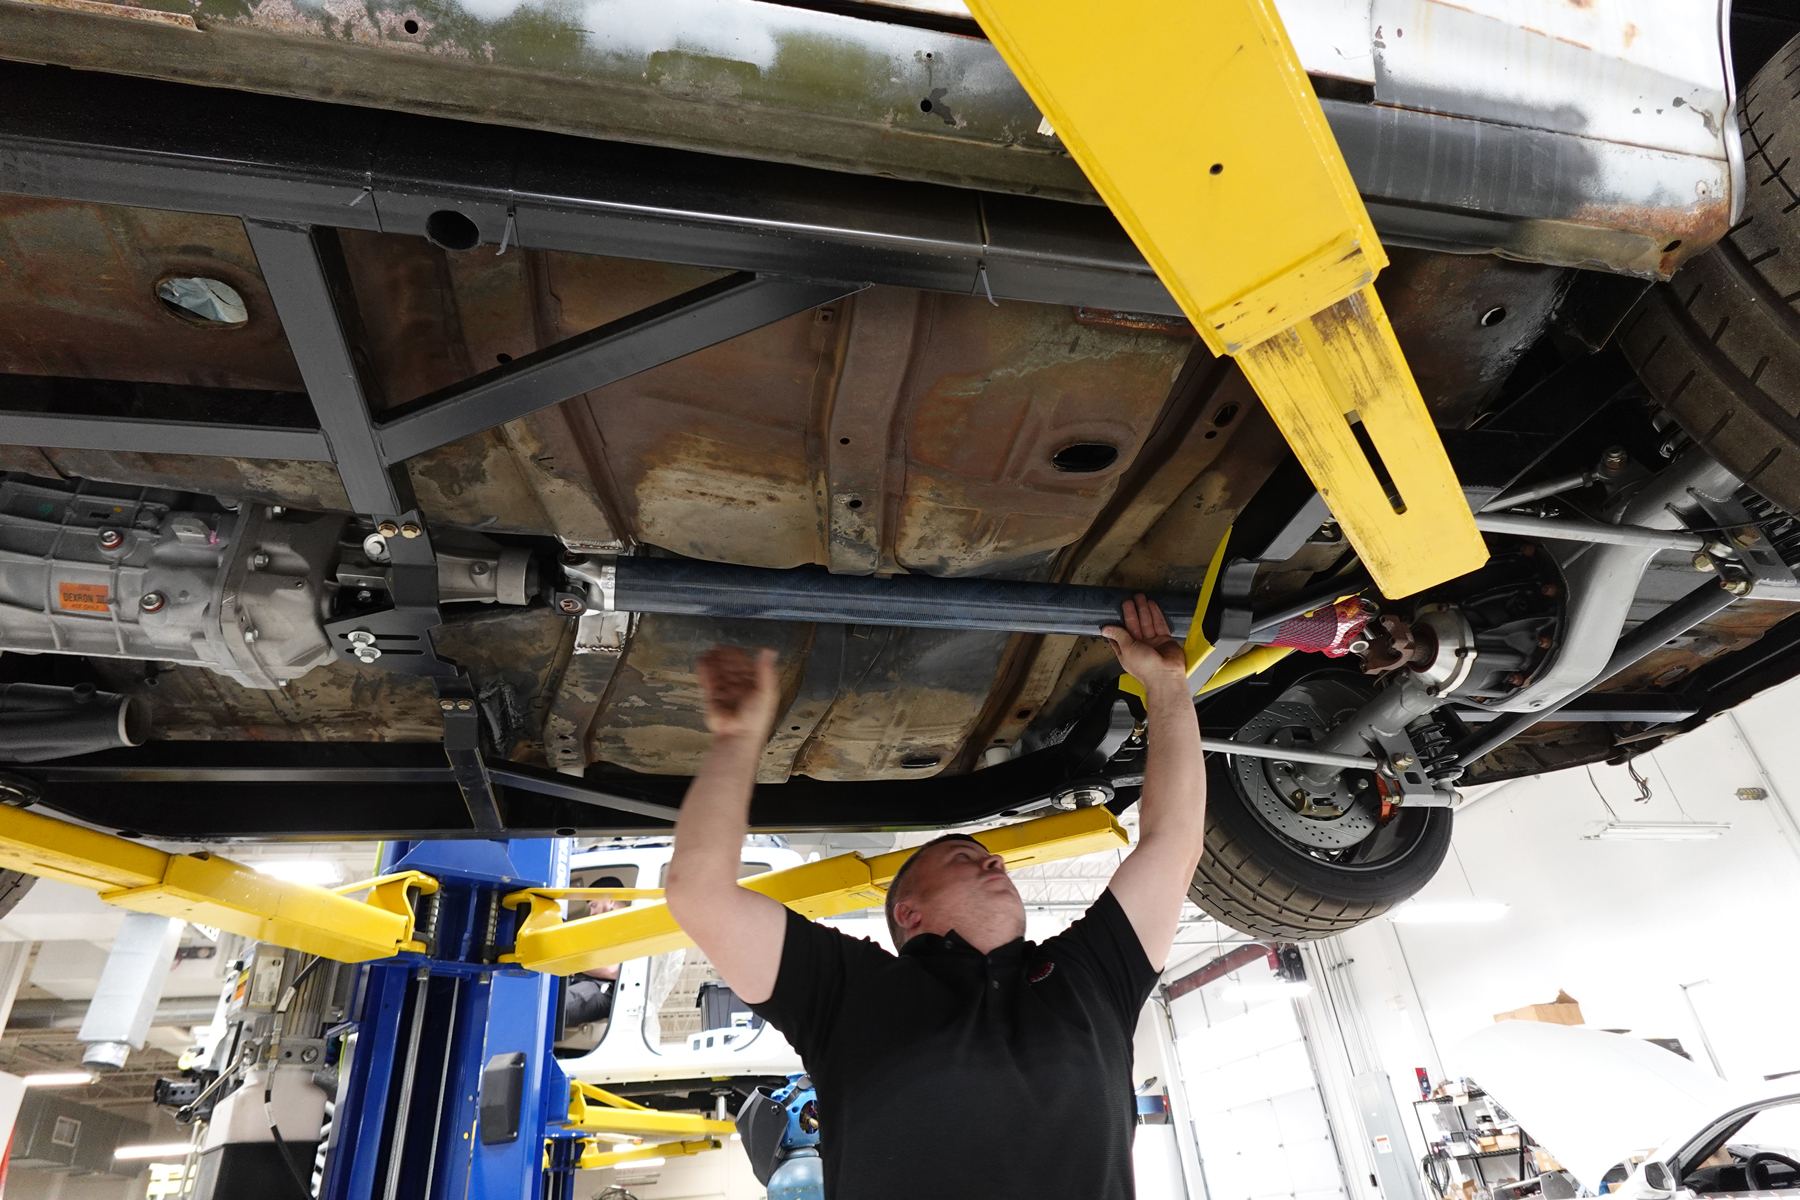
IPT has been hard at work, knowing our intention to make it to the ’24 SEMA Show. Miles to go before we sleep! Thankfully the QA1 driveshaft fit with minimal massaging to the floorboard. In a more dedicated track car, we’d probably want more clearance and maybe even bring the frame closer to the floorboard. However, we felt the compromises made fit the intended use of the car.
As for the body and metal work, no compromises are being made there. The shell of the car will be acid dipped to strip it to bare metal. Upon disassembly we discovered a few more areas of decay, including the roof where it meets the front windshield and the side of the firewall under the driver side fender. We’ve placed some orders for fresh metal while the body is stripped.
The engine will also be receiving some changes…more updates to come on that, but visually speaking – we’re planning to powdercoat the supercharger in copper to match the brakes and match other underhood items with the wheels (gunmetal aka Dark Transparent Smoke). The Twisted ’67 GTO, which appeared at the ’23 SEMA Show, provided a little inspiration, albeit a different color scheme.
September 30th, 2023 – New Home
Project Payback made its way across the country to its new home – Innovation Performance Technology in Aberdeen, NC. IPT specializes in restomods and Pro Touring builds, giving classics new life by building from the ground up with attention to detail that not only makes them safe but durable, beautiful and handle like a modern muscle car. Upon visiting the shop I knew instantly that these were my guys. They peppered me with all sorts of ideas and things we could do to the GTO to take it to the next level. Crimson Sanders will be overseeing the build from its current state all the way to the 2024 SEMA Show. That’s right, we plan to have the car at next year’s show. And, yes, it will be running and driving.
With the intent to turn this into an award-winner, we are going to be backtracking on some of the previous decisions and work that was done. That will cost us some time but will ultimately lead to a better final product. For example, we will be cutting more of the front clip out to make the radiator fit cleaner. We’ve also discovered some fun Easter eggs like a gutted passenger door from what looks like a failed stereo speaker installation. The front valence is also unusably rusted. And it turns out the driver side fender is pretty rusted underneath the layers of body filler the previous owner applied. Wheel fitment is an issue due to the fender clearance on the front, and I am starting to think 19s in the rear would have been a better choice. We’ll be modifying the fenders to clear the front tires, and revisit the rear wheels a bit later. Last but not least, we are not confident that the tunnel will fit our beautiful new QA1 carbon fiber driveshaft. So even more metal work is in our future. We can’t wait to get to work.
June 6th, 2023 – In Transit
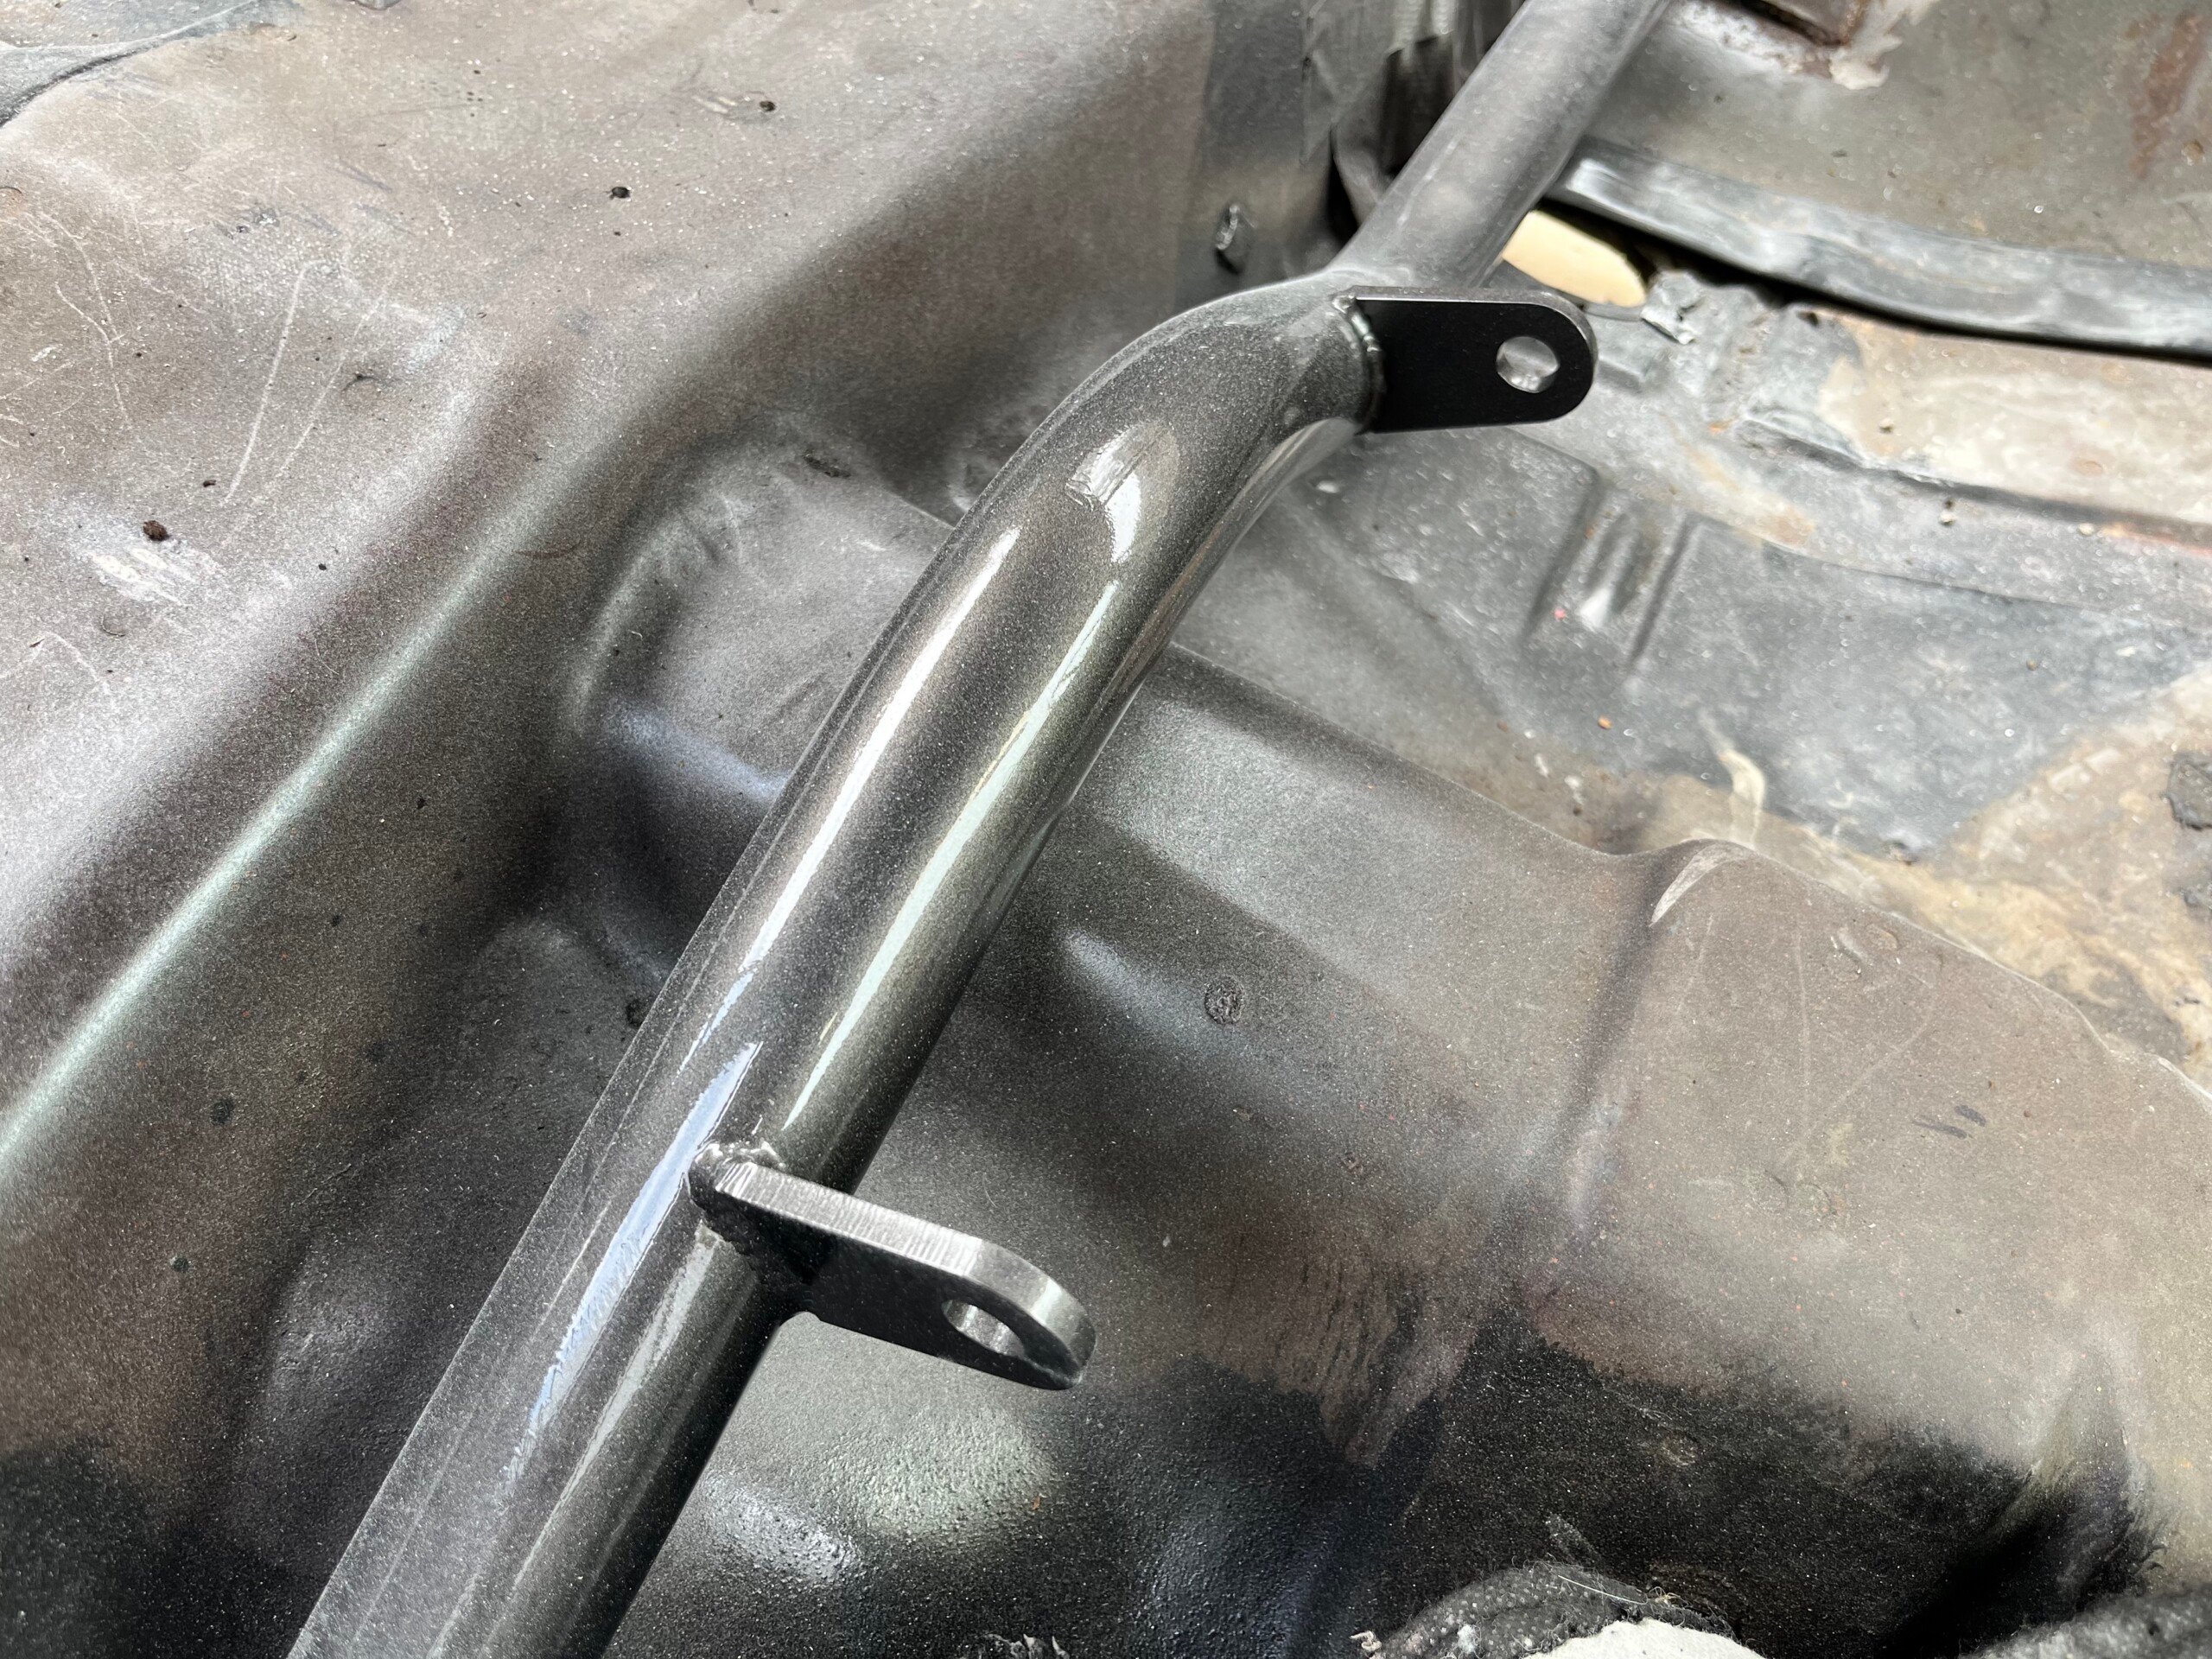
In all honesty, I had hoped to make LS Fest West but there were some additional challenges. I am happy to say that we have worked through them now, but (and I hate that we have a “but” here) we are having to make some significant changes in the build plan. The car is being relocated from southern California to a destination to be named later. That said, we’ve got a new hood that is cut and fitted to the aligned body panels, we’ve ditched the heavy and poorly functioning hood latch as well as the rickety hinges, added custom-cut Delrin body bushings, solid metal and even painted the roll bar to match the wheels.

November 14th, 2022 – Fresh Metal
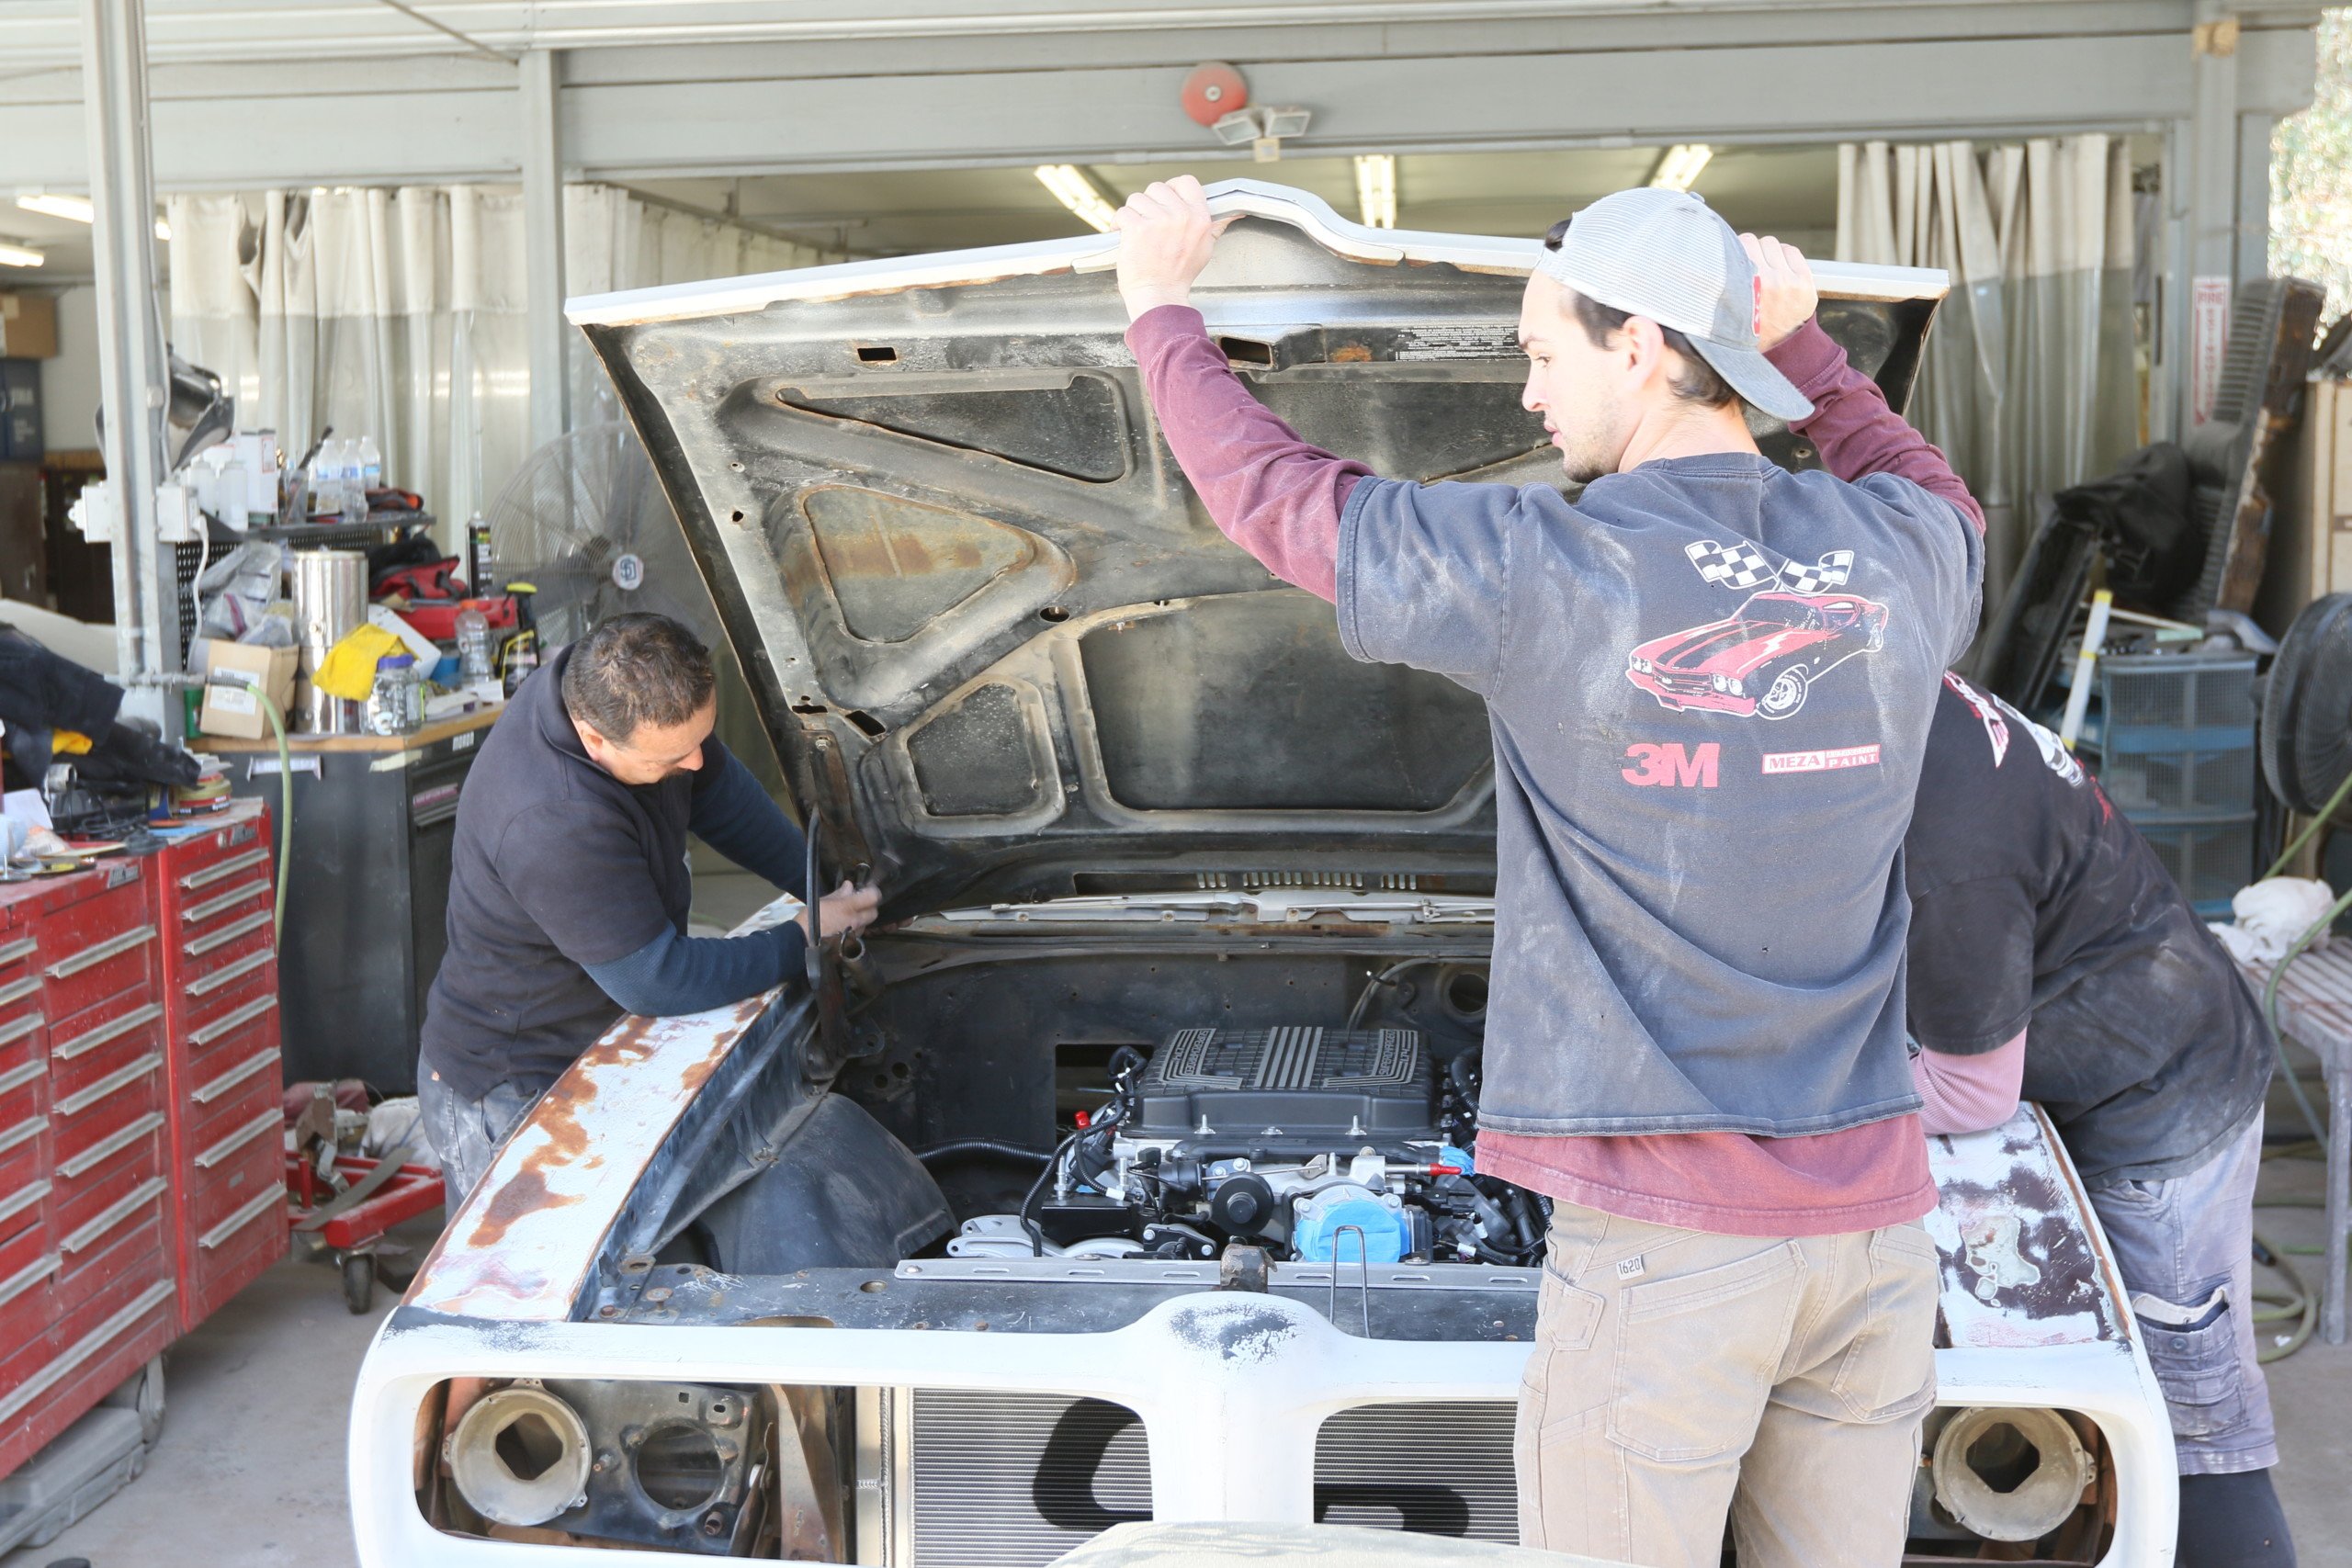
We spent a little time mocking up some new headlights from UPI and wiring from Ron Francis, but before getting too far along we sent the GTO back to Best of Show Coachworks to replace the drip rails around the rear window and the package tray, fabricate the body mounts, install a fiberglass hood and deck lid from Unlimited, hood pins and hinges from the Ring Brothers, and fitting all the body panels to get it ready for driving.

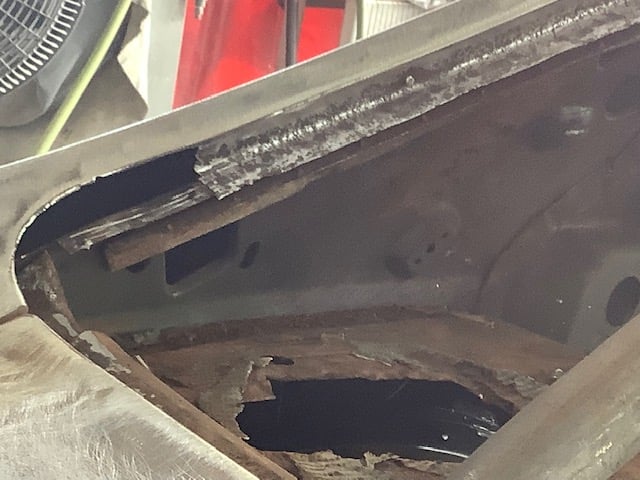
This is an extremely common issue with GM A-bodies. Water drains from the roof into the gap between the rear window and the metal, collects and rots out – even in west coast cars apparently... Best of Show used metal from AMD rather than try to fab this which would have taken longer and cost more to make.
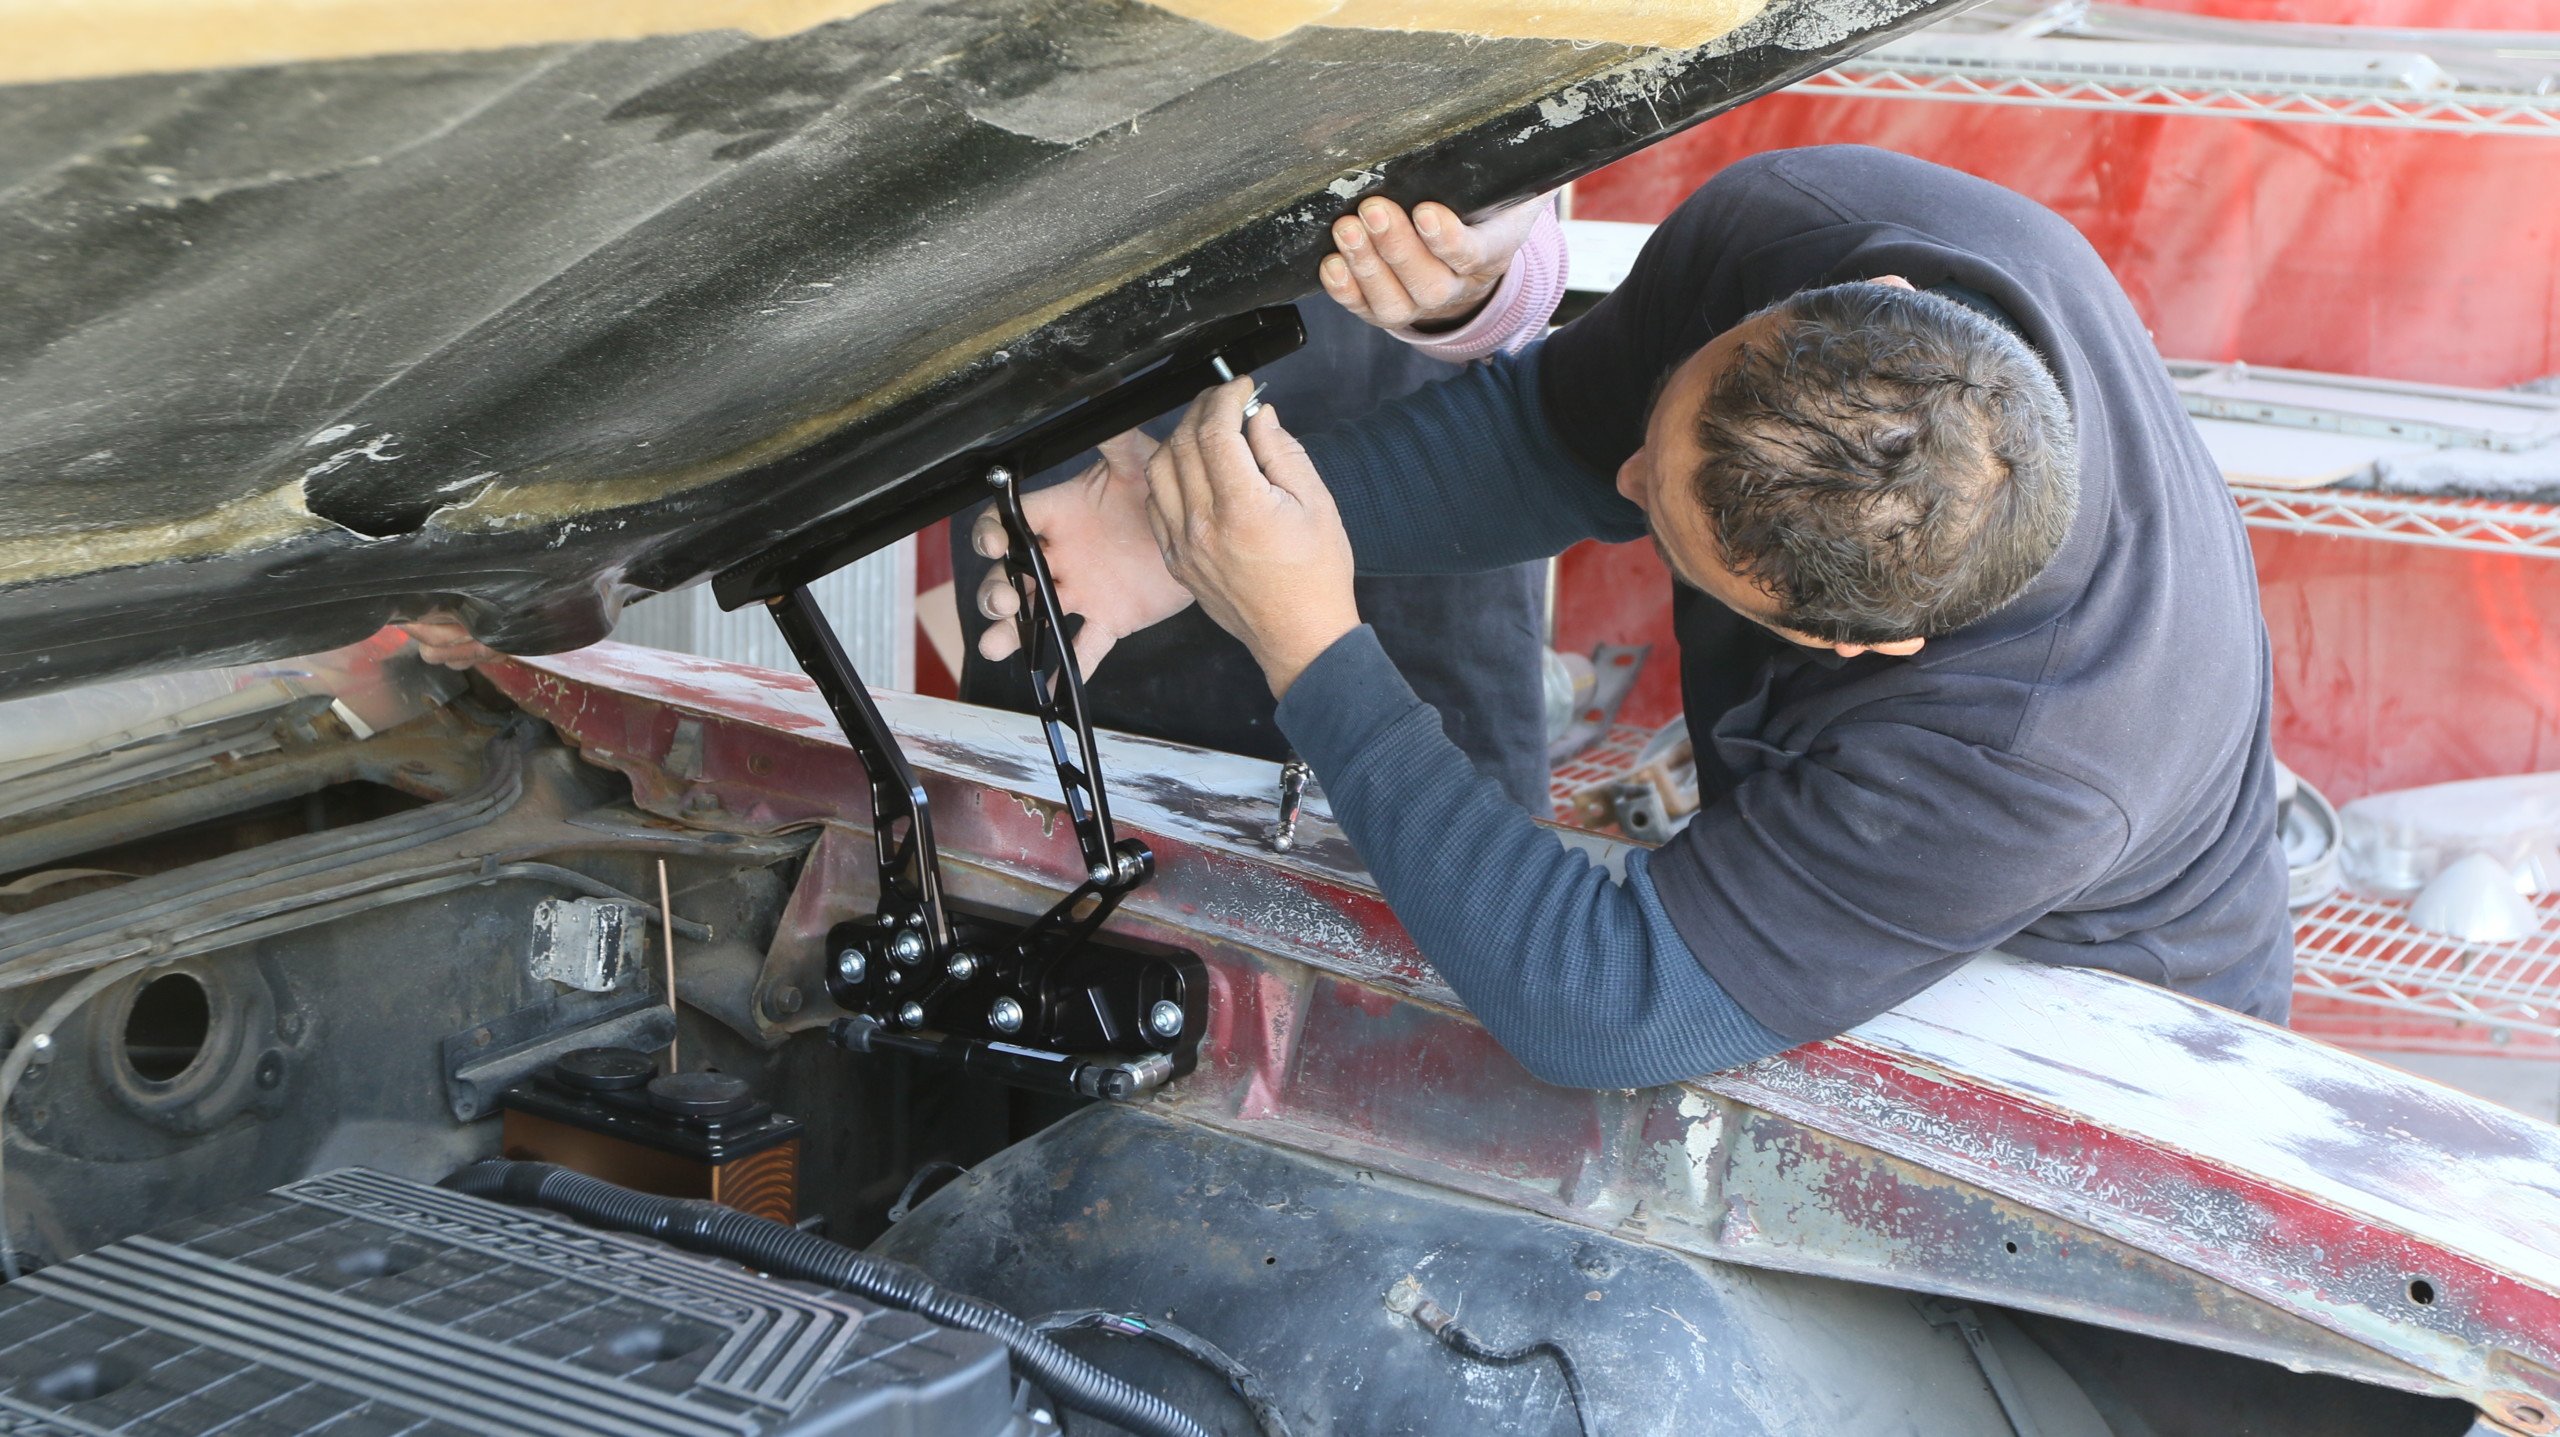
In just an hour, Best of Show had the hood and deck lid removed and replaced with the new pieces from Unlimited. Ring Brothers happened to carry one of the only aftermarket hood hinges on the market for the ’68 (there are subtle differences between the ’68 and ’69 I am told), and while we were at it I wanted to ditch the poorly functioning factory hood latch. It is a bad combination of hard to actually un-latch and even when it’s latched there is no telling when it will fly up on the highway on you (thankfully it was on the trailer when it happened last time). The decklid has no aftermarket hinge solution out of the box. I may later look into whether we can retrofit a billet Chevelle hinge. For now, Best of Show removed the tension rod, which would have bent the fiberglass and re-used the factory hinges.
On first glance it appears that while very light, the fiberglass will need quite a bit of prep work. This isn’t at all uncommon, but those of you expecting near-final finish on a $370 hood have another thing coming. The Ram Air nostrils also are molded closed…I may later open them up. During final paint and body work I do intend to use hood vents to relieve both lift and hot air to help keep the LT4 cool, which is notorious for its cooling issues. Without vents, the GTO should run perfectly fine on the street and the autocross course. Stay tuned for more updates over the winter as we wrap this body work and head back to our shop for assembly.
June 27th, 2022 – Next Round Coming Up
No different than any of you I’m sure, car parts are in high demand and low supply, so we are waiting our turn. I’ve got a Rick’s custom gas tank waiting eagerly in the garage for a powerful, brushless fuel pump from Fuelab that will carry enough E85 to feed not only the LPE-tuned LT4 in its current configuration – but also enough headroom to upgrade the blower. We are also working with Ron Francis on wiring, upgrading the lights to LED with electric motors, and plumbing the whole car to get it road worthy. The only other items on our checklist include some fine tuning to the body panels from Best of Show Coachworks and finish mounting our TMI seat brackets and Low Back loaner seat until the new Chicane II seats are ready. We’ll be modifying and recovering the factory rear seat at TMI, and swapping dashes with a fresh set of gauges from Classic Instruments. And we also plan to swap the tired door panels and add some fresh carpet with heat insulation. That should get the old girl roadworthy. And then the real fun begins.

May 5th, 2022 – Slinging Some Copper
OK, I know welding wire is actually a base metal with a copper coating or whatever…but it sounded better than “slinging some slag” or something. I was just really excited to have brought Project Payback home with all the fresh metal bent by Funkhouser Race Cars. In SoCal, there are few fabricators as talented as these guys, so I knew they would make quick work of the GTO. Our checklist as I mentioned last time included: fitting a TMI seat, welding in the S&W roll bar, installing the custom C&R radiator and heat exchanger, and making a custom intake tube. In the preview below you can see the lower bar that Funkhouser added to the roll bar for extra rigidity and to mount the lower harness belts, the new lower radiator tray, and the intake tube they fab’d. Overall I am pretty happy with the results and can’t wait to start piecing the rest of the car together. Stay tuned for the full article!
In case you are wondering, next on the horizon – we are ordering the rest of the fuel system, an air/oil separator, radiator overflow, wiring, and plumbing materials to get this beast running. Yes, I said “running.” I’m also excited to get my hands on the new seats that TMI just released (what you see in the video is just for mock-up).
March 3rd, 2022 – Slowly But Surely We Are Making Progress
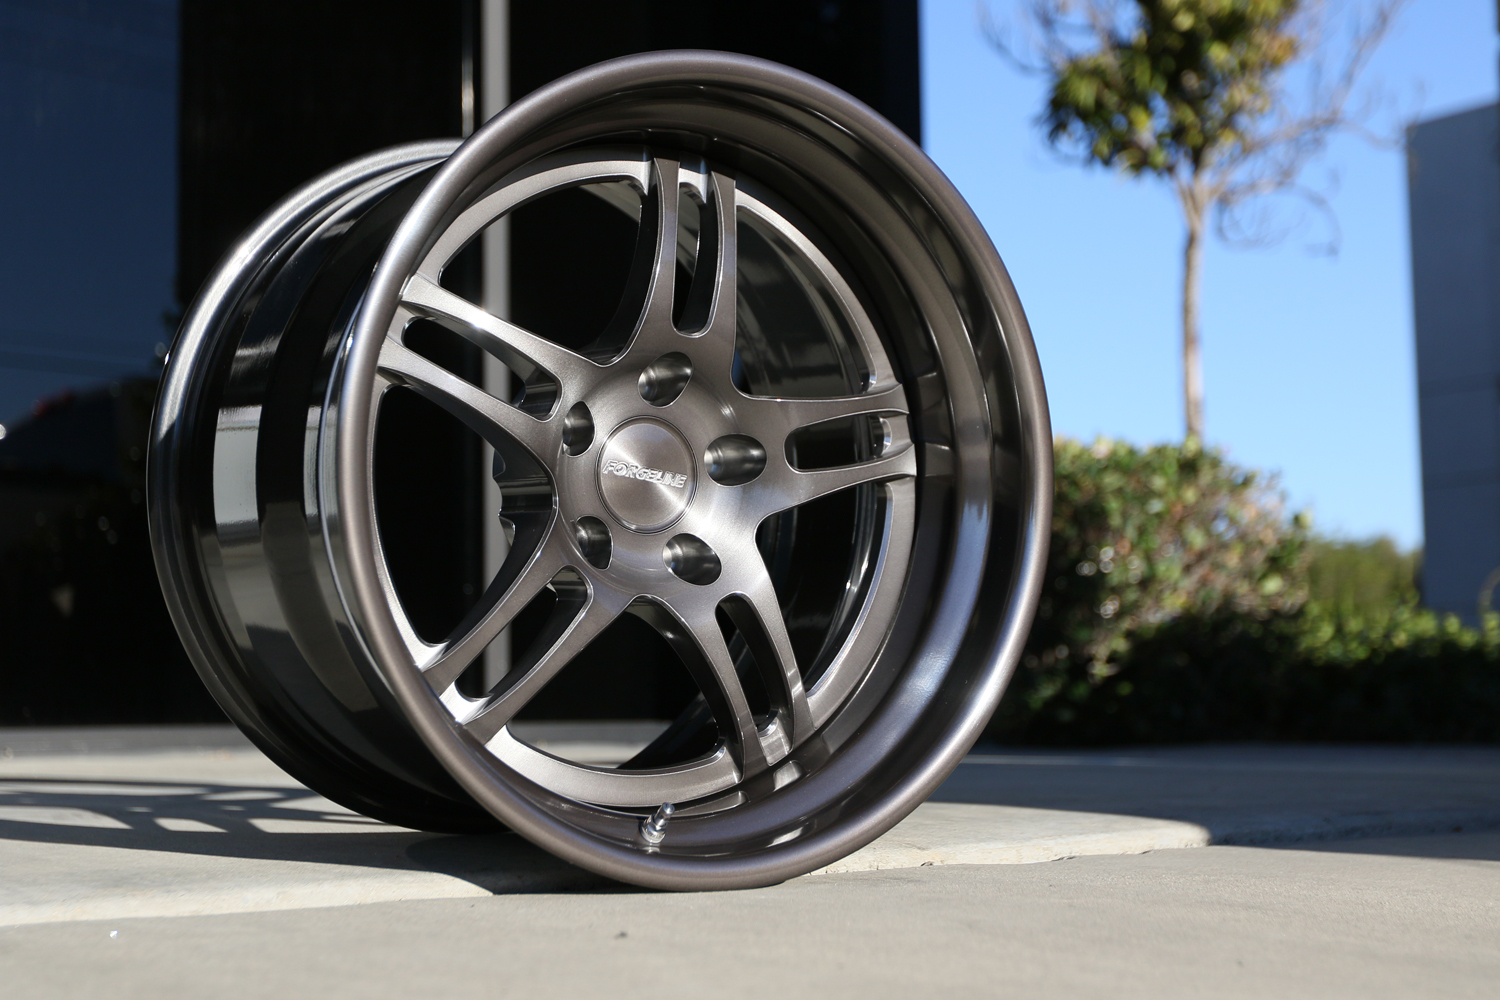
The wheel and tire story is now live, which details the selection of each in a combination that I think will help make the GTO competitive in most 200 treadwear autocross classes, including the USCA and NMCA Auto-X. It’s worth noting, since we did not in the story, that the Forgeline wheels and Baer hubs required small diameter, acorn style lug nuts – 1/2-inch thread with an open end for the extended studs. If you are putting together a similar project, I picked these up through Amazon as Gorilla came highly recommended through the Pro Touring circles.
Next up, we will be working with a local chassis shop to install a chromoly 4-point roll bar from S&W Race Cars (aka S&W Performance Group). While S&W is most known in the drag racing world, building SFI-legal roll bars and cages for your average bracket racer to tube chassis dragsters, they also have a full line of road racing, Lemons, and drift cages with available NASCAR door bars. Since this is a Pro Touring project that will see plenty of street time, including use of the back seat, our choice was a simple 4-point bar with a removable harness bar. While not SFI-legal for the drag strip, the bar itself will provide roll over protection, side impact protection at the B-pillar and give us optimum angle for the harnesses. The latter of which is the main objective. I have seen plenty of people mount their harnesses to the rear lap seat belts, at an extreme downward angle which is far from ideal and could compress your spine. No thanks. Stay tuned to the Project Payback Instagram page for additional updates.
January 20th, 2022 – New Year, New Update
We’ve been playing the waiting game with your typical supply issues that have plagued 2021… Thankfully one thing that was not held up were our wheels and tires. Like a kid on Christmas morning, I eagerly unboxed the 18-inch Forgeline DS3s while trying not to slobber all over them. I went back and forth on whether to get a 19-inch wheel given the larger dimensions of the A-body, but the tire selection was too limiting. We’ll have a full story detailing our measurements, as it does get a little complicated. On the rear, the limitation is mostly the frame rail after upgrading to the ABC mini-tubs. On the front, the control arm seem to be the limiting factor. But that is not to imply that we didn’t wind up with some really beefy rollers at all four corners. Sizing was only the start, though, as Forgeline’s wheel styles and finish combinations seem endless. From past experience I can tell you that a different combination of rim and spoke finish can make it look like an entirely different wheel. And, in case you are wondering, the rubber of choice is the Yokohama ADVAN A052 – one of the stickiest 200 treadwear tires on the market. This thing is going to rip! Are you excited? I know I am.
What’s next you might ask? Well, we still have some fab work to do including the roll bar, package tray, radiator mounts, and the intake tube. Meanwhile, the gas tank just came and I can’t wait to crack open the box and check it out. Fun times are ahead. Stay tuned for a full story on the wheels and tires.
June 23, 2021 – Now We Are Getting Somewhere Again
The latest story on Project Payback covers the extensive cooling system upgrades that C&R spec’d for the GTO. Running open track days in SoCal means track temps that exceed 110-degrees, as we found out filming Season 1 of Pony Wars. Having firsthand experience of what can happen trying to race a boosted vehicle for extended periods in the heat, C&R worked with me to design a system that keep the LT4 cool in the most demanding conditions. We discussed airflow and the impacts of running an A/C condenser and heat exchanger in front of the radiator. Ultimately we felt this was the best option, but mounting the oil cooler remotely and possibly adding its own fan. A set of SPAL dual fans were key to the design as well to pull air through the radiator and heat exchanger.
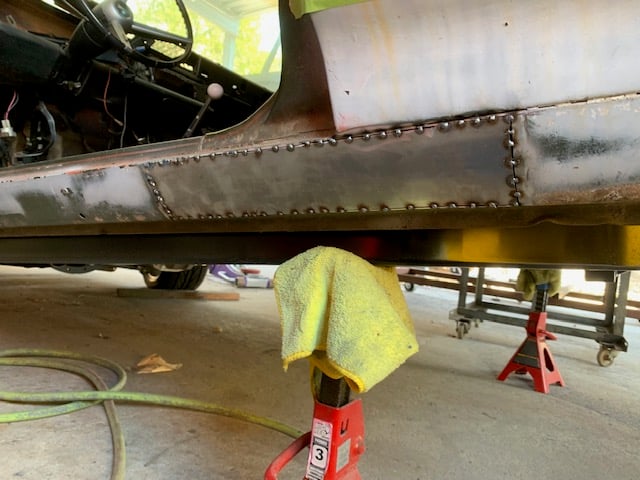
Meanwhile, things are moving along at Best of Show where the ABC wheeltubs are fully installed, sealed, and painted. They even repaired some rusted out areas of the floor, trunk, and rocker panels. It’s a good thing because we will be starting the seats next and we’ll need some solid metal to bolt them to!
June 8, 2021 – Let’s Catch Up
I know it has been a while, but it’s a good time to catch up. How have you been? How’s your family? That’s great. Let me tell you what we’ve been up to…not much. With all of that fresh stimulus money flowing, many shops are flooded with work. And we had come to a stopping point in this build where I (and the PAM shop) need some outside help to install new wheel tubs from ABC Performance. I mentioned these mini-tubs a while back and until we install them, we can’t order new wheels. We also have some much needed rust repair going on before we weld in our S&W roll bar and front seat brackets. If you have been missing content on Project Payback, you are not the only one (*sniffle). That said, here is some proof of life.
Of course, if you are on the ‘gram and need your fix of this project, feel free to check out some additional updates like the sweet C&R radiator and heat exchanger with the matching SPAL fans I just picked up for the project. Occasionally I post some other related Pro Touring content. If you have a Pro Touring project, especially a fellow Pontiac, I’d love to hear from you.
February 27, 2021 – Driving On
Well, I am happy to say that I finally finished up the Holley LT4 wet-sump accessory drive system, aside from the wiring and plumbing, which will come later. Shortly after, we started to get caught up on the chassis and brakes stories. On the latter, we take a close look at why we went with the Baer 6S 14-inch brake package and full floating rearend. Schwartz Performance highly recommended this setup, and with more than one experience with pad knock-back and unresponsive brakes it was a must-have for me. The chassis story takes a close look at why I chose the Schwartz chassis, including the price – believe it or not. Fab work isn’t cheap!
If you are wondering what is next for Project Payback, the GTO is getting the wheel tubs replaced to run some wider rear tires. Once Best of Show does its magic, we should be able to fit up to 345mm of rubber in the quarter panels. Hubbahubba! The wider wheel tubs will allow us to get a solid measurement for a set of custom wheels. In case you are wondering, the 17-inch Billet Specialties wheels are loaners from Project Max Street (currently disassembled) and just barely clear the brakes with the wheel weights knocked off. There is a reason Baer recommends 18-inch wheels at a minimum with these brakes, but they’ll do just for rolling around. We’ll have more stories on Project Payback, including the powertrain installation, in the coming months.

January 3, 2021 – Project Car Two-Step
Man, time flies. I wish I could say that I was slowly chipping away at this project one day at a time, always making forward progress. But I reached the point in the project where you take two steps backward for every one step forward. Holley was thankfully quick to remedy the missing air/oil separator, however, there was no resolution to the unfortunate reality that the A/C compressor would not clear the upper shock mount. This was a mistake on my part when measuring (using Holley’s diagram). I had thought the compressor would sit farther forward and have plenty of room. It did not. This leaves me with just a few options in order to keep cool in the 100+ degree summers of SoCal.
In the midst of the accessory drive installation, Scott and Noah from our shop came over to install the new Holley oil pan. This turned out to be a bit of an ordeal as well, first because the GM engineers made our lives quite a bit more challenging by going back to RTV to seal the oil pan. In addition, the oil pan bolts to the bellhousing and there is also a mid-plate. The tight firewall (we will need some additional clearance for serviceability as it turns out) and welded cross-bar in the front of the chassis essentially made it impossible to swap the oil pan without unbolting and dropping the trans while lifting the engine.
Onward and upward as they say. After cleaning out the office a bit, I started taking a good look at the new dash and gauges that arrived from Classic Dash and Classic Instruments. While I await some help with the remaining metal work–namely the firewall clearance, wheel tubs, rust repair, and roll bar–I am going to start mocking up the gauges and designing the electrical system.
September 11, 2020 – Steering in the Right Direction
In July, I was able to take a small step forward while our shop is tied up by installing a Flaming River steering shaft. We went with a stainless steel DD-style shaft, connecting with U-joints on both ends. It will provide a solid connection to the rack and pinion that came on the Schwartz chassis, as well as the factory steering column (for now). It was a tidy install, and only required a saw and grinder (which I didn’t have) besides your basic hand tools that most DIY’ers with a better equipped garage can handle. I (thankfully) was able to have our shop cut the shaft for me.
Last month I started on a Holley accessory drive install. Things were going pretty smoothly until I first realized that I did not order the optional air/oil separator that sits on the back of the water pump. The factory one can not be reused with the Holley pump, and I definitely did not want to go without it – knowing how hard I’d be pushing this engine. Once that was rectified, it was smooth sailing…almost… When I went to install the A/C compressor, it was apparent that my measurements prior to ordering the kit were not sufficient. The upper shock mount tube prevents installing the compressor. However, that is when the engine is installed as tightly to the firewall as possible. The next step is going to be sliding the engine forward on the adjustable mounts. It looks like 2 inches will do it. Since we need to swap the oil pan for a Holley one anyways, we should be able to kill two birds. Hopefully we’ll have this install wrapped up soon.
April 19, 2020 – Enter the Vlog
While things are slowing down on the build front, due to our shop–and most of California–being closed, it was a good time to get caught up on content producing. Behold we have the first vlog on Project Payback, which covers the Schwartz G-Machine chassis that will serve as the foundation of this Pro Touring build. I plan to make this a regular thing, so you can follow the build in a variety of forms. If you like low production quality and hearing me ramble in my garage for 22 minutes, then you are in for a treat. But seriously, please be kind – I have feelings, too, you know.
A little over a week ago I did a chassis primer, before we delve into the installation portion. The chassis story goes in-depth on the design of the chassis from the ground up, which is applicable to any 1968-1972 GM A-body. Slightly out of order, we also did a story on the gorgeous Ultimate Headers we are using for the LT4 swap, which are specially designed for the Schwartz chassis. On deck, we will have a video with Street Muscle Editor Vinny Costa (and me again, sorry), which gives an overview on the project and helps you get to know it just a little bit better. Thankfully, this was done by our talented production team and will be featured on the PAM YouTube channel.
January 13, 2020 – Off-Season Musings
Santa was very kind to Project Payback, as he dropped off some goodies from Holley. When installing the LT4 on our Schwartz chassis, it became quickly apparent that the factory wet sump oil pan would not clear the frame. Since I thought I ordered a dry sump LT4 from Chevrolet Performance, I was not aware we’d run into this issue. Thankfully a quick call to Dale Schwartz confirmed we’d need Holley’s LT Retrofit oil pan (PN 302-20). And given our intentions to road race the GTO, we also had Holley send the oil pan baffle kit (PN 302-30) to effectively keep the oil pump pickup submerged. This is a trick little piece that helps bridge the gap between a wet and dry sump during those high-g corners.
But wait, there’s more! One of the challenges of the Gen V engines is that they do not come with power steering pumps (factory applications all have electric power steering), and the A/C compressor does not fit many restomod engine compartments. With its sights on being the leader in LS and LT swaps, Holley was quick to market with a wet sump LT4 accessory drive kit (PN 20-220) to complement the LT1 kit already in production. Recently Holley even released a dry sump LT4 and LT5 kit. The kits are all inclusive, meaning not only do they have all the brackets and tensioners but even the A/C compressor, power steering pump, and alternator. It’s completely plug and play.
On its next trip into the shop, we’ll be installing all of these pieces along with a radiator, heat exchanger, and external oil cooler. This will require some metal work along with larger wheel wells for the rear tires, so that we can measure for and order the wheels. Oh and by the way, I finally found a new home for the chassis – which will be going under a 1946 Ford 2-door coupe.
While this stuff is all crucial to the build, sometimes the details can really make a build stand out. For example, one idea I had was to paint the LT4 supercharger lid “Pontiac Metallic Blue” engine enamel as an homage to the factory 400. Is this poking the bear or a trick detail? Sound off in the comments below.
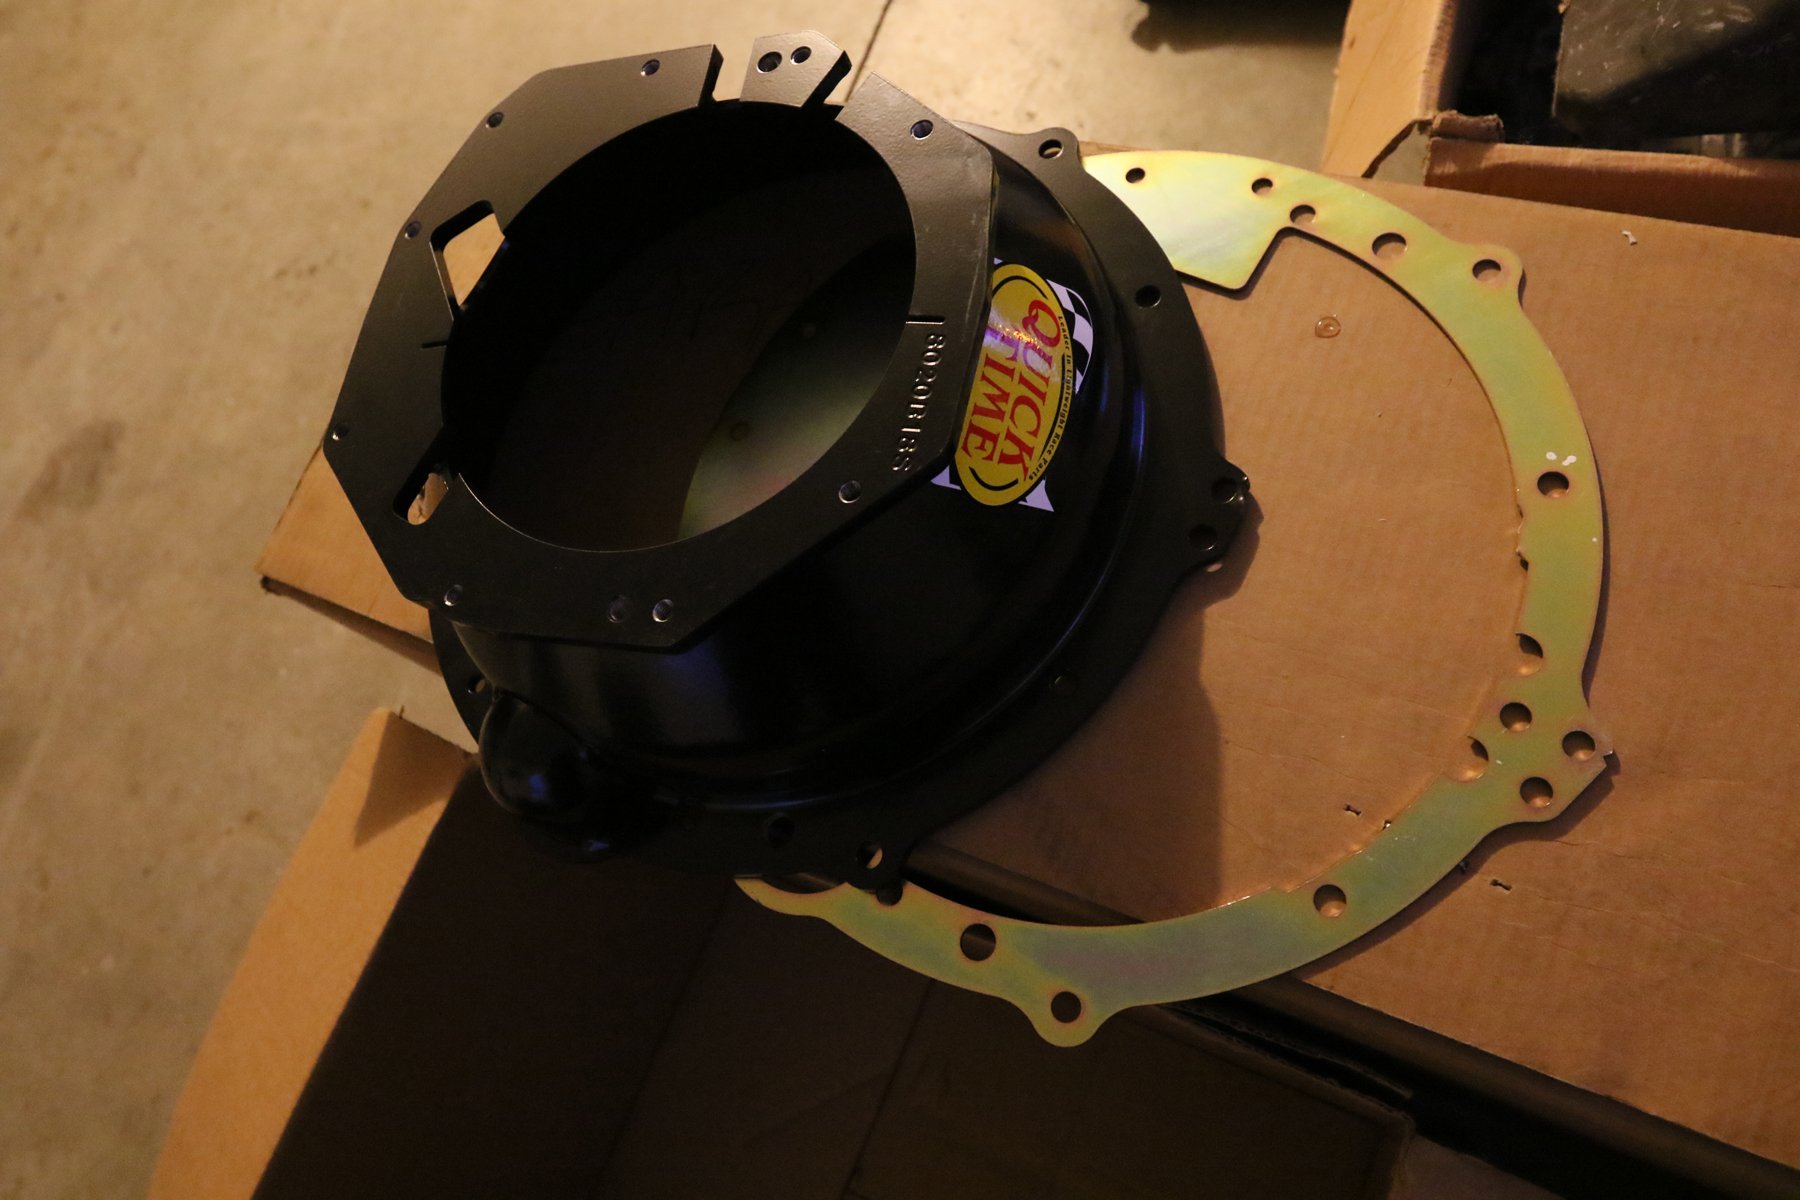
October 30, 2019 – Things Are Getting Serious
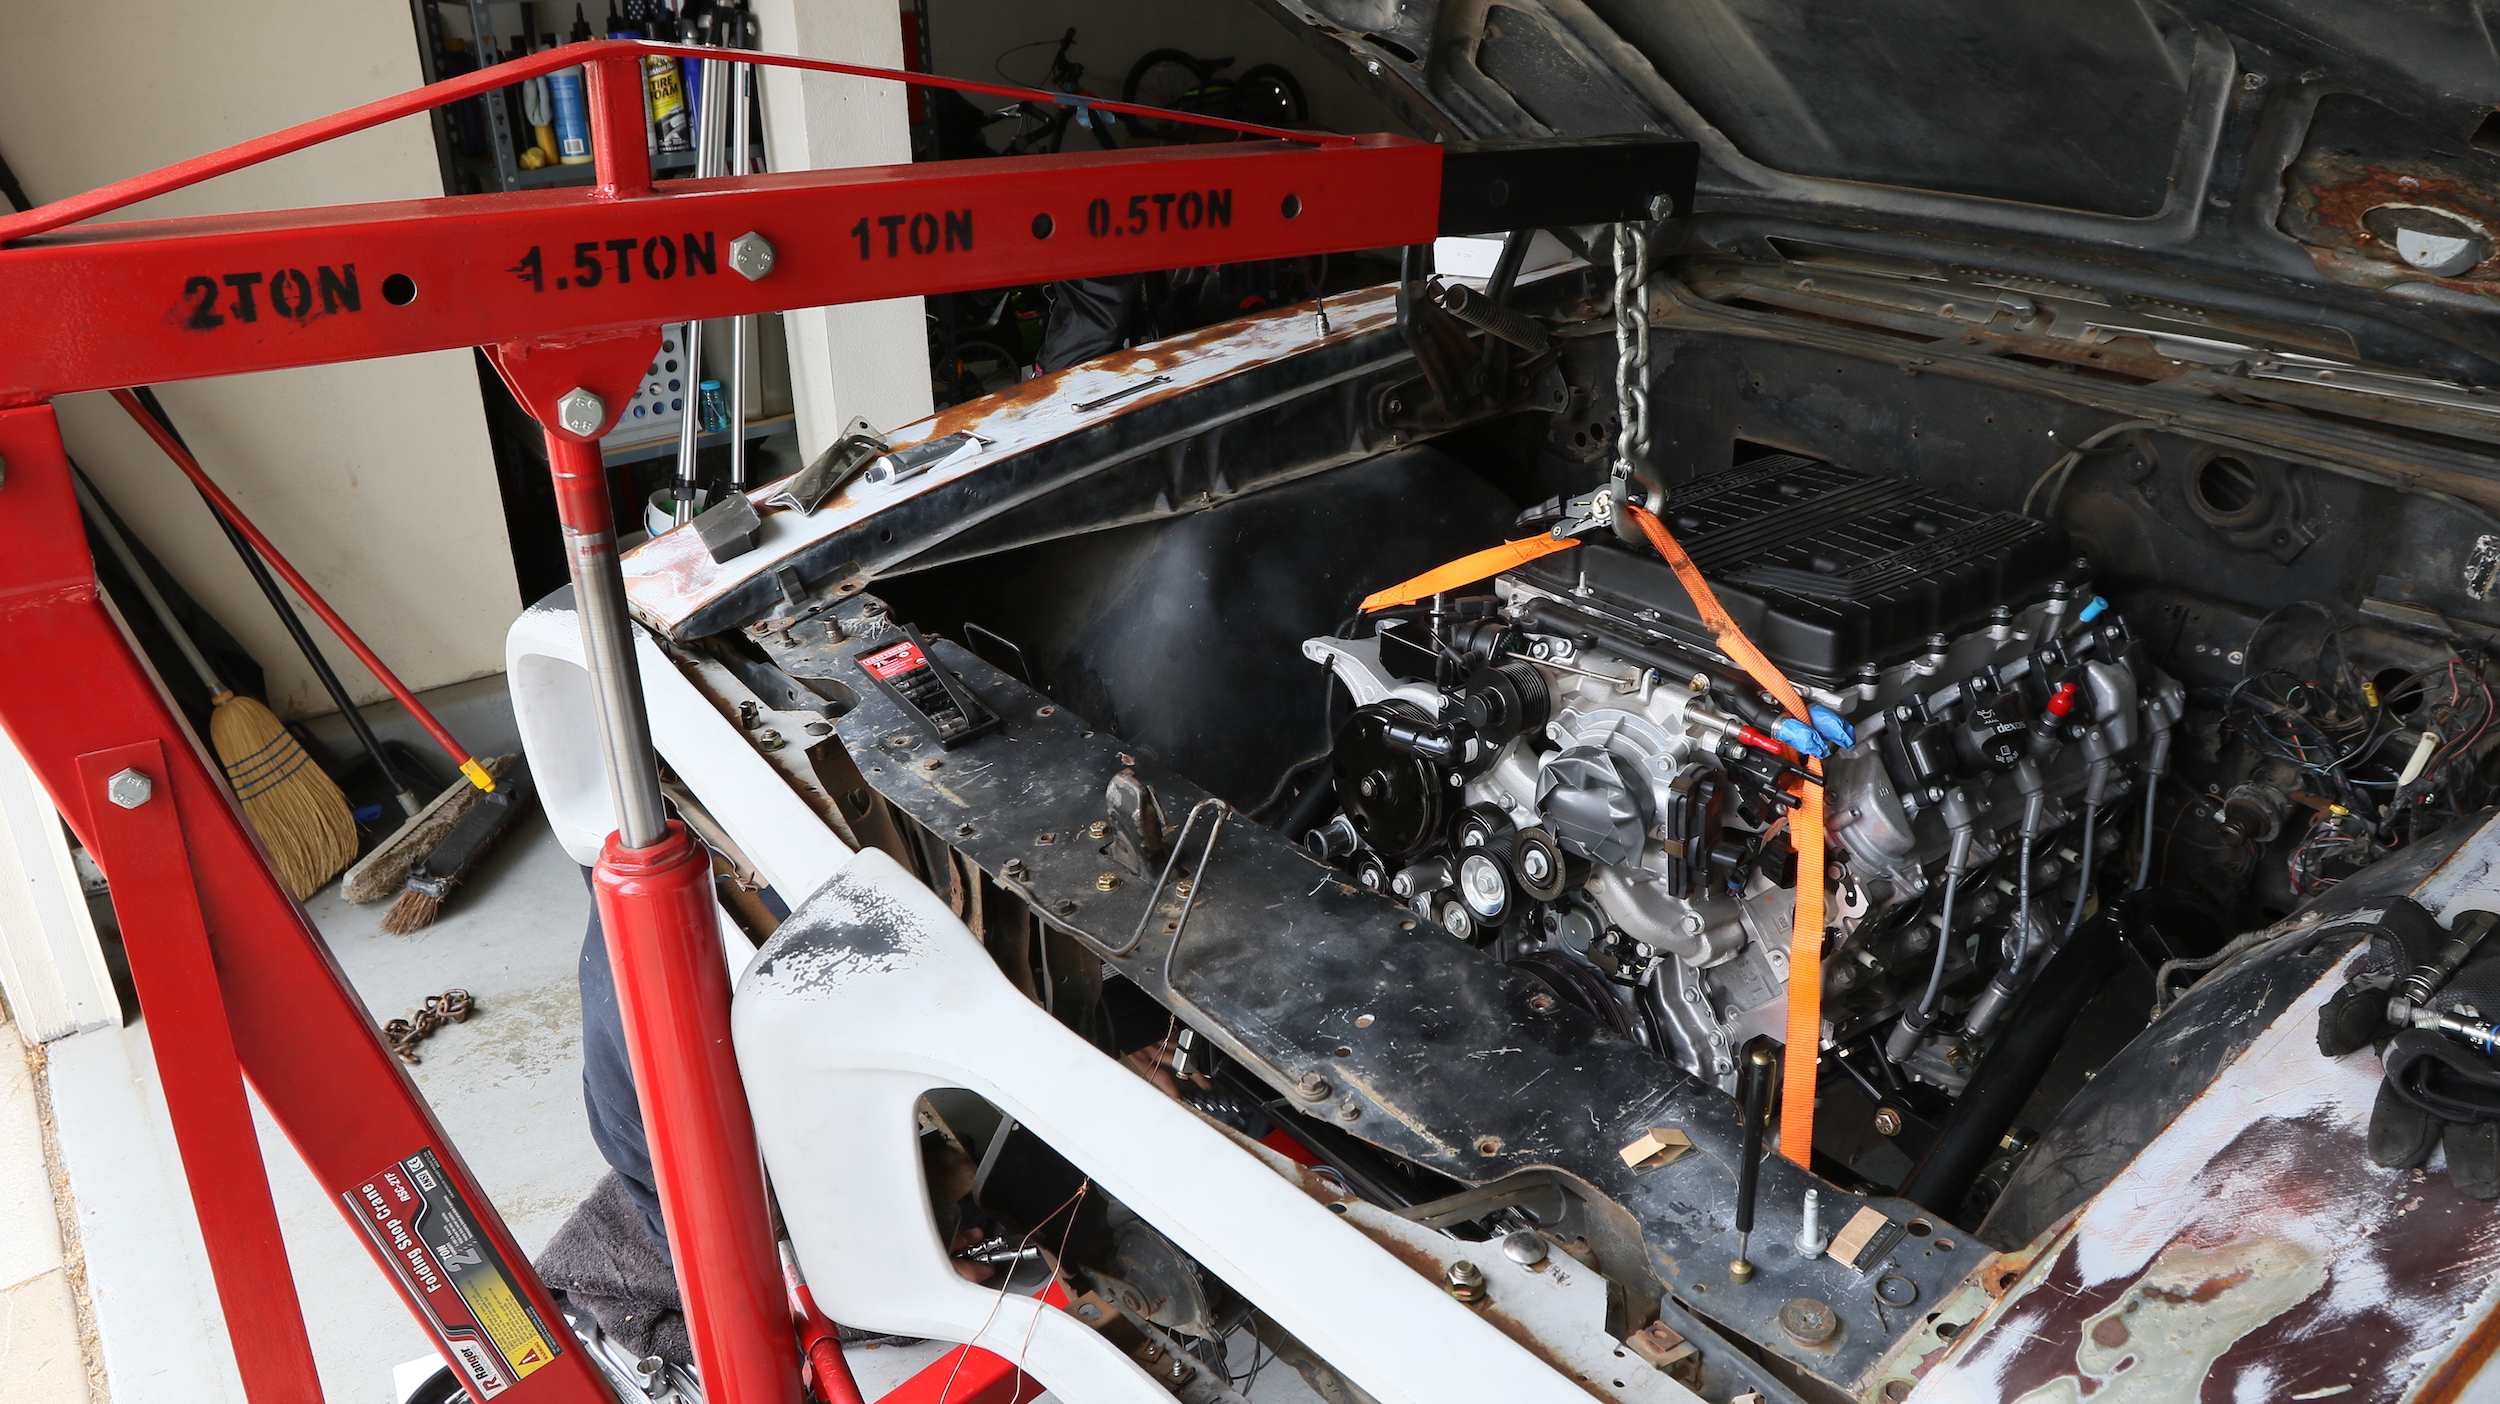
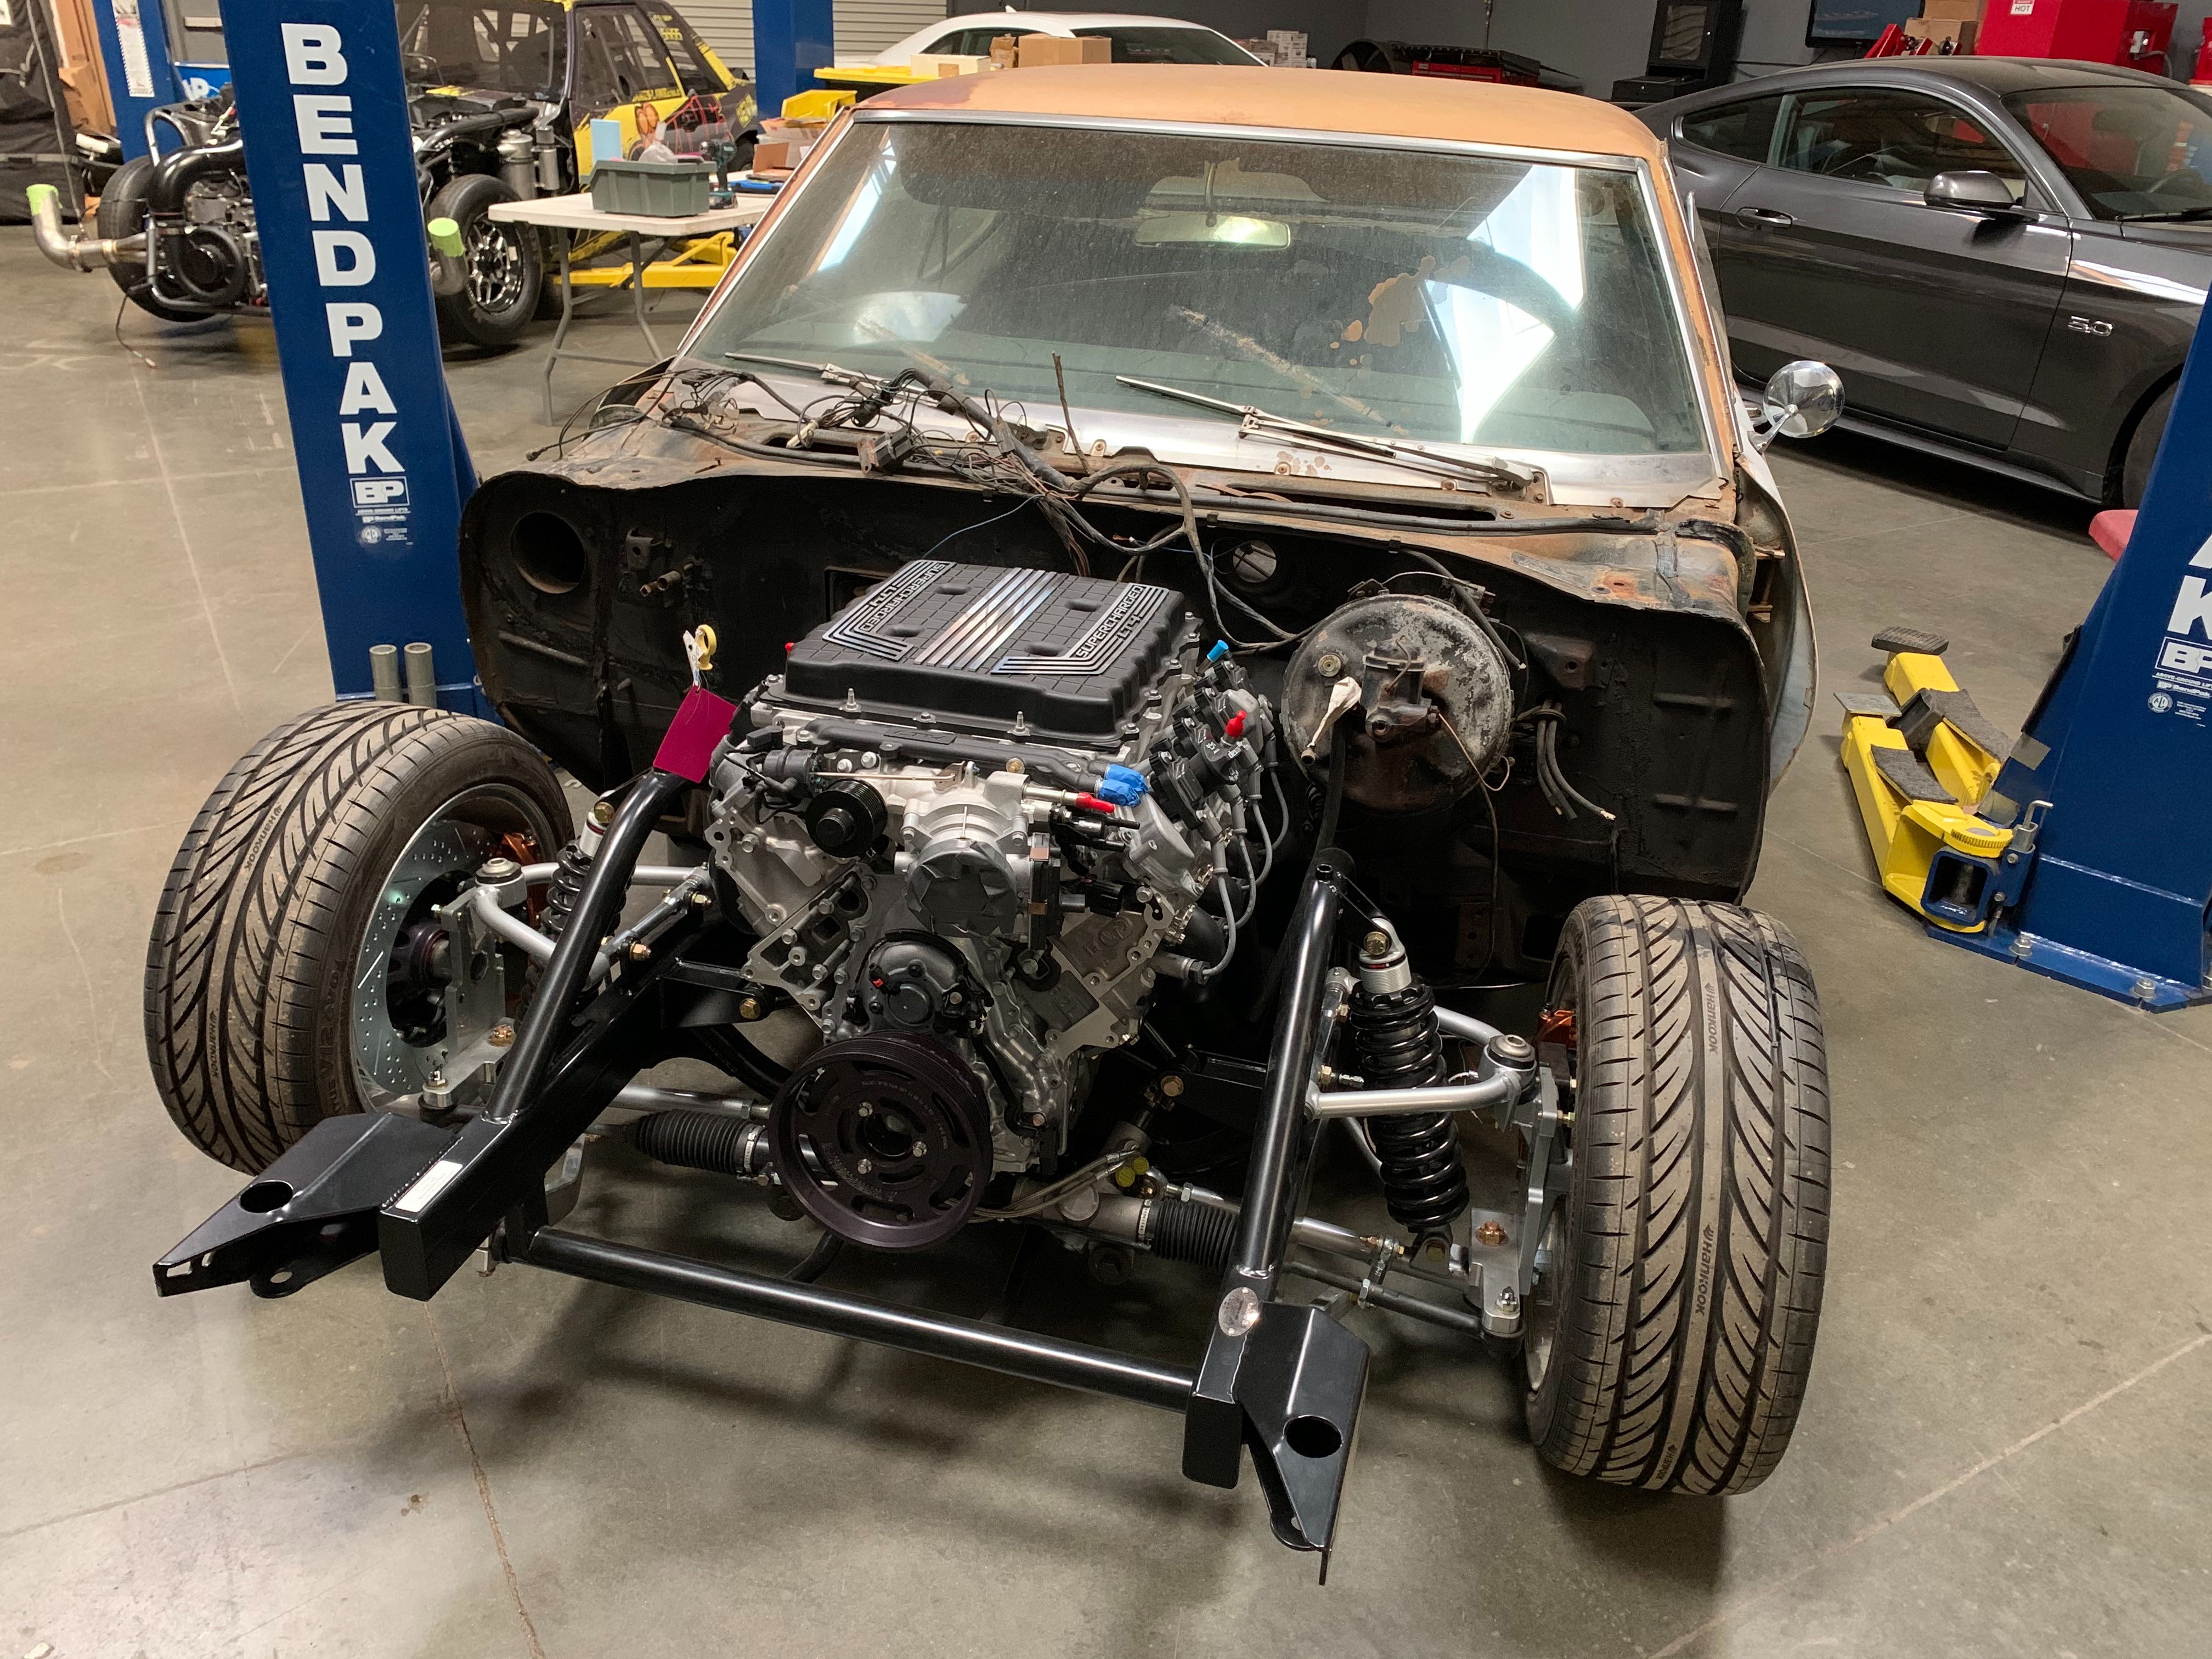
Between the $10K Drag Shootout and the Junkyard Challenge it was hard to get some shop time. Especially with the amount of work that was needed to get this project going. But finally things are starting to get fun again. My long-time friend Greg Lovell of AntiVenom agreed to fly in and bail us out of our backlog by tackling the GTO and a few other projects, while the rest of the crew worked on the race car. Greg made quick work of the GTO: bolting up the Lingenfelter-tuned LT4 and Chevrolet Performance clutch, bellhousing, and T-56 Magnum combo – then lowering it onto the frame. The Schwartz Performance chassis came with Gen V-specific adjustable motor mounts (yes, they are different than LS engines), which are pretty trick because they help set the engine back pretty far up against the firewall. The big-block was much more centered, but also not as far behind the axle centerline. This means our weight distribution will be much better. We’ll be going with an aftermarket A/C system, so there was no need to clear the large evaporator box along the firewall.
For the transmission, Silver Sport sent us everything we needed for pedals, hydraulics, and wiring. It is crucial that you use proper pedals as I found out on my G-body project, simply retrofitting a pedal that was designed for a mechanical clutch linkage is not typically a good option. Greg had to cut the floor for additional tunnel clearance. Silver Sport provided a template, but our aftermarket chassis appeared incompatible. He bent some sheet-metal and away he went – it came out great! The tunnel was capped off by a piece of tin from Silver Sport with the shifter cutout to place it within a factory center console. Having been in T-56 equipped A-bodies before, I really liked this option. The last thing you want is uncomfortable shifter location. Silver Sport has a few options on their kits, and this is one of them.
For the next phase, we are measuring for the radiator and heat exchanger as well as the wheels and tires. Stay tuned for more updates as we get closer. In the mean time, I have to figure out what to do with this stock frame…
August 12, 2019 – If I Said You Had a Beautiful Body…
When I think of a “muscle car” I think of an A-body. The lines are what drew me to purchase the GTO and start this project, and so it was very important that they be preserved and perfected. Thankfully I had a fantastic body shop at my disposal, Best of Show Coachworks, that was able to mate the National Parts Depot quarter panel skins to the existing body. The area that mates to the deck lid on the rear-facing portion of the quarter panel had to be made by hand. We also found that fitting the aftermarket Endura bumper was incredibly tricky. There isn’t any give to the material to shape it, so the best you can do is make adjustments. Check out the full story for more info.

March 16, 2019 – Saying Goodbye to Old Ways
The ’70s Pontiac 400 and Turbo 400 that came in the GTO found a new home. I was very happy that within just a few days its new owner had it up and running in his ’68 Firebird. As much as some may question the use of a “Chevy” engine in the Pontiac, in doing so I have helped give life to someone else’s project. So that was nice to see.
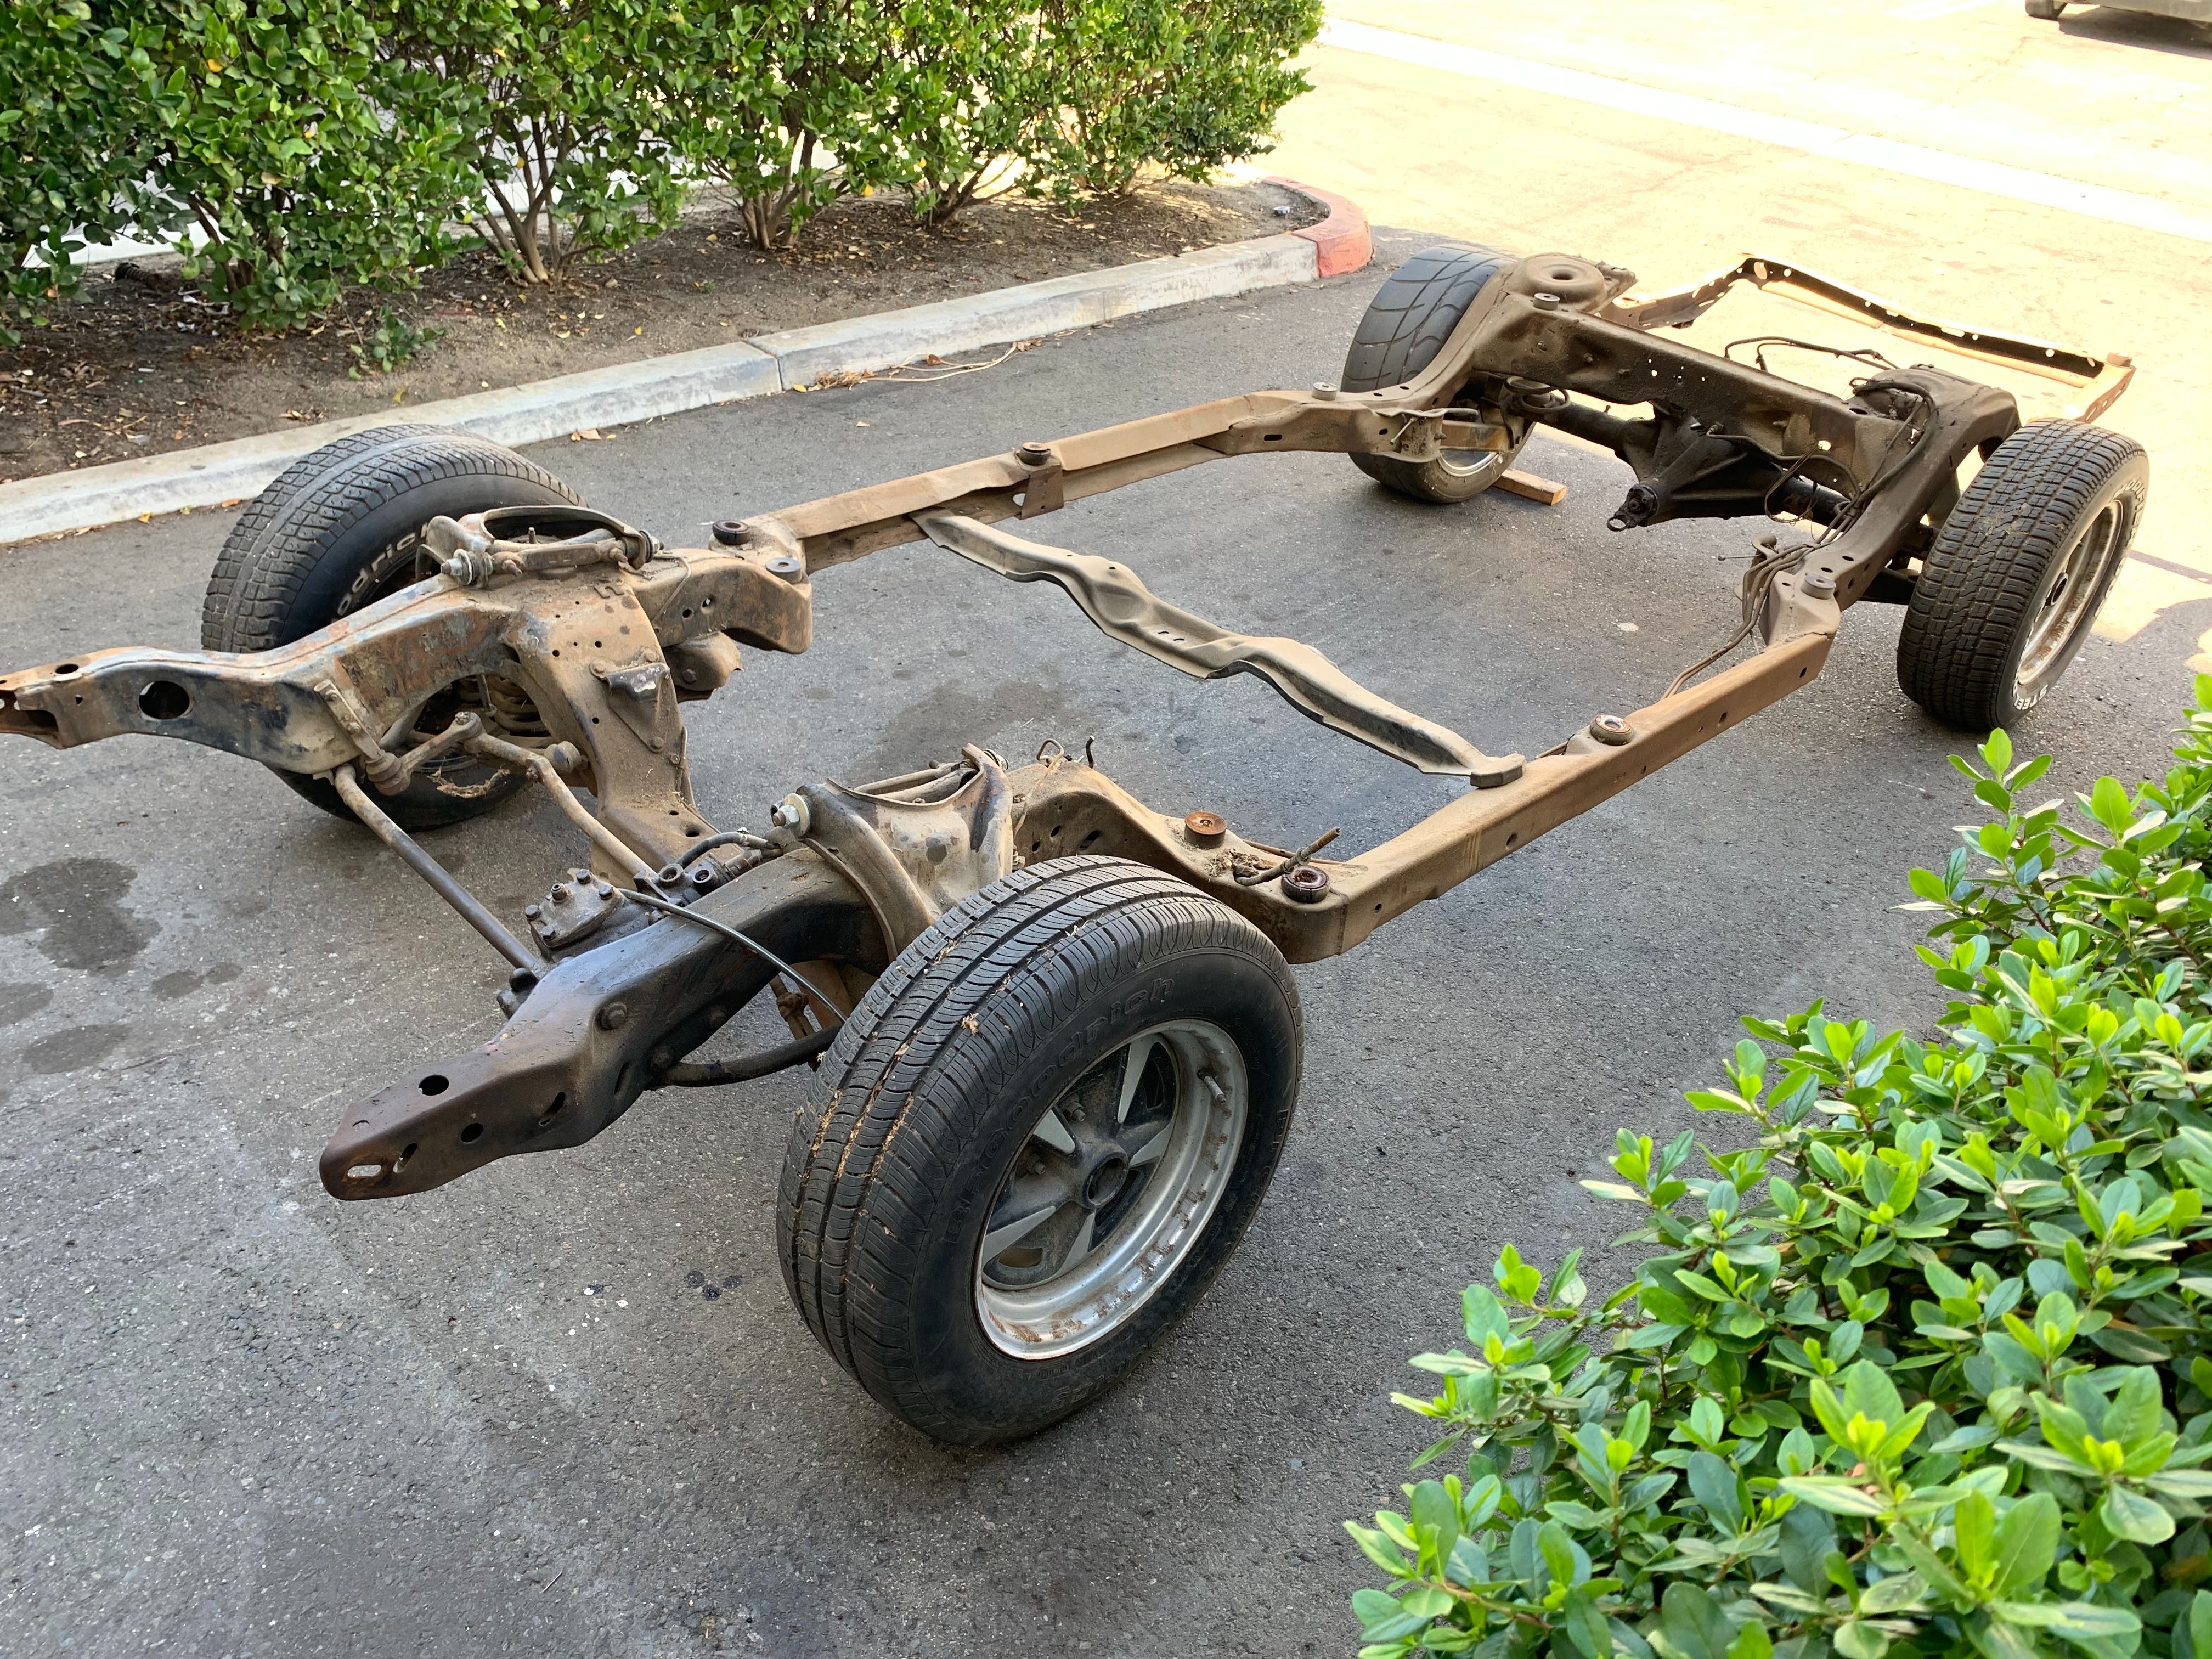
March 15, 2019 – The Chassis Hath Arrived
As they say, perfection takes time… But at long last, our beautiful new chassis has arrived from Schwartz Performance. Rolling off the enclosed transport, behind a flawless Thunderbird and a Nova I would have happily tucked away in my garage, the Schwartz chassis gleamed in the SoCal sunlight. Complete with wooden wheels, I sat on it and made engine noises until it was time to roll it into the shop.
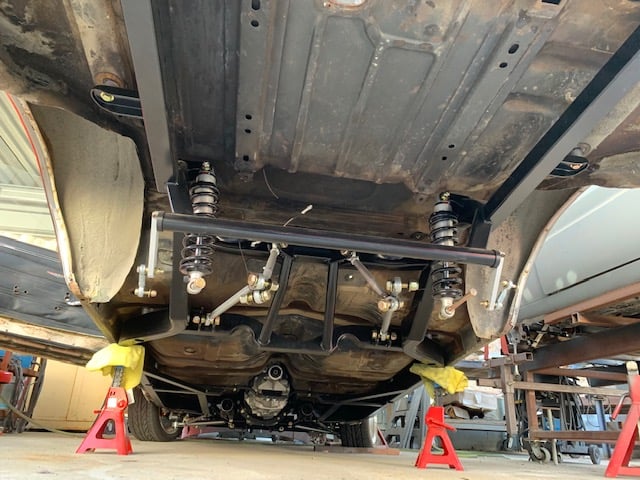
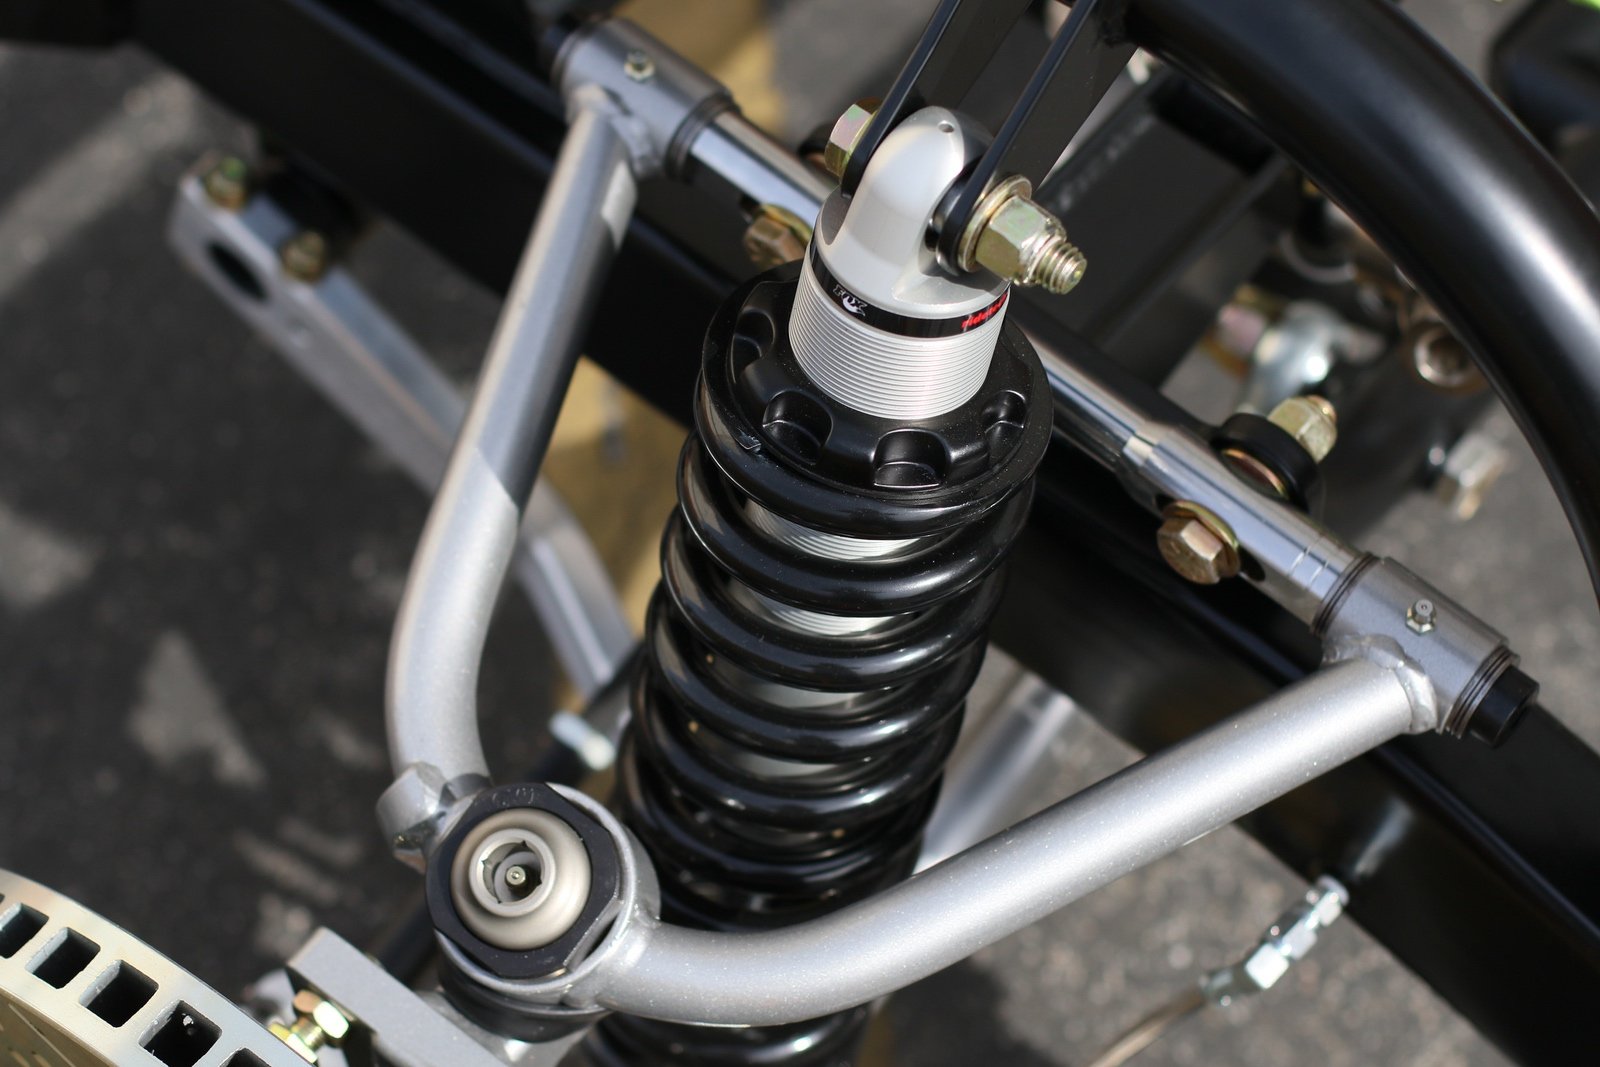
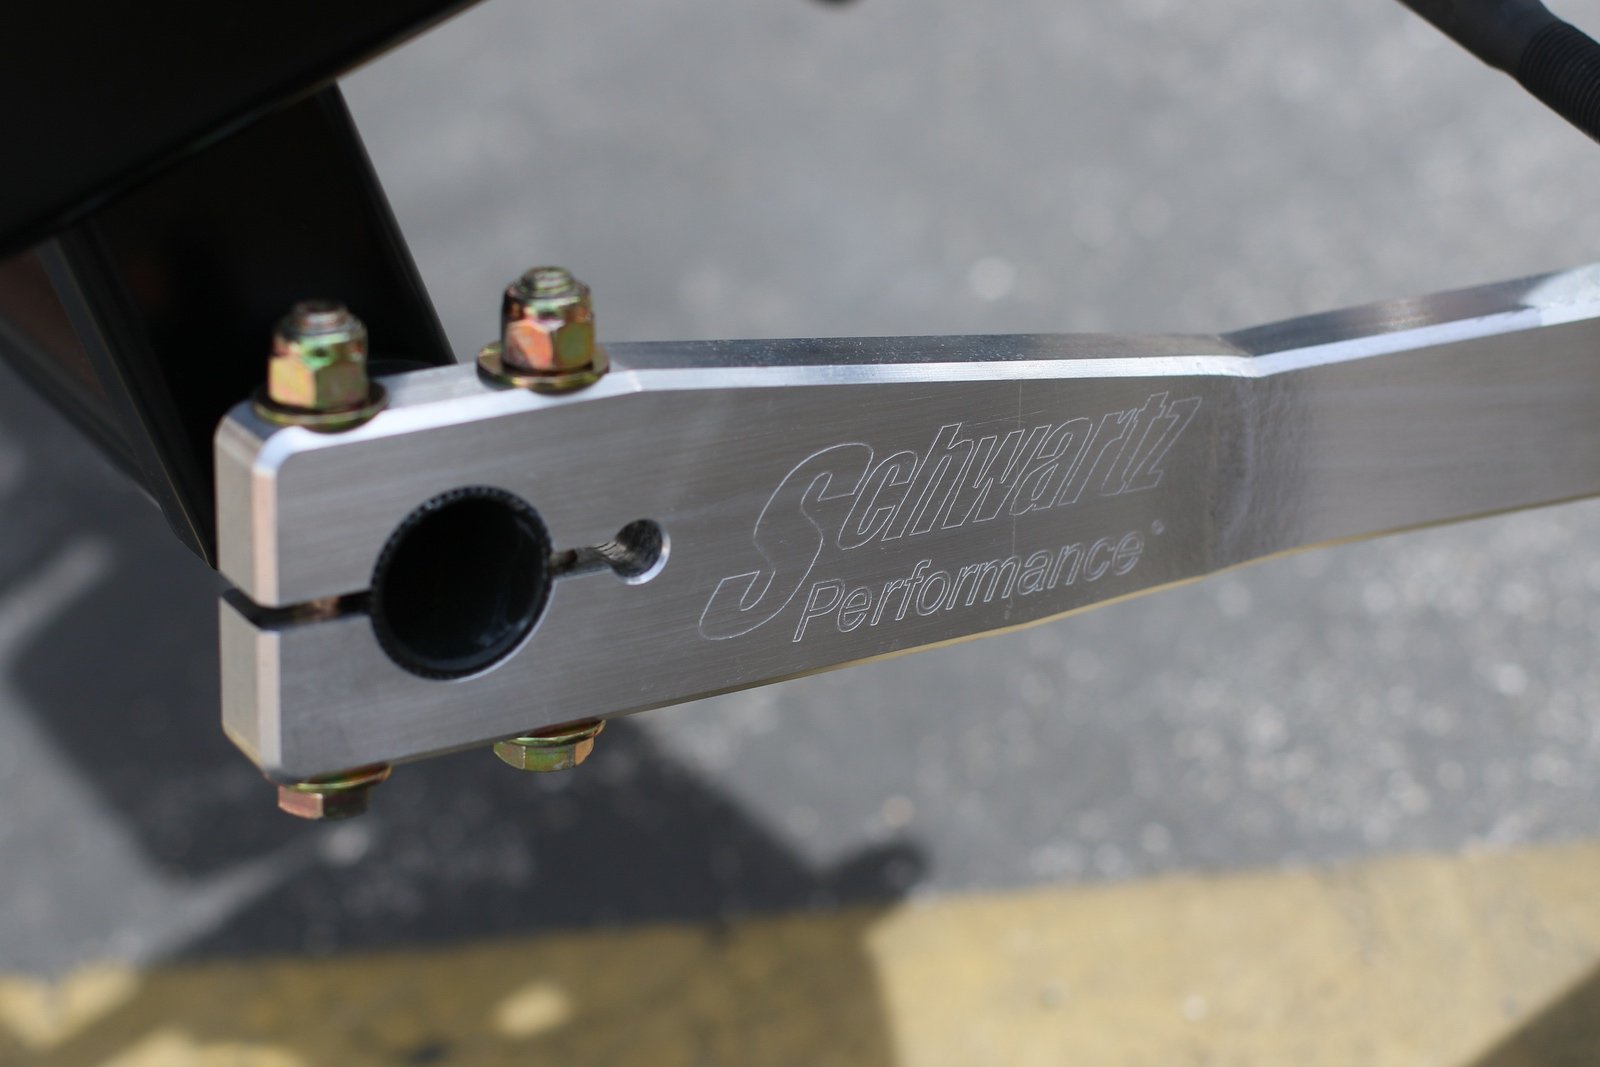
The Schwartz G-Machine chassis is not just beautifully formed, welded and powder coated, it has many subtle features that we will attempt to touch on here. For starters, it comes completely assembled. Yes, completely. Second, all of the brake lines are run through the frame like a high end motorcycle or bicycle. It has a modern rack and pinion, so it steers like a brand-new car; Ridetech coilovers, which are manufactured by Fox Racing; and splined sway bars. Overall it is a healthy mix of “street” and “race,” which is just the way any Pro Touring vehicle should be. Best of all, it still relies on a parallel four-link. This suits my driving style, comfort level, taste, and (frankly) budget nicely – much better than a 3-link or torque arm suspension.
Another awesome feature of the Schwartz chassis is that it allows for a variety of transmission and engine combinations. Ours came with the billet aluminum engine mounts for a Gen V small-block, but if we later decided to go back to a Pontiac engine we could. And there is even some adjustability in the engine position, should you want to push the firewall back for better weight distribution. Honestly, that is tempting and something we may consider down the road. At the very least it takes into account any OEM variances between the various A-bodies as well as what 50 years of heat cycling and, well, life can do.
For an in-depth look at the chassis you’ll need to stay tuned for a full story on Street Muscle. In the meantime, we’ll keep updating you as we prepare to put the ‘68 GTO under the knife.
January 12, 2019 – New Year, New Project for Street Muscle: Pro Touring 1968 Pontiac GTO
In August we introduced Project Payback, our 1968 Pontiac GTO – a Pro Touring machine with a downright nasty attitude. If you like A-bodies, Pro Touring and watching tires being spun in anger, this is the project to follow. There is no shortage of autocross events specifically for muscle cars in Southern California, not to mention three excellent road courses within 3.5 hours drive. Ultimately we’d like to see what Project Payback can do on a larger stager at Ultimate Street Car events and the Holley LS Fest.
But, first things first, let’s get to the building. We spent the second of last year planning for the first stage of the build while the initial body work was being completed. We were extremely fortunate that National Parts Depot had everything that we needed to repair the sheet-metal on the quarter panel and fender that had been poorly slathered in body filler prior to purchase. NPD and Best of Show Coachworks have been great partners thus far in the build, and we should be publishing that body work story here soon.
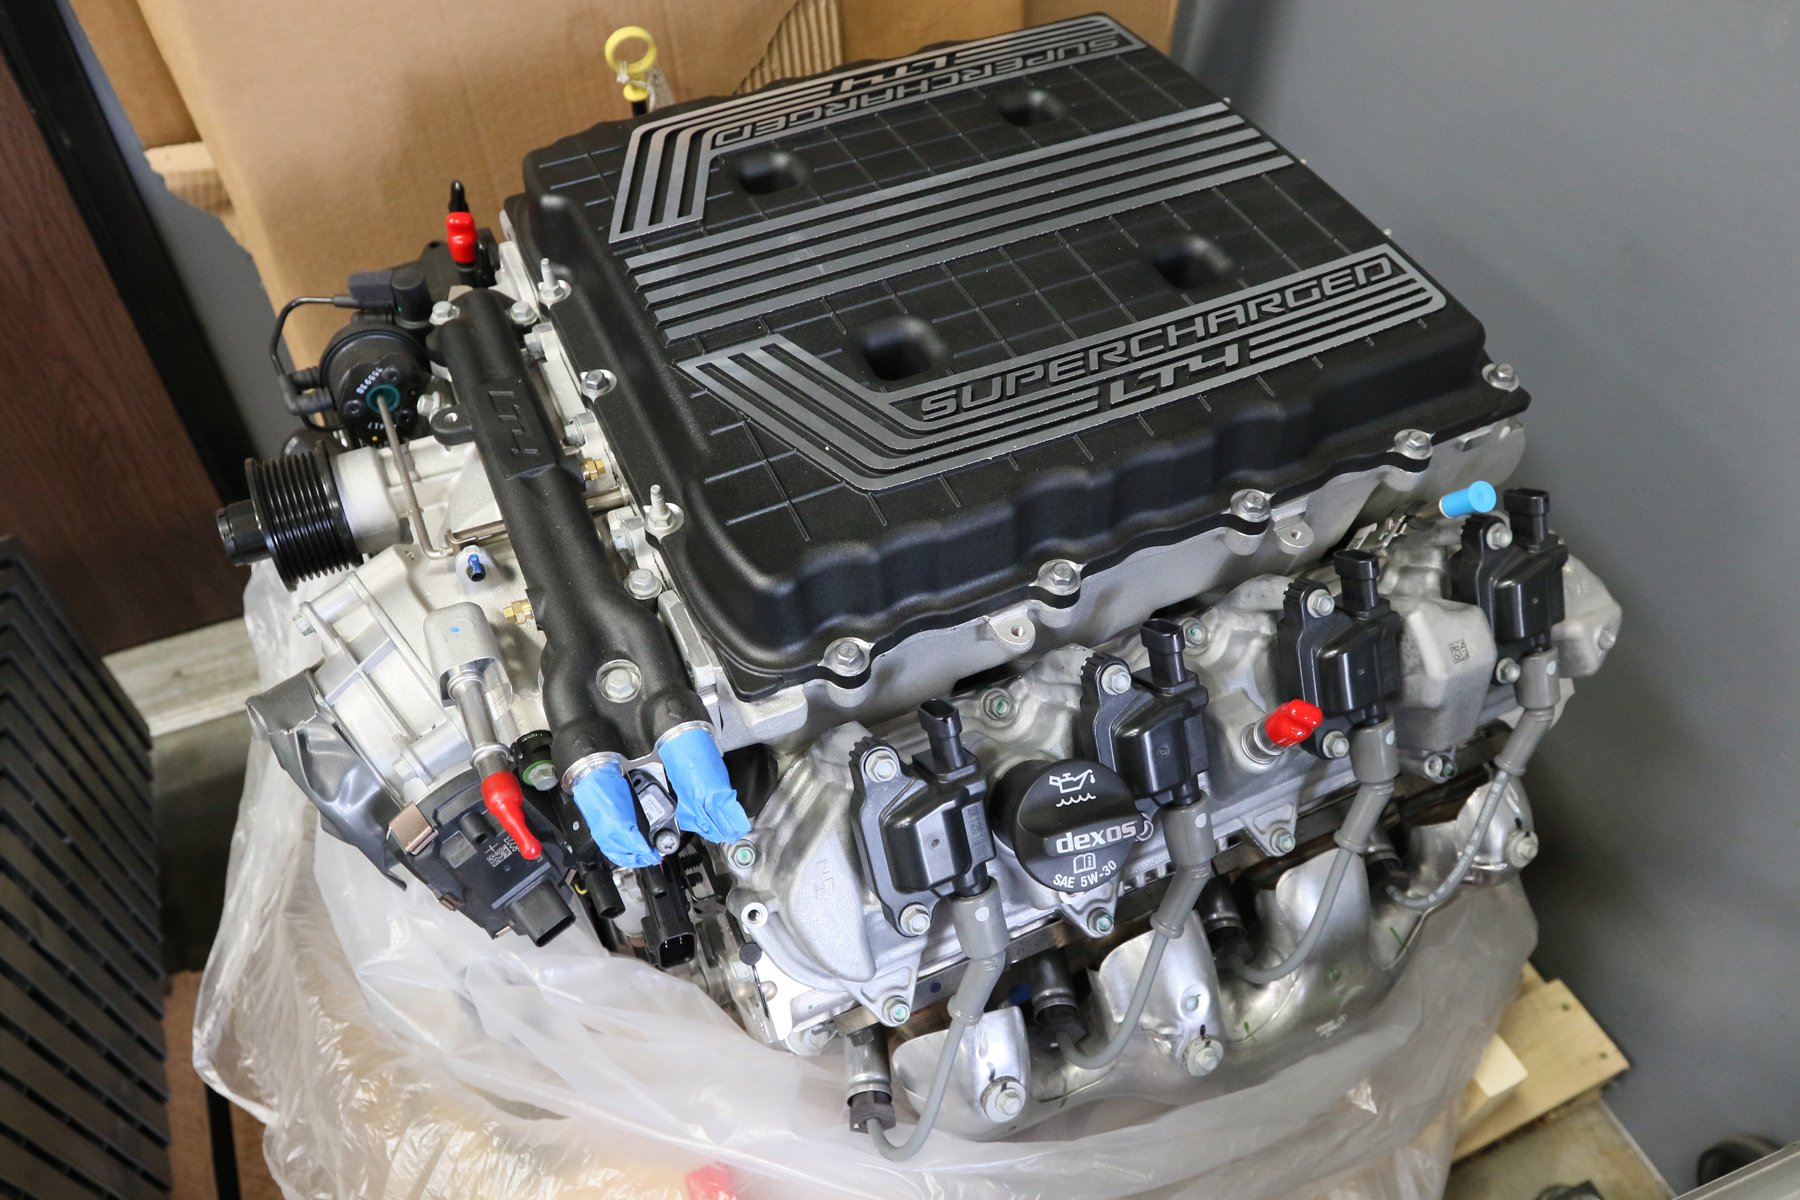
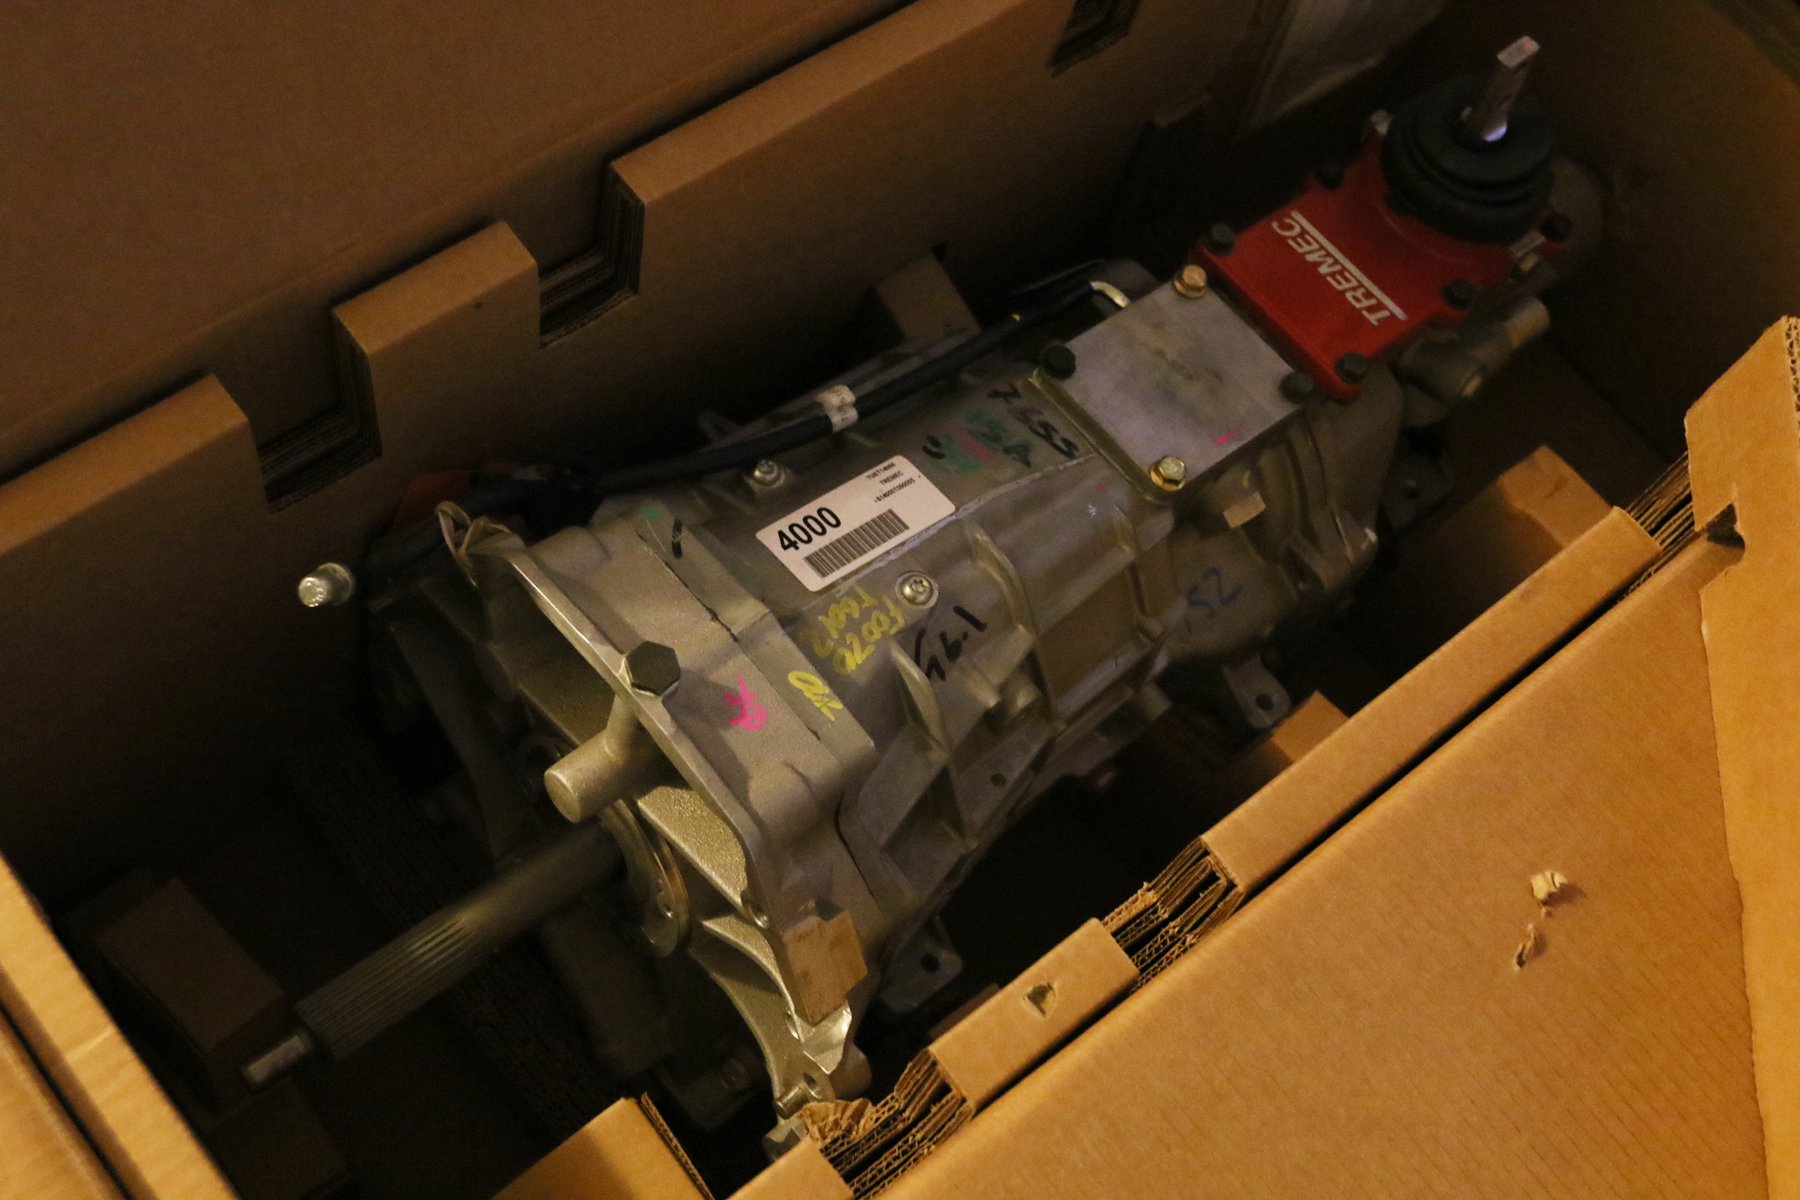
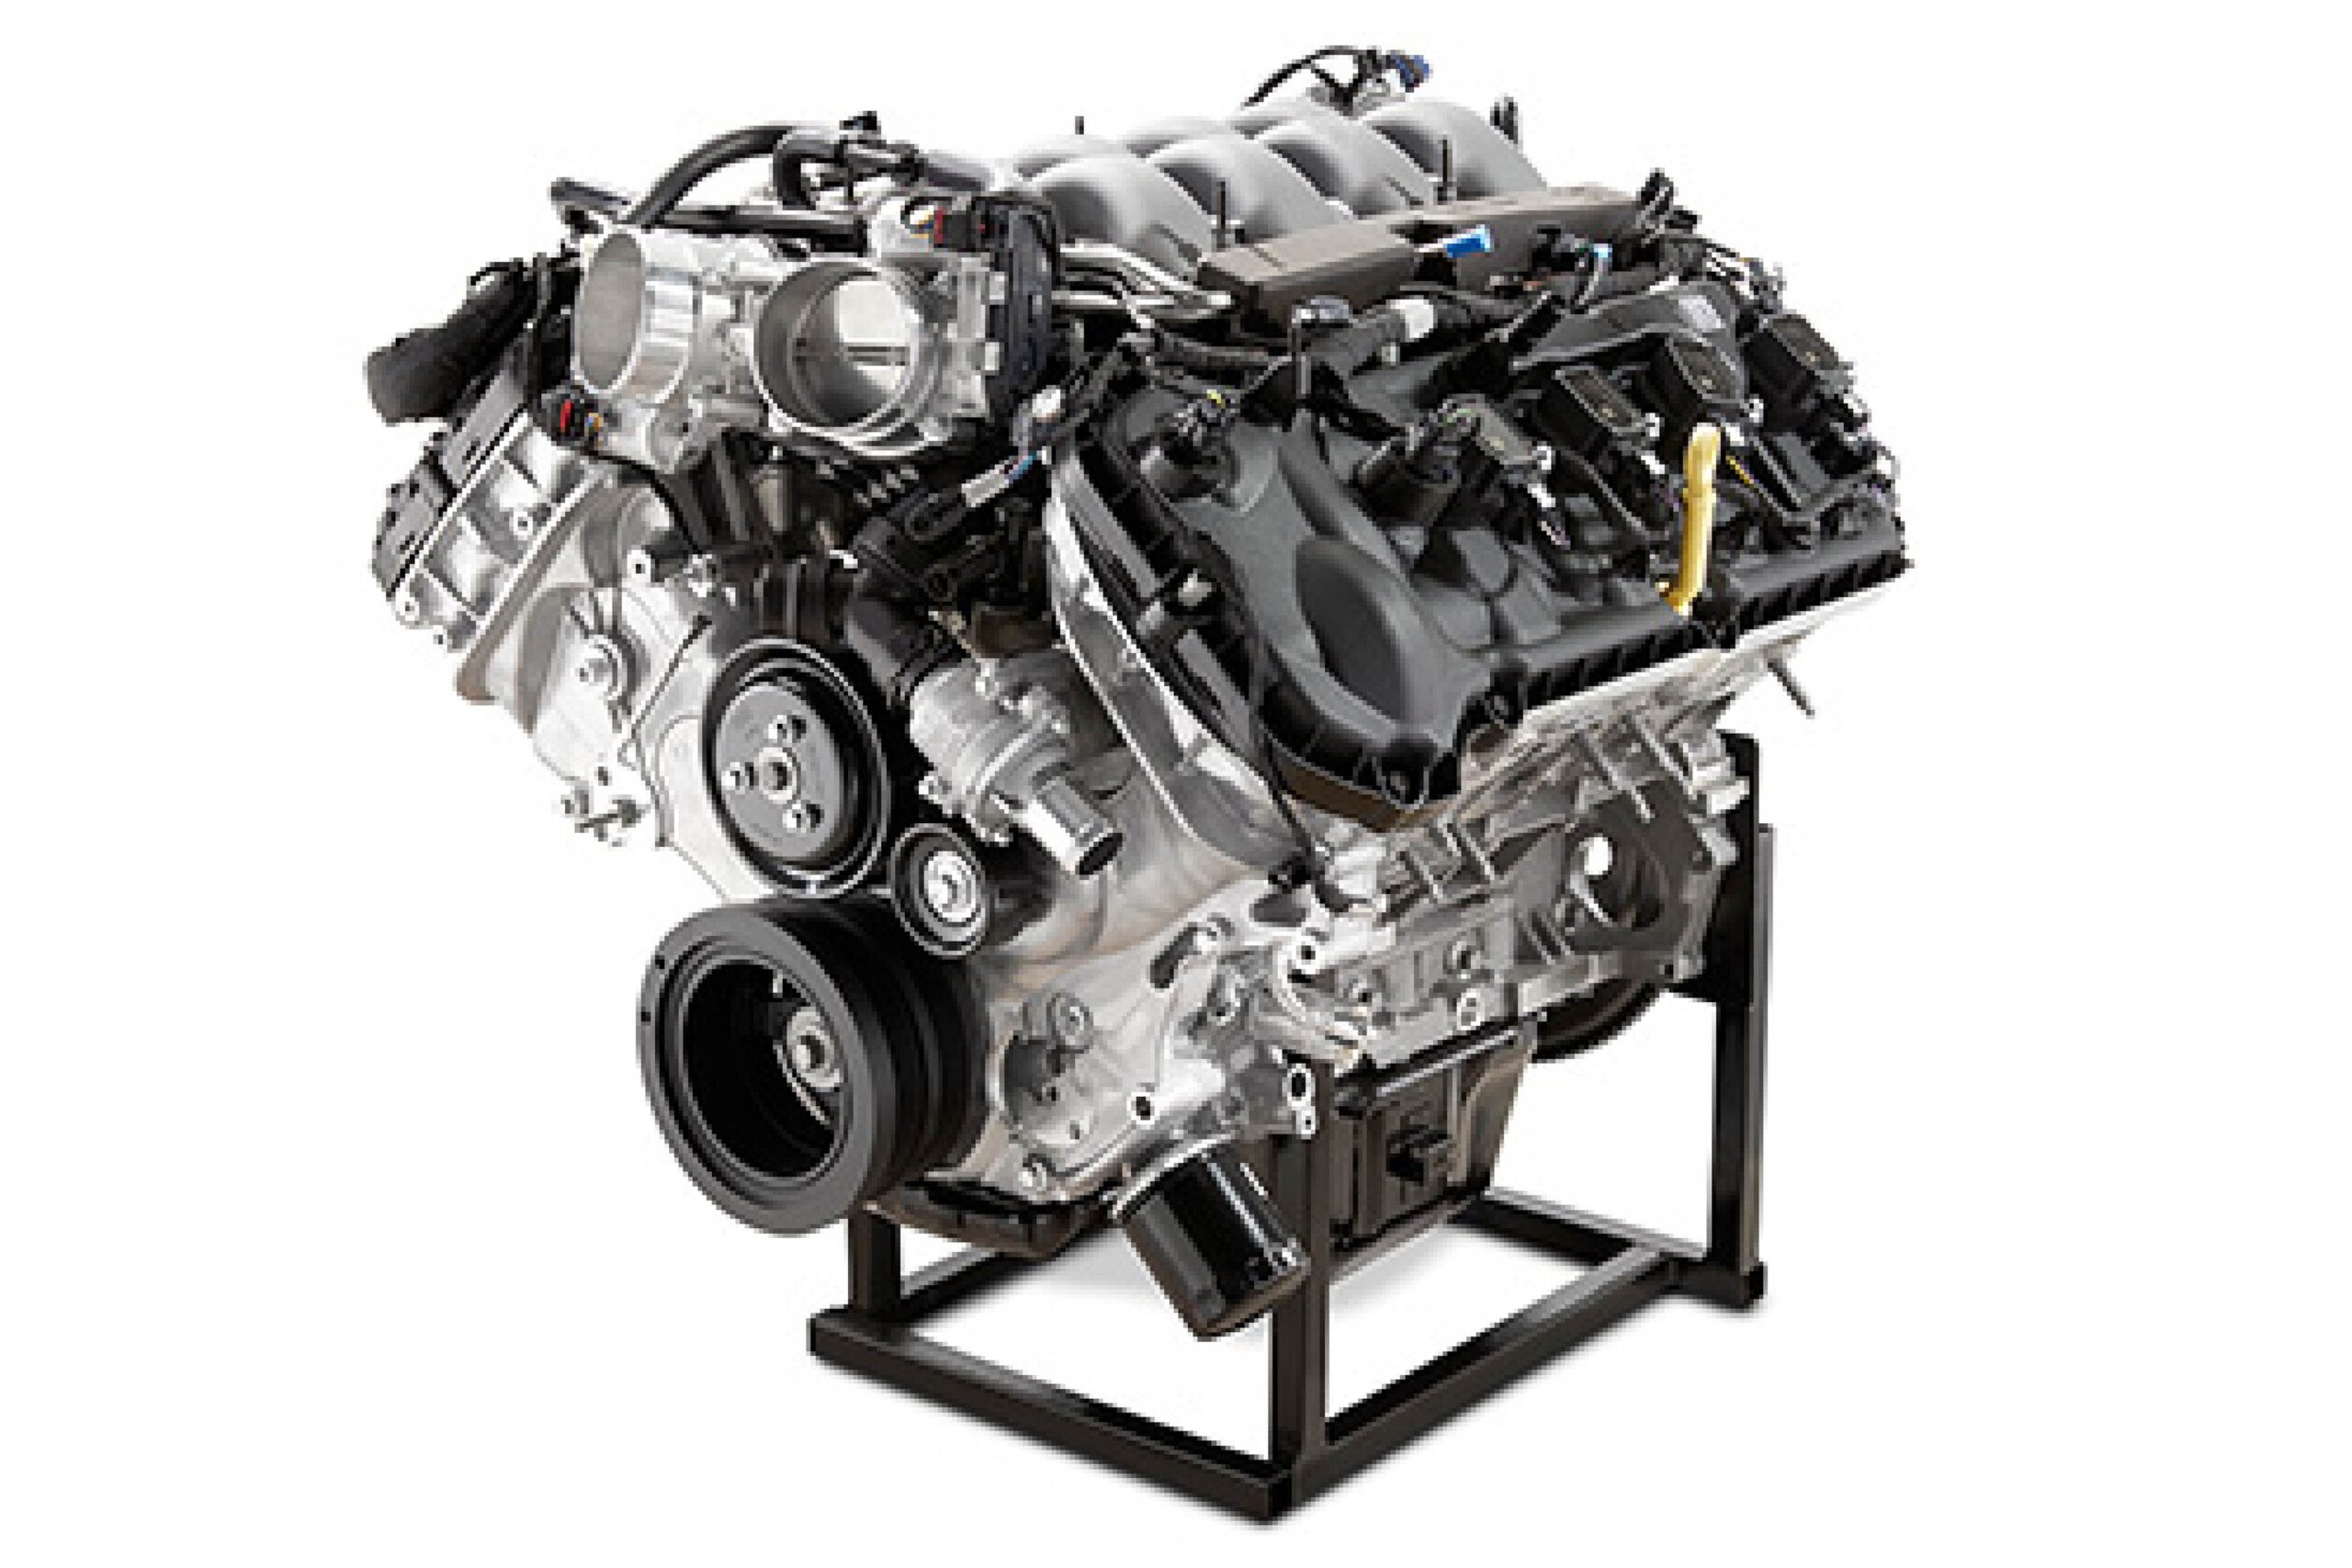
On the mechanical side, we have taken delivery of the entire powertrain. I know there will be purists that say Poncho power is all you need, but we decided to go a different direction on this build. It is true that a stroker kit, valvetrain upgrades, aluminum heads and intake with a quality carb or EFI setup will be make over 700 horsepower naturally aspirated using the factory 400 block. However, our intentions on this build were not to be quite so faithful for nostalgia’s sake. Instead, our goal is to win. We need the sort of reliability that will allow the car to run well on track with minimal changes despite dramatic elevation and atmospheric changes, to drive cross country if needed, and to withstand sustained as well as oscillating lateral g-Forces. For that reason we chose a dry sump Chevrolet Performance LT4 crate engine. And to back it up, we have a Chevrolet Performance T-56 Magnum 6-speed manual transmission and Silver Sport A-body conversion kit.
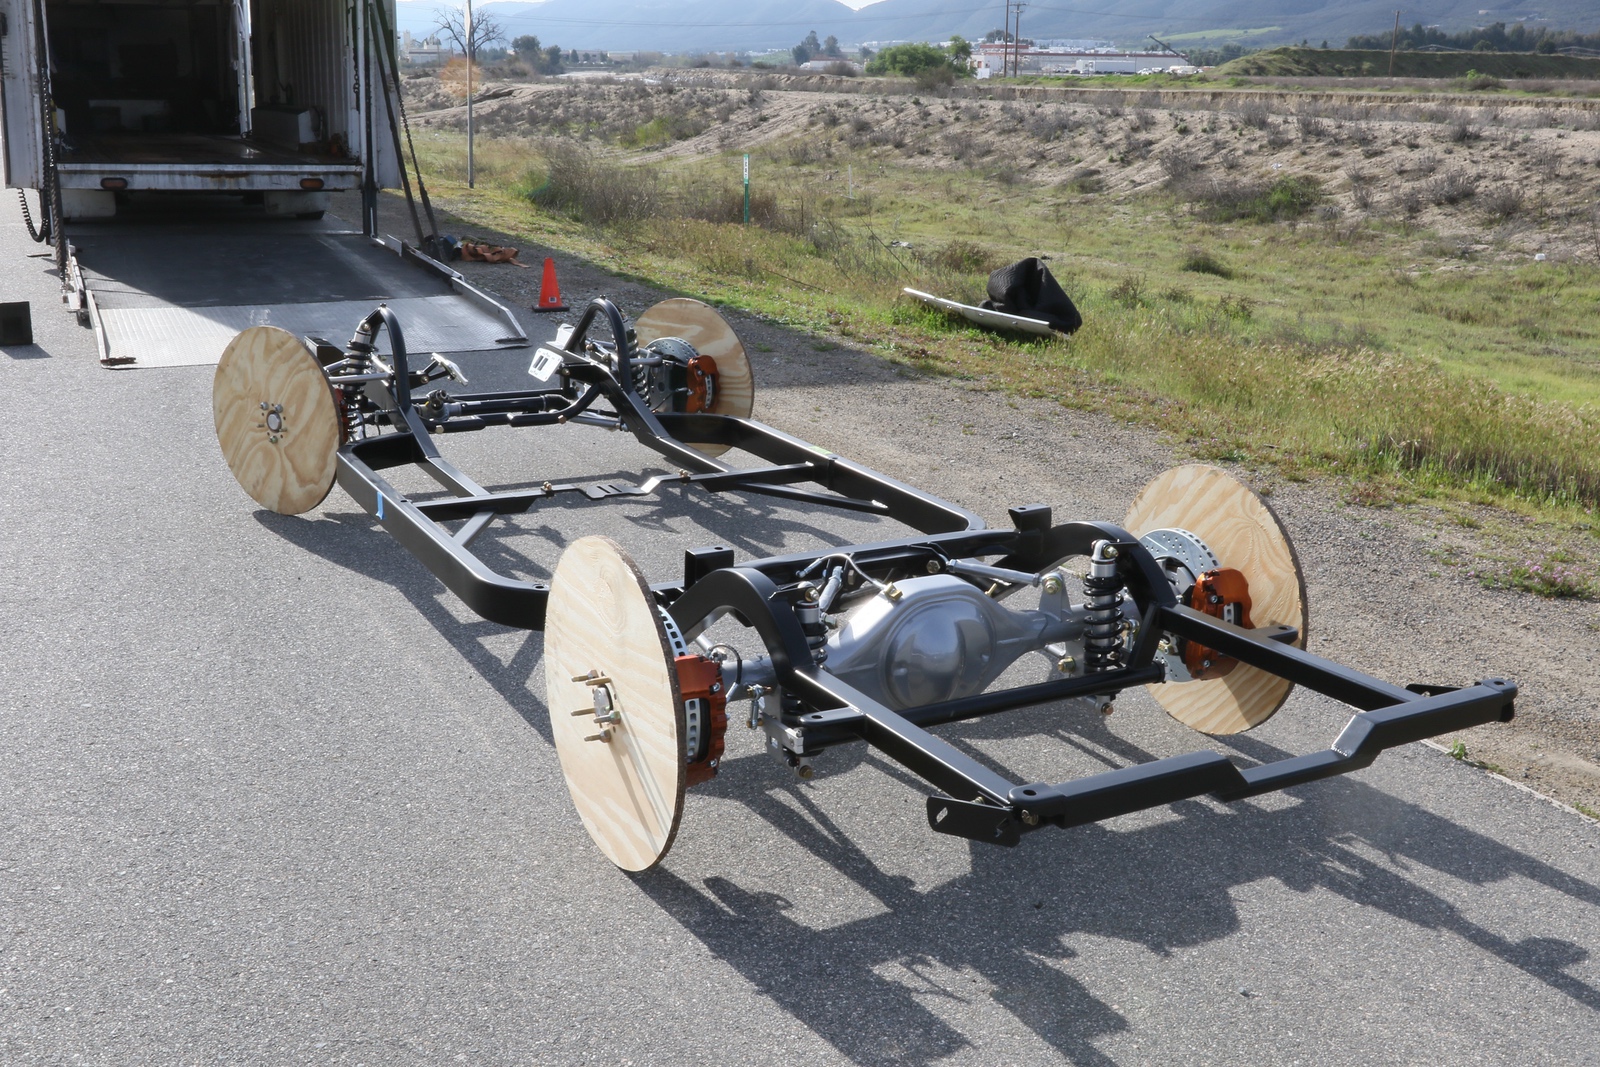
Not to take anything away from the 650 horsepower powerplant, but the key factor in making the larger A-body hang with some smaller and lighter setups on the autocross course is the chassis and suspension. I put a great deal of research into figuring out what was going to make this car the most competitive, and ultimately it was clear that we needed a whole chassis rather than some bolt-on suspension upgrades. This car had a rough life, so the stock chassis may not be in the best condition (though its measurements did checkout OK). Thankfully Schwartz Performance had us covered. I have been watching their Tempest run for years, so turning to some fellow Pontiac lovers seemed like a natural choice for the GTO. Since second-gen A-bodies come with a 4-ink and coil springs in the rear, the biggest benefits by going with an aftermarket chassis are rigidity and modern steering. Schwartz says its frame is torsionally 200% stiffer and weighs 125 pounds less than the stock chassis. Of course, we will have many other killer parts built into the Schwartz package including massive Baer brakes, Ridetech coilovers, and a Moser full-floating 9-inch. Oh, yes, we’ve come to play.
As I type this, Schwartz is finishing up the chassis to get it assembled and shipped off to PAM’s HQ where we’ll be doing most of the mechanical work on the GTO. Stay tuned for another update when the chassis arrives.