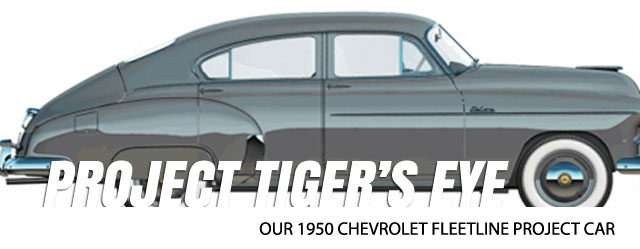
As a new editor of Rod Authority, Andrew Almazan took on Project Tiger’s Eye to gauge his own tenacity and determination in the face of a true challenge–resurrecting an iconic vehicle from the graveyard. Almazan has transitioned to other roles as he moves up the corporate ladder but the project and challenge remains.
Picked up for $600 and protected only by the Arizona desert that filmed every nook and cranny Project Tiger’s Eye represents just that, the ferocity, passion, and determination that shade-tree builders and forefathers of kustom kulture exhibit when giving a car new life.
Project Tiger’s Eye is being built in vein of traditional 50’s kustoms and approached with the same subtle aesthetics that Japan’s kustom scene has mastered. The objective is to create a big-bodied cruiser that is both elegant and intimidating on the road.
The drivetrain and suspension are being updated with an AK-47 mentality; simple, streamlined, reliable, and hardy. The 350 small block will be completely rebuilt to bring her back to “0” and the suspension will be updated to handle prolonged daily driving conditions.
Project Tiger’s Eye is a build that honors the ingenuity and creative passion associated with the most respected individuals on this side of the automotive spectrum. It is our contribution to keeping alive the tradition of giving classics a second life.
Full Tech Articles By Segment
The Background, The Plan, And Where We’re At
GK Kit, Engine Machining, And Wheels
How To Assess A Used Engine Block And The Machining Process
Front Suspension And Tires Update
Electro Tech Coatings Powder Coating
TCI Engineering Helps Us Get New Lows
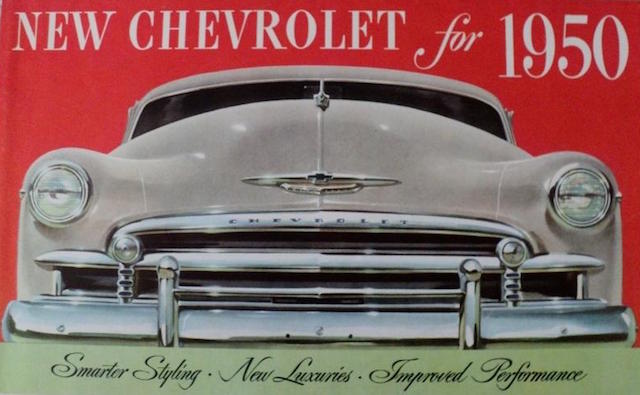
From 1949 through 1952, Chevrolet only offered the Fleetline in the fastback model. A car whose evolution had been interrupted by World War II, the Fleetline was never given the respect that it deserved during its production years. The fastback shape, with distinct sloping roof which extended through to the trunk lid, had a smoother profile and lower look than the sedans. The windshield of the fastbacks were actually one-inch shorter than standard sedans, which made it popular with the younger crowd.
The 1950 model came stock with an overhead-valve, 216.5 cubic-inch straight-six that produced 90hp at 3,300 rpm while breathing through a single-barrel Carter carburetor. A column-shifted three-speed synchromesh manual transmission was joined to complete the powertrain package.
A new powertrain option was available in 1950 which saw a heavy-duty 105hp, 235 cubic-inch straight-six, from the Chevy truck line, which was modified with hydraulic lifters and larger intake valves for duty as a passenger car. A relatively new style two-speed automatic transmission, the Powerglide transmission, was available for clutch-less driving at an affordable means. Obviously none of this was with our hulk when it was retrieved from the desert, so there is little way of knowing for certain which powertrain came with the beast originally.
The 1950 Fleetline was offered in both four-door and two-door models. The sleek looking Fleetline series have become highly collectable today with many turned into street rods. Most are packed with the common but very durable Chevrolet 350 small-block V8 and the TH350 or TH400 transmission.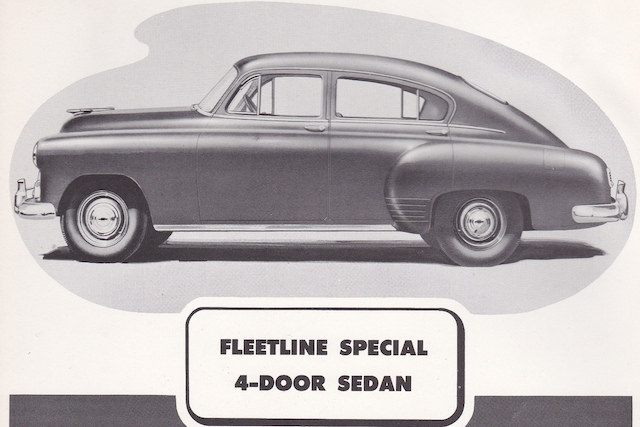
1950 Chevrolet Fleetline De Luxe Series 2100 Original Specs:
Model number: 2153
Body Style: four-door, six-passenger, five-window sedan
Layout: Front engine, Rear drive layout
Platform: “A” body
Engine: 216 ci, 90 hp, Inline six
Wheelbase: 115 inches
Length: 197 inches
Width: 74 inches
Curb Weight: 3,275 pounds
For build updates, newest to oldest, scroll down.
June 23, 2016: Building A Custom Driveline With JE Reel
Driveshafts are an often overlooked component in the build process, unless things don’t fit properly, then a problem of epic proportions exists. Knowing that we were changing the entire drivetrain from anything resembling the OE engine and rearend mounting locations, a custom driveshaft was already in the plan. We sought out the experts at JE Reel to help us take advantage of all the intricacies of driveshaft operation. It is not enough to have a driveshaft with the proper length. There are other considerations that make custom built driveshafts the best option when it comes to dollars per power. While it is true that a driveshaft can’t make horsepower, it can lose power to make a difference.

In a custom build, a custom-built driveshaft can be worth its weight in gold.
Jim Reel helped by explaining how to properly measure for a custom built driveshaft, how to select the correct end attachments for the application, pinion angles and RPM loads. All of this information translates into driveshaft tube diameter, mounting, and balancing for the end result. Ideally a custom driveshaft will have the strength to support the power and torque being supplied to it, and will have the alignment to live a long, trouble-free life. The full article on building a custom driveline can be found here: Building A Custom Driveline With JE Reel.
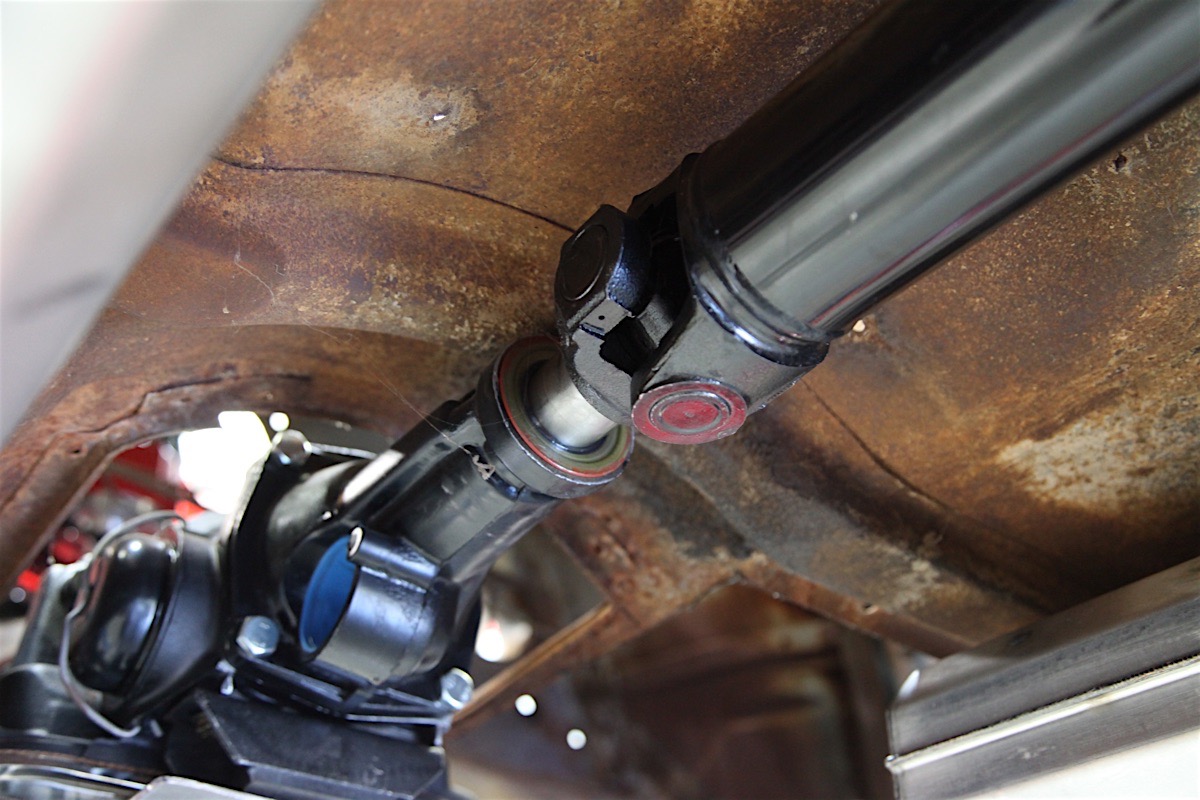
There is an art form in selecting the right diameter tube, correct end attachments, and balancing a driveshaft.
March 18, 2016: A Freshly-Built 383 Cubic-Inch Stroker
Our project car was looking for a new heartbeat and keeping the components in the same family was important to us. So we selected the legendary Gen I small-block Chevy for its bullet proof reliability as well as its plentiful aftermarket support. For a vehicle that we plan on taking out on frequent road trips, cruises, and long drives, the SBC is an easy choice to make. We hauled a rebuildable block to L & R Machining and started the rebuild process. Using components like the rotating assembly from Scat Enterprises, Lunati Voodoo camshaft, Edelbrock Performer RPM cylinder heads, and an Edelbrock Performer intake manifold topped with their 650 cfm Thunder-series carb.
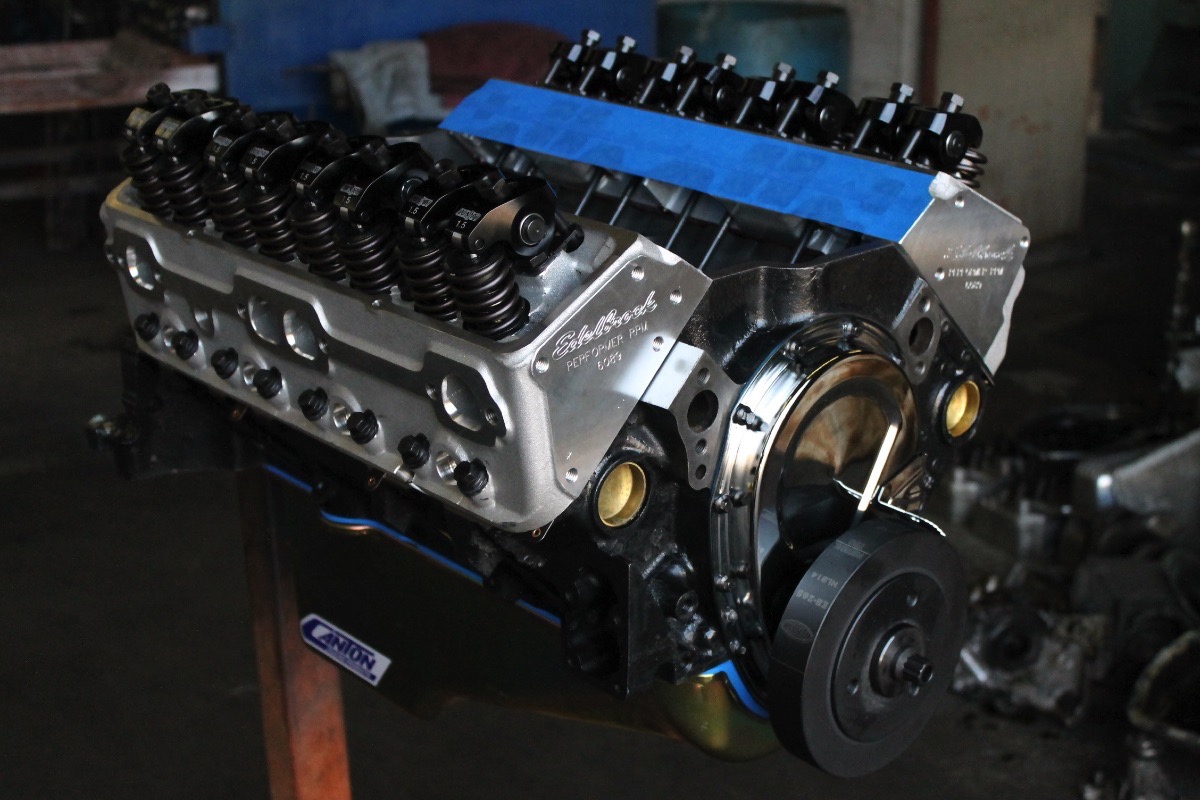
We were looking to add some modern power but keep the reliability of the bowtie heritage with a new engine. We opted to go the stroker route with a Gen I SBC 383 stroker build. It doesn’t get any better than this for cruise nights.
There are a couple of different methods for building a 383 stroker engine. One method calls for a normal spec crankshaft with a longer connecting rod and the other calls for a long throw crankshaft with a normal sized connecting rod. Both options lengthen the stroke but our chosen method in this build was with the long throw stroker crankshaft. Fortunately we had skilled machinists on hand to help clearance the engine block for the bigger crankshaft. Longer connecting rods also require different pistons, which we found in the SpeedPro line.


We loaded up with some serious internals like Scat crankshaft and SpeedPro pistions.
Using ARP hardware throughout the build, the crew continued to bolt together our stroker. There is no replacement for displacement, and we were dying to get the mill mounted for a cruise down the coast. We still needed to get the rest of our drivetrain together before the hulk could get finally get on the road. Stay tuned as work on finding the right driveshaft to get the whole works bolted together and drivable. Read the full story on our 383 stroker build here: Finding The Stroke With A Freshly-Built 383 Stroker
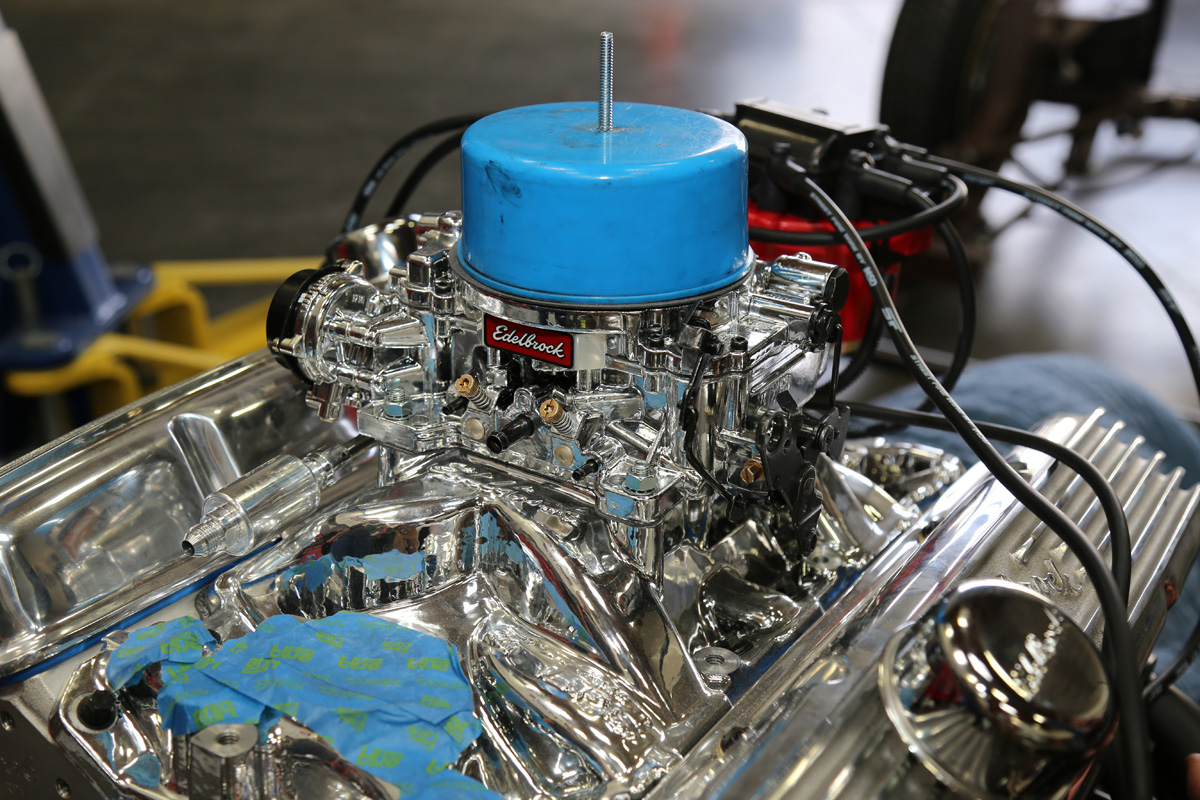
The Edelbrock top-end highlighted this build and makes it a pride of ownership thing when you lift the hood at the car show.
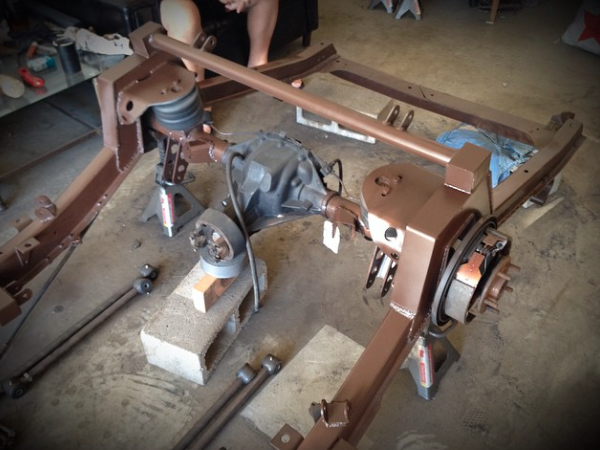
February 23, 2015: TCI Engineering Helps Tiger’s Eye Achieve New Lows
Establishing the perfect stance for your project is one of the most important details. In the case of Tiger’s Eye, we needed to achieve two things: an aggressively lowered ride height and turnkey height & spring rate adjustability. We reached out to our friends at Total Cost Involved Engineering in Ontario, California to help us achieve the stance that we were looking for.
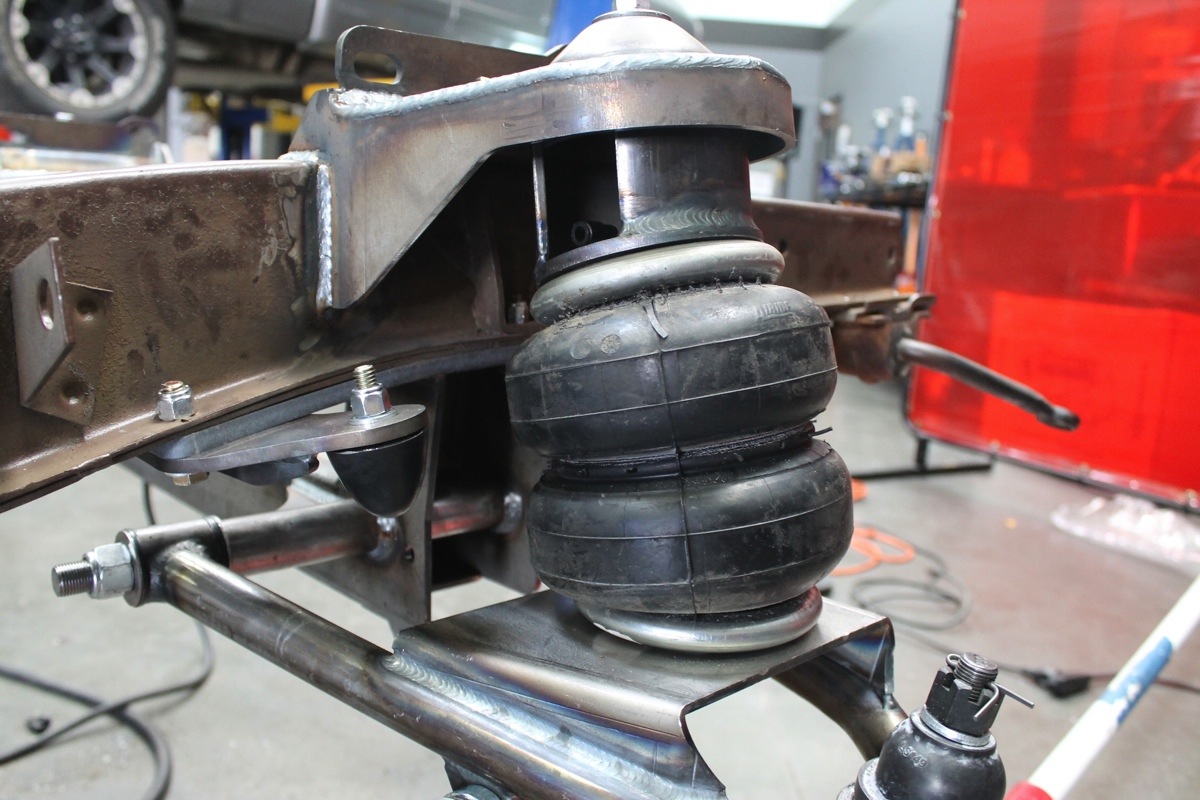
Selecting an airbag suspension was the best direction for our project build.
When you lower and commit your vehicle to a fixed ride height you sacrifice undercarriage clearance. Air suspension affords the driver the ability to increase ride height and seamlessly drop back down to a desired stance after besting the terrain, all with the flick of a switch. Turnkey adjustability is the second detail that lead us to choose airbag suspension over the traditional coil and leaf spring setup. TCI Engineering walked us through the process of selecting and installing an airbag suspension system.
With friends in low places, we were really on a roll.
The focus of this technical article was helped by Jason Wilcox at TCI Engineering when he explained, “We’ve spent a lot of time engineering our IFS packages to create a setup that addresses three important details: lowering center of gravity, decreasing body roll, and increasing handling.” When you improve all three of those elements, you have improved your project car to superstar status. The full tech article can be viewed at: TCI Engineering Helps Tiger’s Eye Achieve New Lows.
When it comes to coatings, the devil is in the details.
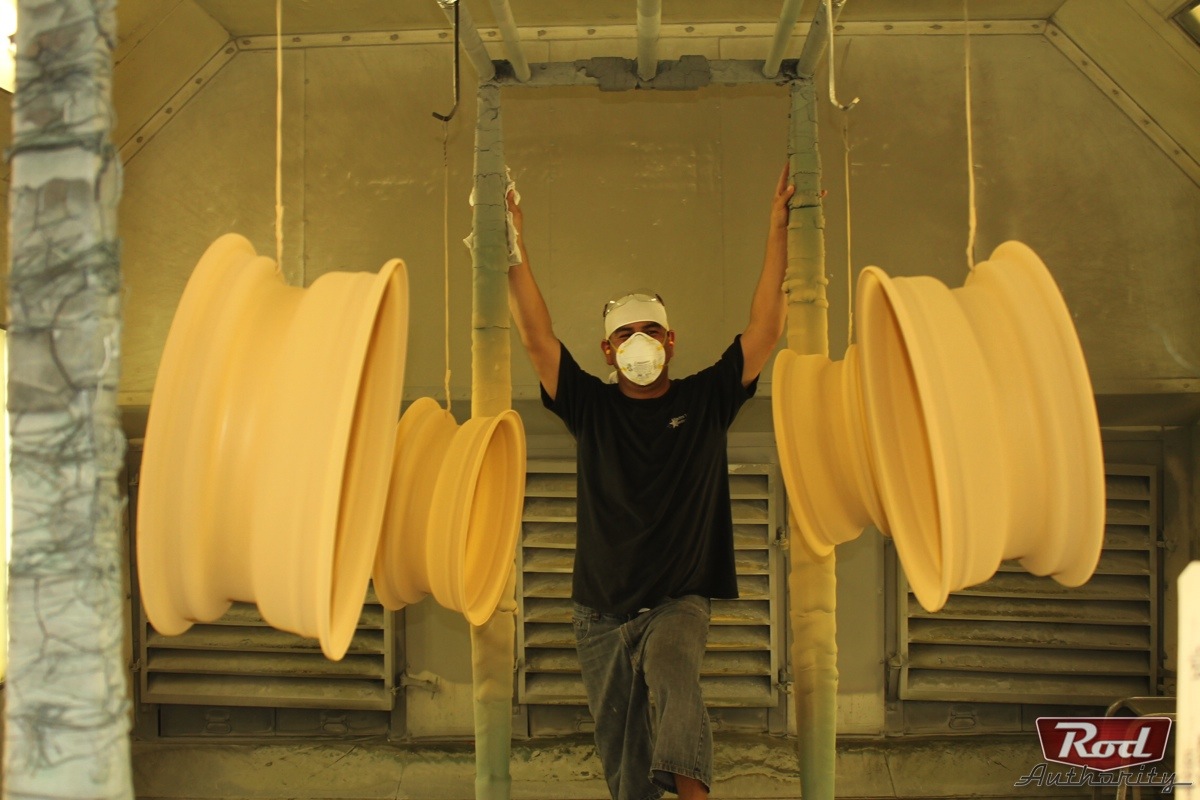
December 10, 2014: Electro Tech Coatings Powder Coating Walkthrough
We were given the opportunity to document the powder coating process from start to finish in a single day at Electro Tech Coatings in San Marcos, California. Starting in the sand-blasting booth, the crew at Electro Tech Coatings walked us through the first baking, the powder coating, the second baking, right through cooling and packing. While it may not sound like much, the devil is in the details, and each stage of the process captured the attention to detail that the best coating companies achieve. The full technical article and frequently asked questions can be found here: Electro Tech Coatings Powder Coating Walkthrough.
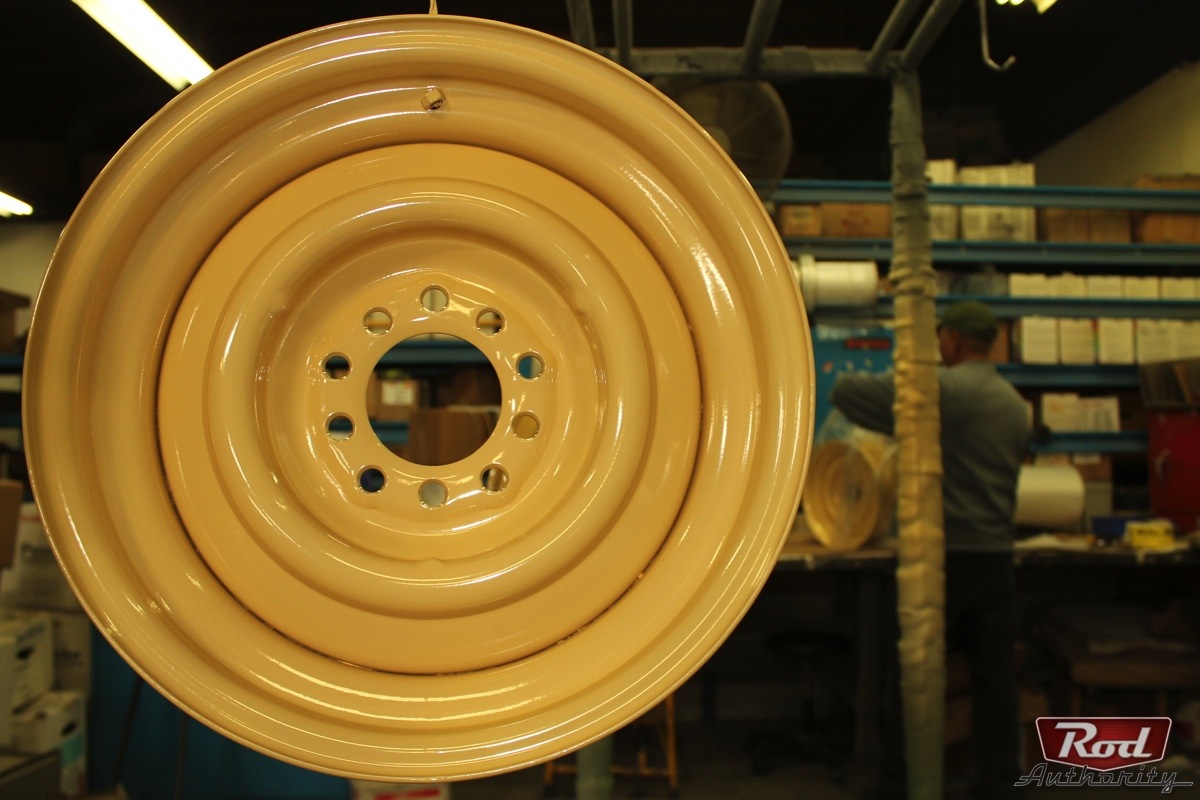
The finished product was something that everyone in the process can be proud of.
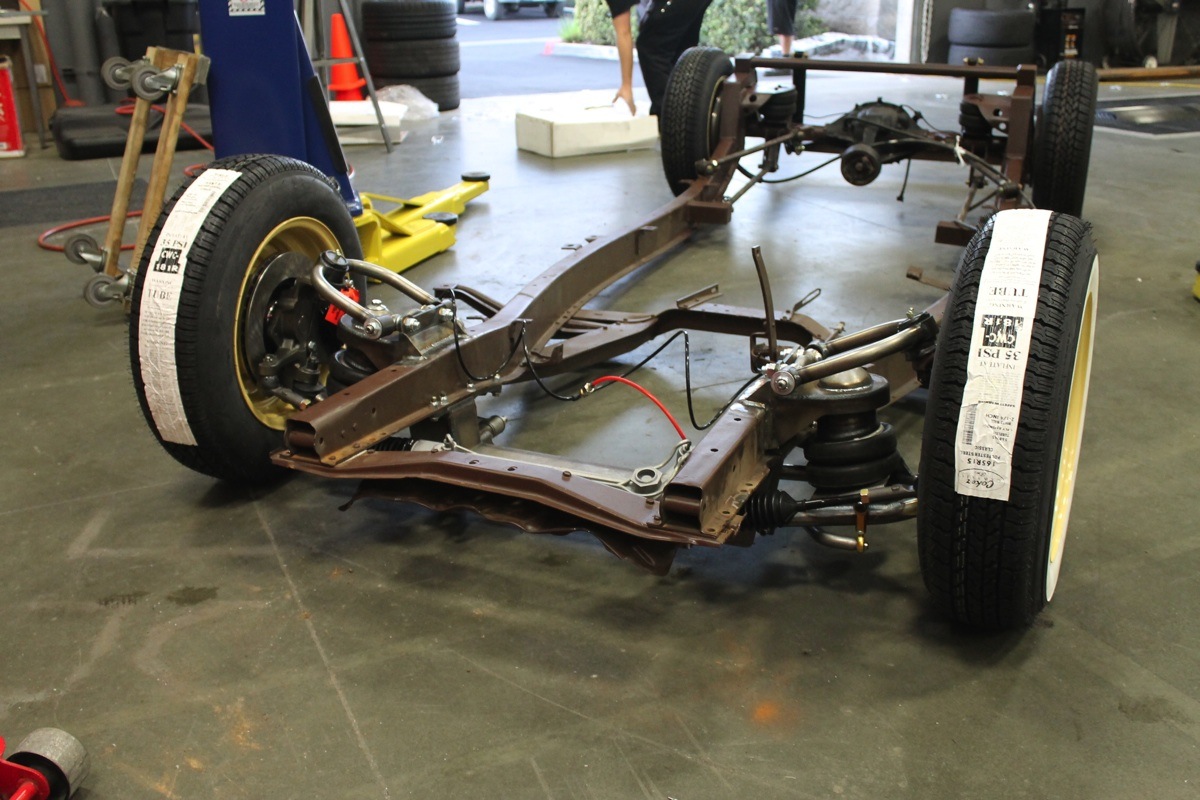
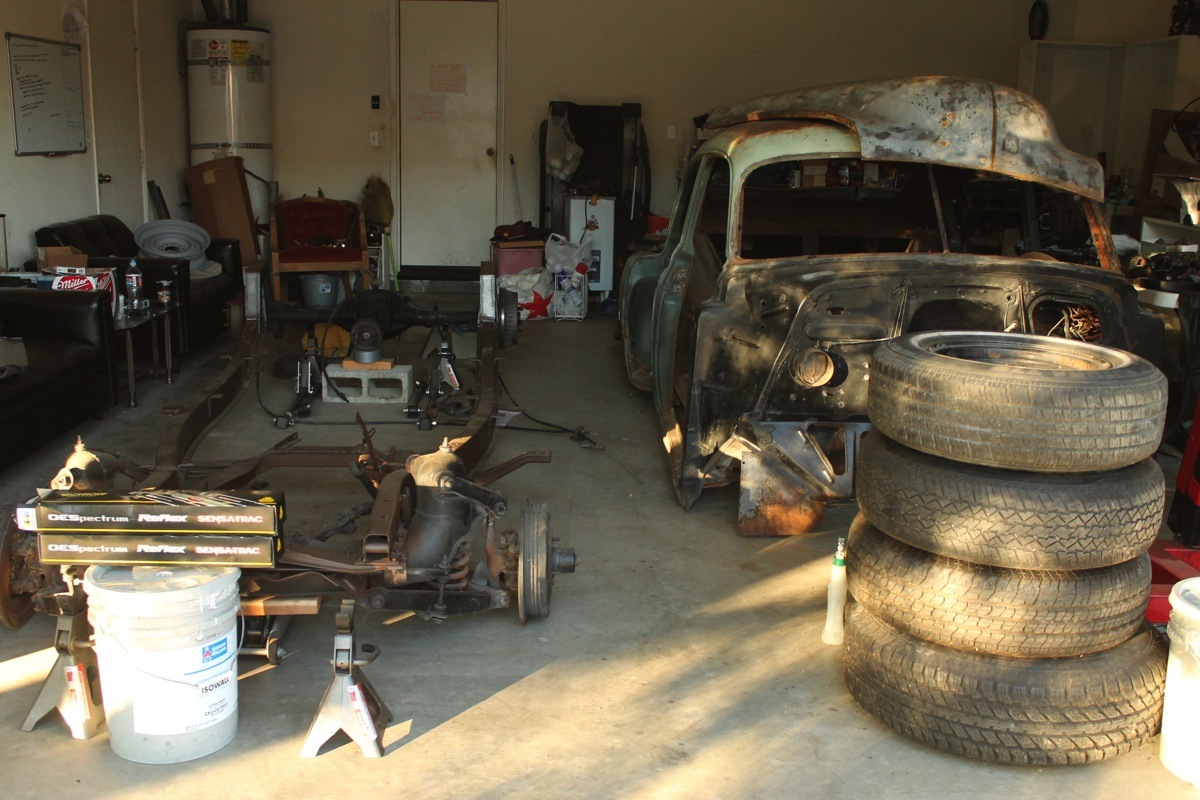
November 22, 2014: Project Tiger’s Eye Update: Front Suspension & Tires Ready To Roll
Things were really on a roll as we installed our new rear suspension setup courtesy of Gambino Kustoms’ Taildragger Kit. The project car’s wheels were off being powder coated courtesy of Electro Tech Coatings out of San Marcos, California, and our 350ci had been bored. .030-inch over so that we could bring the overall displacement up to 383ci upon assembly.
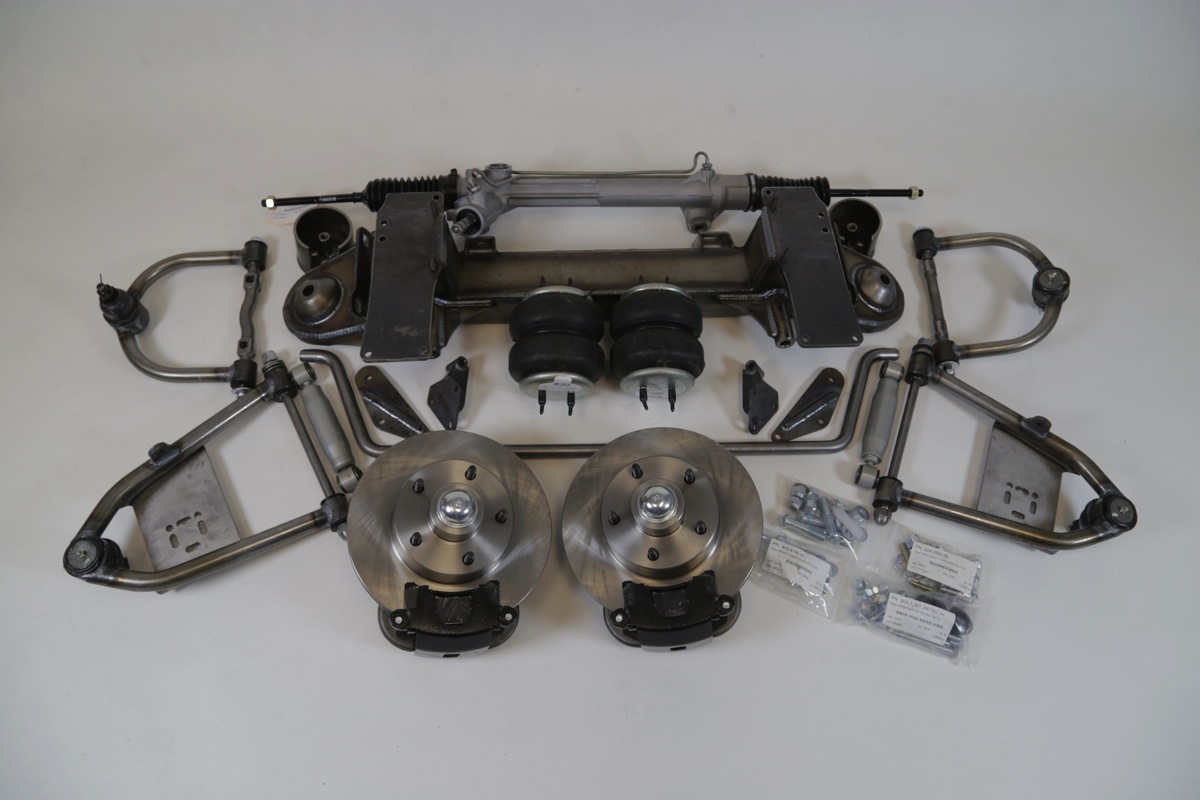
We were getting ready to install the front suspension as we completed the rear with wheels and tires.
Rounding out our latest update, we ordered a set of Coker Classic Nostalgia Radial Tires off of Summit Racing. These tires (PN: 568745) feature a radial construction with a thin 165R15 profile. The whitewall is 2.25-inches wide–we wanted a set of economy tires to run while we were completing the build that still had a nice amount of flare. The progress update was documented in this brief article: Project Tiger’s Eye Update: Front Suspension & Tires Ready To Roll.
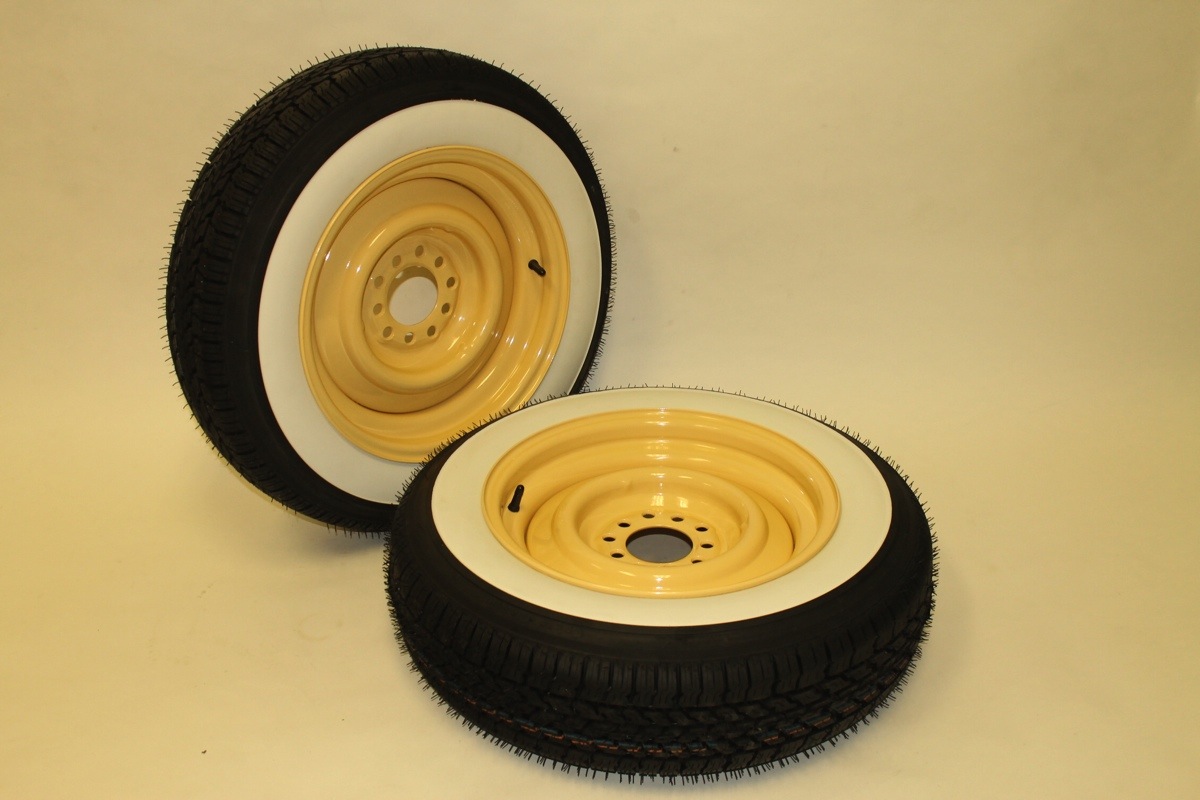
The Coker Classic Whitewall Radials gave us the exact look we were after and our powder coated smoothies topped off a great set of upgrades.
October 28, 2014: How To Assess A Used Engine Block And Step-By-Step Machining Process
We reached out to the techs at L&R Engines located in Santa Fe Springs, California to help us get the job done. Derek Ranney, second generation owner and operator of the family-owned business, gave us a closeup view of his facility’s testing and machining processes. Derek gave us some guidelines and tips on the processes and offered insight on some questions that you might have when sourcing a used engine.
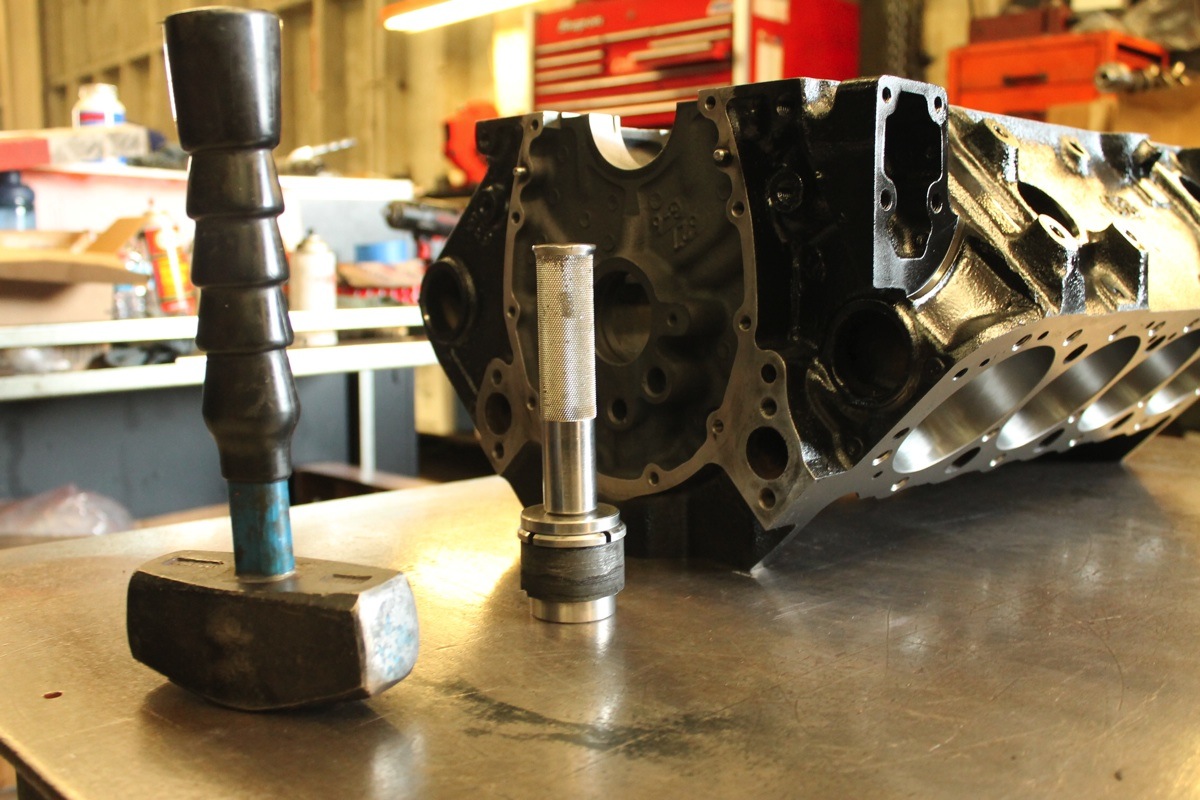
Derek Ranney of L & R Engines, walked us through the process of evaluating a block and machining it for re-use.
Our process was documented in the essential steps to assess and properly machine a block for use. From hot tanking, magna fluxing, through the boring and honing process, we covered it all. The full tech article, all the way to installing the block plugs, can be researched in this tech article: How To Assess A Used Engine Block And Step-By-Step Machining Process.
October 24, 2014: GK Kit, Engine Machining, And Wheels
At this point we have finished the installation of Gambino Kustoms’ Taildragger kit, welded on our four-link brackets, shock mounts, and air bag plates, and coated with a coat of Kona Brown paint to give our setup a bit of protection against the atmosphere. We had arranged the engine machining of our small-block and started to work with our wheels. The quick brief on our latest status at that time was documented in this article: Project Tiger’s Eye Update: GK Kit, Engine Machining, And Wheels.
August 24, 2014: The Background, The Plan, And Where We’re At
A routine trip to the barber shop turned into a not-so-routine trip to Escondido, California in search of the perfect project car. The ’50 Fleetline was in pretty bad shape but we’d seen worse. It was definitely weathered and exactly what we were searching for.
Like every other hot rodder, we are coordinating this build from a home garage.
The plan was to go with style over performance, which meant the physical flare, soul, and design aesthetic will highlight the build. In terms of drivetrain and suspension, the keynote of those components is stout-reliability over smoking the competition. A motor and transmission combination that can handle long distance cruises to Las Vegas, or running the span of Route 66 is what will determine what drivetrain we would use. The suspension would need to brace against the variant road conditions that cross-country and state-to-state travel would present.
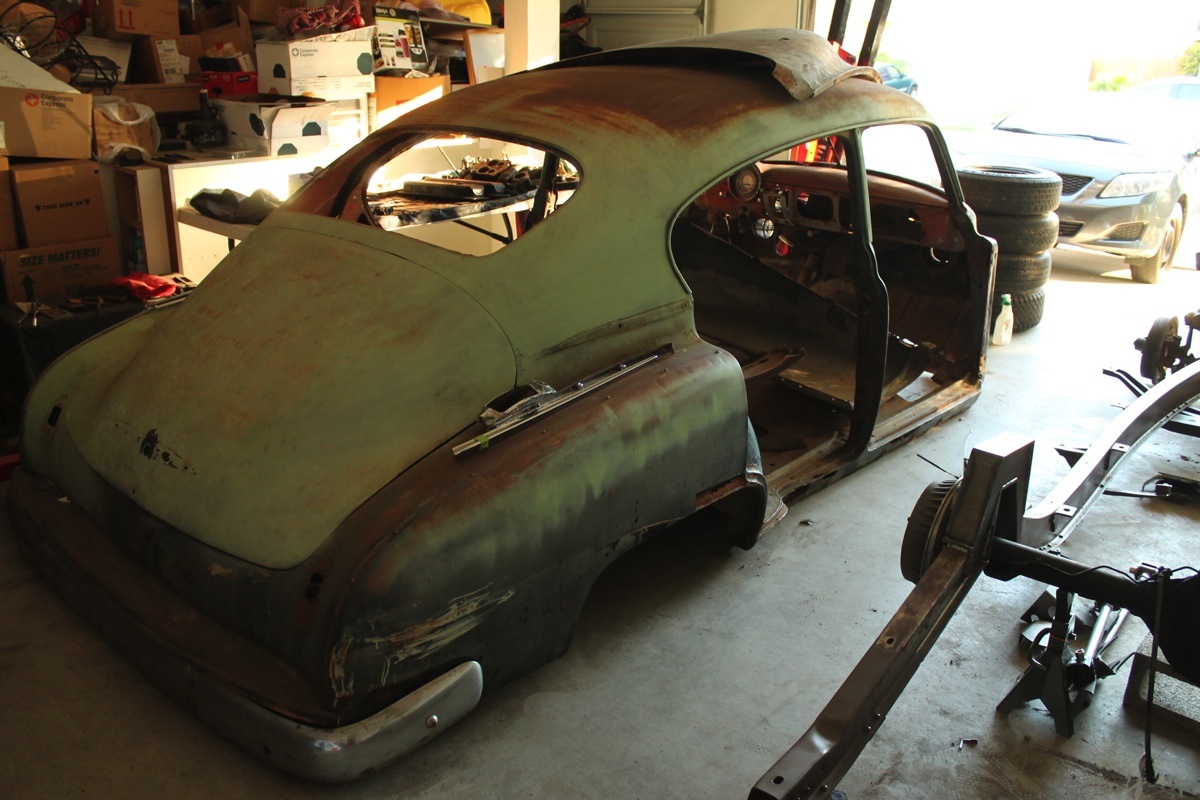
A four-door fastback gives way to style over flat out performance. Exactly what we were looking for.
Knowing that project plans change during the course of a build, there are some aspects that we are pretty committed to. Set in stone is 15-inch smoothies with baby moon caps and trim rings painted cream, or camel will off-set a Spruce Mica paint job. Spruce Mica is a 2014 Toyota color which features a dark forest green highlighted by gold pearl when the sun hits it.
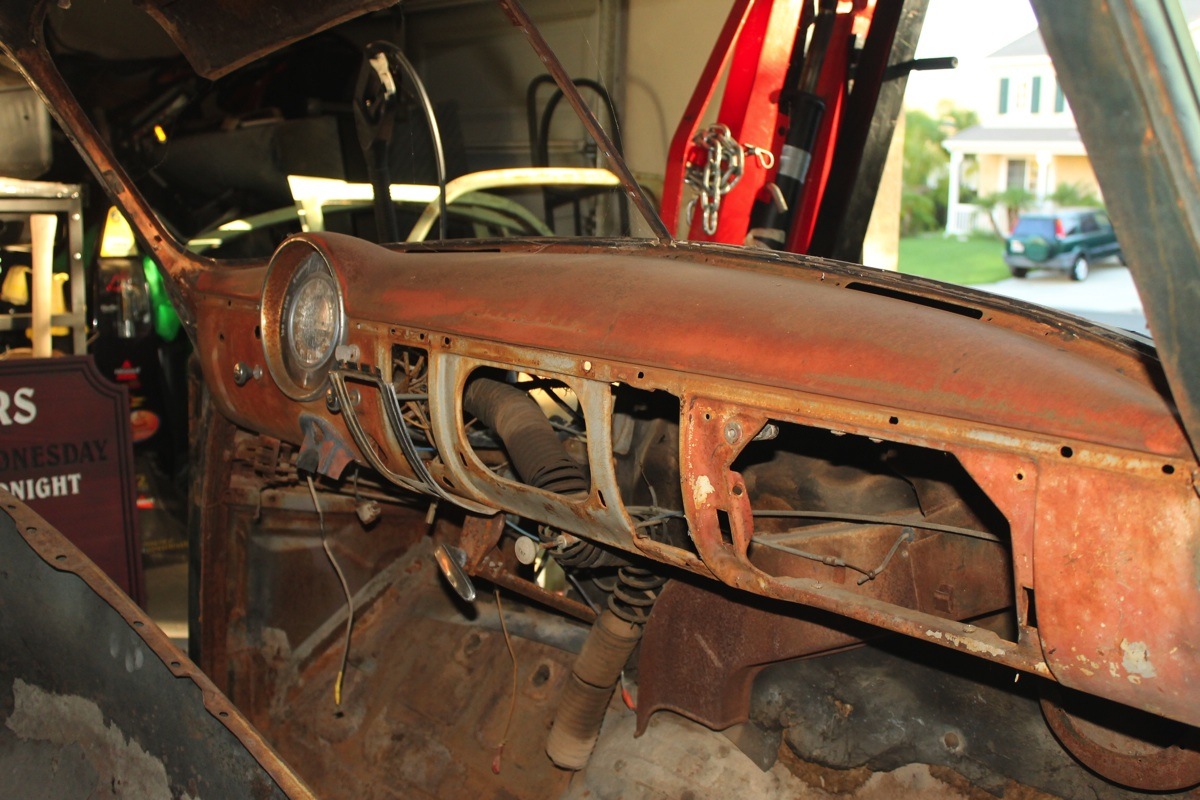
We’ve seen worse, but this old Fleetline was definitely weathered.
Lake pipes will run right under the rocker panels and help give the kustom a lower look. The stock taillights will be swapped out with 1949 Oldsmobile 88 taillights and the headlights will be frenched. The front end of the car will feature a decked out assembly; amber fog lights mounted to the bumper panel and the OE grille outfitted with a set of nine ’53 Bel Air teeth will give the front a more aggressive look. To top that off, the addition of a truck-style Fulton visor and functional spotlights will round out what will be a truly visual front end. The full plan for our project car can be viewed here: The Background, The Plan, And Where We’re At.