Delivering large horsepower gains has been a hallmark of ProCharger’s legacy; from the company’s enormously successful lineup of racing superchargers on down to its smaller street units, the 30-year track record of racing success, and powerful street performance speaks for itself. So when we had the opportunity to utilize one of its latest Stage II supercharger kits (PN 1FW611-SCI) on this 2020 Mustang using the company’s renowned P-1X supercharger, we jumped at the chance.
There are two part numbers available for the 2018-’20 Mustang. The HO Intercooled system (PN 1FW611-SCI) uses the factory airbox and the buyer’s choice of either the P-1SC-1 or P-1X supercharger (plus the cost difference, of course) to deliver 55 to 60-percent more horsepower than the stock engine with 6.5 psi boost pressure. The Stage II Intercooled systems (PN 1FW613-SCI) offer the same choice of supercharger and are spec’d for 8.5 psi of boost.
The simplicity of this system is one of its greatest reasons to appeal to the enthusiast. We especially appreciate the carbon fiber inlet tube to improve the underhood appearance. It really can be installed in a home garage over a weekend. Grab a buddy and get to work!
As delivered, these systems feature C.A.R.B. EO# D-365-21, which means that they are 100-percent street-legal in all 50 states, which is a huge win for our California friends who must contend with the long arm of the law whenever they are considering vehicle mods. To retain the C.A.R.B. (California Air Resources Board) certification, one of these part numbers must be used as they retain the factory airbox.
ProCharger also offers a list of options based on its interactions with enthusiasts to give them ways to customize the supercharger system for their vehicle and taste. There are three different options for the head unit finish: Satin, polished, or texture black. The traditional straight-cut gearset that features the signature ProCharger sound is standard equipment in each configuration, but for those users looking for a stealthy installation, a helical gearset upgrade is available. Stage I purchasers can also choose to order the Stage II intercooler — especially if they live in a warm climate where heat soak can be a concern.

The stealthy appearance of the P-1X in its Texture Black finish lends itself well to the dark appearance under the hood of the Gen 3 S550 Mustang. The P-1X supercharger is one of ProCharger’s most robust units and regularly punches above its weight in racing scenarios.
One of the great things about the 2018-’21 Mustang is the direct fuel injection system; it allows for massive power gains to be made without stretching the engine’s durability, and ProCharger has exploited those capabilities with these C.A.R.B.-certified supercharger systems. ProCharger’s engineers developed the system to use the factory airbox, a critical component for the C.A.R.B. certification process to go smoothly.
Erik Radzins, communications director at ProCharger, says, “ProCharger has been committed to making C.A.R.B.-compliant systems for years, and thankfully the large handful of our product offerings in the Ford, Dodge, and GM markets are all certified. Between our engineering team and the calibrations team, I am pleased that we have a really smooth process for E.O. testing these days. We knew the Mustang would be a slam dunk because it’s such a massive power gain to be added legally. With 93 octane, you are talking 300 extra fully-legal horsepower over the stock engine… how cool is that?”
The Mustang sat in mostly stock form, with only a Holley Intech cold air intake underhood before we subjected it to the boosted treatment.
Easy To Install
One of the hallmarks of this system is its ease of installation. After a quick dyno session to establish a baseline, we spent one solid weekend in the garage and emerged with a newly supercharged Gen 3 Coyote-powered Mustang.
In fact, ProCharger touts the fact that the system can be installed with a simple set of hand tools: a 3/8-inch ratchet, quarter-inch ratchet, sockets, hex bit set, Torx bit set, a 3/8 extension, pliers, screwdrivers, and open-end wrenches along with a cutting tool of some sort to trim the radiator surround and cover. None of these are out of the ordinary for a typical hot-rodder’s garage, but if you are going to install this system and don’t have these tools, it’s a small investment to make for the thousands of miles of smiles you’ll get in return.
The throttle body adapter shifts the orientation by 180 degrees for clearance purposes, since the head unit is not in the traditional driver’s side location.
This car wears the P-1X in Stage II configuration, which is the most aggressive version of the 50-state-legal kit offered by ProCharger — complete with a straight-cut gearset for the legendary ProCharger whine.
“The P-1X is good for about 10-15 free horsepower [over the P-1SC-1] at the power level this customer is seeing on 91 octane. However, if a person decides to turn up the P-1X that’s when the gap starts to get even wider. Let’s be honest, the P-1X is now running in the 4-second zone on 235s in the DXP class!” says Radzins.
Installing the supercharger to the main bracket is simple. It may be helpful to have a second pair of hands to help mount the main bracket to the sub bracket on the engine since you have to place the bolts through the main bracket and standoffs to screw them into the sub bracket.
Engine bay preparation for the supercharger is mostly limited to removing the stock items that are in the way of access to the supercharger mounting position. The cosmetic engine cover and air intake system come out, and then the vehicle undertray and front fascia are removed. ProCharger’s full-color installation manual walks you through the entire process.

The bracket system mounts to the passenger side of the timing cover/cylinder head area.
Remove the coolant hoses, coolant reservoir, and throttle body, then install the throttle body spacer. This item provides the ability to rotate the throttle body 180 degrees from its original position for added clearance.
This area of the fan shroud (in front of the inlet) needs to be clearanced for the inlet to fit properly. The radiator cover also needs to be trimmed, so take your time to make sure it's nice and clean when you're finished.
Then it’s time to get busy with the installation of the supercharger sub bracket and main bracket with the head unit. With the bracket and head unit in place, the belt is replaced, and it’s time to drop the intercooler and supercharger tubing into place. The Stage II intercooler is ProCharger’s big-dog unit for this application, and once the radiator is shifted using the included brackets — and the horns are relocated — the unit is set behind the bumper, adjusted as high and forward as possible, then bolted into place.
Move the radiator using the supplied brackets, set up the new fabricated ProCharger coolant reservoir with the fittings oriented correctly, and relocate the harness above the bumper to give the intercooler the clearance it needs.
Our installer says the most difficult part was trimming every rubber coupler to ensure a nice tight fit with no tubes touching anything else in the vehicle, which can and will cause false knock and reduced power. After the tubing is sorted out, the cooling system reservoir and surge valve system are installed, then the steps of sorting out the PCV system are finalized. After the carbon fiber inlet tube is set into place using the factory airbox, it’s time to move on to the last few steps of installation.
The finished engine bay is stunning, yet looks OEM, and is worthy of the massive power improvement realized by the installation of this ProCharger P-1X system.
Ancillary Items
Minimal aftermarket upgrades were performed for the dyno testing at the completion of the installation. In fact, just one item was used over and above the products delivered in the ProCharger box — an nGauge tuning device, which is no longer available. ProCharger currently includes its own tuning device but at the time of this install, the nGauge was still available.
We used the nGauge to upload the C.A.R.B.-spec ProCharger vehicle calibration, and the PowerMAX amps up the fuel pump output to ensure the port fuel injectors have the necessary supply of liquefied dinosaurs. JMS configured the PowerMAX for the application right out of the box, and they don’t recommend making any changes to the switches.
Tuning device installation is simple: it plugs into your OBD-II port to transfer tune files. At this time of this installation, the fuel pump booster was included with the kit, but it was determined that it wasn't necessary and is no longer part of the system. Our installed found a clean spot in the trunk to mount the JMS PowerMAX fuel pump booster and hooked it up per the instructions — it required a couple of wires to be spliced to the fuel pump driver module, and then others attached to the pressure switch mounted on the vacuum manifold as shown.
After refilling the cooling system and checking everything over to make sure hoses and wires are routed and secured correctly, the front bumper is reinstalled along with the engine cover.
On The Dyno
Before the supercharger installation, this car wore a Holley Intech cold air intake, a Flowmaster axle-back exhaust system, and a canned DiabloSport 91-octane tune. With these modifications the car put down 439.5 horsepower and 379.4 lb-ft of torque on the chassis dyno at Westech, respectable numbers considering the engine is rated at 480 horsepower and we’re sucking down junky 91-octane California fuel. It is also worth noting that a stock vehicle typically records somewhere around 400-410 rwhp.
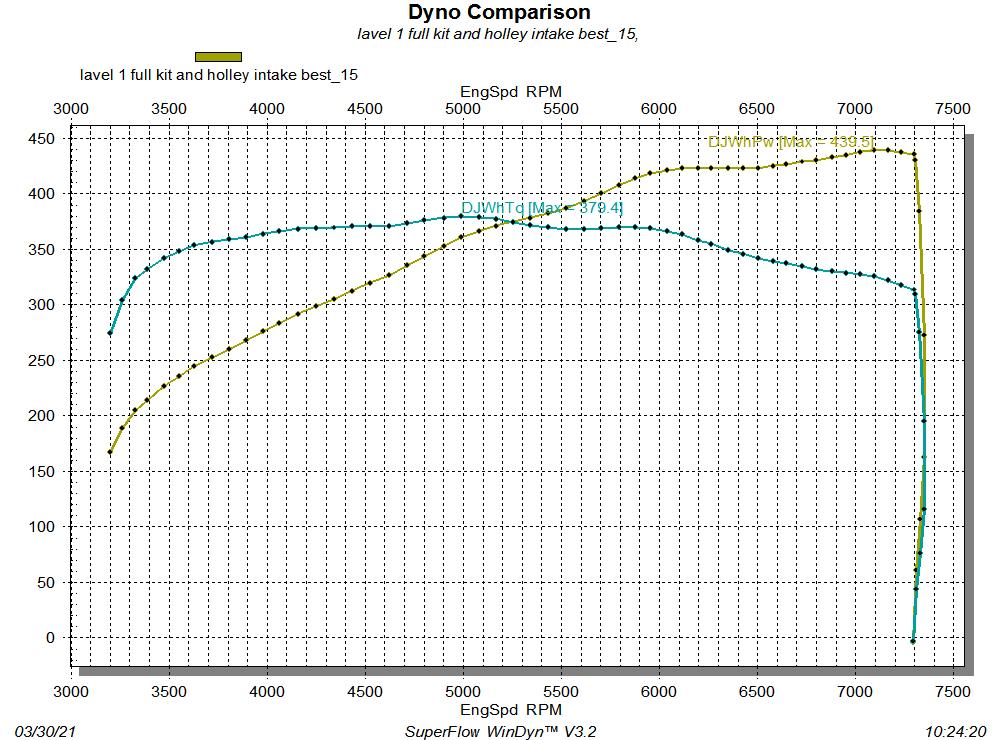
The dyno results prior to the installation showed 439.5 rwhp; certainly a strong number, but this car was in for a great awakening by the P-1X.
After the weekend-long supercharger installation, those numbers jump up to 621.3 rear-wheel horsepower and 486.4 lb-ft of torque. That equates to somewhere right around 750 at the crank and is a real-world gain of 181.8 horsepower and 104 lb-ft of torque — an impressive improvement, especially when we consider that this vehicle still passes California emissions and wears that coveted C.A.R.B. EO number that says it’s good-to-go in the eyes of the emissions police. If you’re starting with a stock vehicle you’d see gains of more than 200 rwhp with this system installed.


On the left we have the graph with the ProCharger 91 octane tune installed, and the results are satisfying. On the dyno at Westech, the Mustang produced 621.3 horsepower with a nice broad torque curve from 4,200 rpm on up through 6,500 rpm that peaks at 486.4 lb-ft — a super-fun power curve with the 10-speed automatic transmission. And on the right we have the dyno results without the airbox installed, as the car might be configured for track use. How does 646.4 horsepower and 512.9 lb-ft of torque grab ya? Those figures are quite impressive and hint at the true capability of the P-1X supercharger in competition scenarios.
“This system is literally the biggest bang for the buck or dollar-per-HP that someone can buy, and then easily bolt-on themselves in the garage — plus it’s full legal! It’s really a win-win-WIN situation. Also, I daily drive a 2017 Mustang with this exact C.A.R.B.-legal system, so I might know a thing or two about how much I love it,” says Radzins.
Worthy praise, indeed.