

Rod Authority’s project car, “Sucker Punch,” a 1954 Chevy Bel Air decked out in period kustom threads, has been a palette for all sorts of cosmetic and functional upgrades. When adding a new link to a build, the mechanical equilibrium can change quickly and present challenges, like the latest addition of a three deuce intake.
We jumped at the opportunity to not only swap out the distributor, but to also upgrade the entire ignition system with PerTronix.

Why Upgrade Your Ignition?
When you have a high-horsepower, tri-powered engine, getting the right amount of spark is critical to obtaining the highest level of performance and preventing detonation from occurring.
With today’s fuel and emissions standards, having a clean spark to efficiently burn all of your fuel is close to a necessity in this day and age.
Enter PerTronix
For our 1954 Chevrolet Bel Air, we swapped out the current electronic ignition and went with PerTronix, a leader in high-horsepower and high-RPM ignition components.
PerTronix has a wide range of ignition products that provide solutions and reliability. Its Digital HP Ignition Box, Flamethrower Billet Distributor, and Flamethrower HP 50,000-volt epoxy-filled E-core coil are geared toward those with big spark needs.
 Petronix Flamethrower HP 50,000-volt epoxy-filled E-core coil
PerTronix Digital HP
Think of the Digital HP like a Swiss watch of ignitions, improving the performance of everything from your cars-and-coffee crusader all the way up to serious race cars.

Among many features, the Digital HP provides a 187 Millijoule spark which packs more than enough to fire any engine. The built-in, three-step rev-limiter allows the user to have burnout and launch control, along with over-rev protection tuned anyway you like. The Digital HP also provides multi-spark function all the way to redline. The engine RPM can also be used to trigger output to control shift lights, solenoids, and other RPM-controlled devices.
The Digital HP is 70-percent smaller than the previous design. The reduced size makes it easy to mount in any location, preferably away from power-robbing heat sources and other things that can interfere with electrical pulses. Other key highlights include an RPM-triggered output, adjustable start retard, a locking automotive connector for easy install of the wiring harness, tachometer output lead, and onboard diagnostics and tach calibration — all in an ultra-small form factor.

To install the Digital HP you will need the following tools:
- Phillips Screwdriver
- Wrenches and Sockets
- Wire Cutters/Strippers
- Power Drill with a #20 Drill Bit
- Crimper (PerTronix T3001 Recommended)
Make sure you check out the PerTronix website to see the rest of the Digital HP’s features along with a great step-by-step installation video for the unit.
Step One: Choose a mounting location
Before starting the installation, disconnect the negative battery cable. Then, select a mounting location for the Digital HP where you’ll have easy access to see the LEDs, switch interface, and room for the wire harness attachment. PerTronix recommends the box is kept away from water and heat sources, aka exhaust.
Due to the Digital HP’s size, it can be mounted in locations other larger ignition systems cannot. The mounting location should also have enough room for the harness wires to reach the battery and other connection points. Note* The Digital HP needs to be wired directly to the battery with it’s own dedicated wiring. Typical installation locations include the firewall and inner fenderwell. We mounted ours on the firewall.
Next, place the box in the desired location and mark the mounting hole positions. The mounting hole pattern measures 3.5-inches long and 3.25-inches wide. Drill four pilot holes and use the provided sheet metal screws to fasten the box in place. Optionally, the unit can be mounted with the provided 8-32 machine screws and locking nuts.
Step Two: Attach the wire harness connector to the Digital HP
The Digital HP uses a locking automotive connector. Push the wiring harness connector into the box until it clicks, then push in the red lock to insure the connector is secure. To remove the connector, pull the red lock out, and press down on the black tab while pulling on the connector. Next, route the wires towards their ultimate connection points.

Make sure to keep the wires away from sharp edges, moving objects, and heat sources. Determine the appropriate length for each wire and cut the wire to length. Any unused wires should be coiled and taped out of the way. The most common terminals are provided to complete each connection; be sure to use a proper crimp tool to attach the terminals to the wires.

Step Three: Connect and Reattach
For most applications, the tach should be connected to the gray wire output from the Digital HP. This output is a 12-volt square-wave signal for smooth tach operation, even at the rev-limits. Using the gray wire also allows for other functions like rev-limit verifications on startup. Some OEM tachs will not function properly when connected to the gray wire. Tach wires should never be connected directly to the coil.

Next, install the tabs onto the coil terminals, connecting the black wire with white tracer to the positive terminal, and the unmarked black wire to the negative terminal. Determine the appropriate length for the unmarked red wire to the ignition switch wire or 12 Volt run switch
and the unmarked white wire to the distributor’s trigger wire. Cut, strip, and crimp the provided terminal to each and press fit the connectors together.
Lastly, route the two battery wires and cut them to length. Strip the ends of each – attach them to the large ring terminals, with the red wire going to the positive terminal. Being careful not to reverse the polarity, connect the black wire ring terminal to the negative battery terminal and secure it to the battery.

PerTronix Flamethrower Distributor
Moving to electronic ignition is one of the many steps you need to take when building a strong street mill. If this was a naturally aspirated engine, or a single carb intake the size of your distributor does not need to be on the forefront of your mind. But, supercharged applications, tri-power setups, or engine swaps that keep the engine tight to the firewall — well, size does matter.

The Flamethrower distributor supplied by PerTronix offers a smaller footprint, similar to your factory points distributor vs a larger HEI alternative, and its billet construction looks good to boot. The Flamethrower is a go-to when upgrading your muscle car applications and is plug n’ play. PerTronix even offers street/strip versions alongside full-race applications.
Another benefit to upgrading those pesky points or other aftermarket distributors, the PerTronix Flamethrower distributor maintains peak energy throughout the entire RPM range, reducing misfires while improving engine performance, all while meeting even the strictest California emissions.
For a street-driven muscle car like our tri-power Bel-Air, most of the RPM range is going to be between 3000 and 5000 rpm, and PerTronix claims their Flamethrower distributor can create an average of four times the energy than the factory GM unit.
Installing the Flamethrower Distributor
Installing the PerTronix Flamethrower distributor is quite a breeze since it is a two-wire setup, but there are some tips and tricks when it comes to swapping out your distributor.
Top Dead Center
Before pulling the old factory dizzy out of your engine, it is strongly suggested to get your mill to top dead center (TDC). TDC is when your number one piston is all the way to the top of its rotation and closest to the spark plug. If your timing is off, it can result in misfires and/or backfires — something you really don’t want with a supercharger.
I have… unfortunately too many times, taken a picture of the rotor hoping it would be good enough to get the new distributor in exactly the same way. When you are leaning into your engine compartment trying to line up the gears to match the rotors direction on some grubby iPhone photo, you will thank me for spending the time up front and getting your engine to TDC.
Another issue I have run into is finding the wrong TDC and being 180-degrees off. On your harmonic balancer, you will see your TDC mark, but for every complete rotation of your engine that TDC mark will fly by twice. So, when you get your engine to TDC, pop the cap off of your dizzy and check the direction of your rotor. Follow your spark plug wire and if it leads to the number 1 cylinder, you are ready to move to the next step.
Step 1: Remove Your Old Dizzy
If you are following the install of your Digital HP keep your battery disconnected, otherwise make sure you disconnect your negative battery cable. Last thing you want is to get zapped.
Remove your spark plug wires from the factory distributor cap and move them safely out of the way. If your distributor has a vacuum advance, remove the vacuum tube and place them safely out of the way.
Remove the distributor hold-down clamp found on the base of the distributor, in most applications it is one bolt. Even though you are at TDC, take note of the direction of the rotor and vacuum canister.
Once the distributor is free, pull up from the head of the unit, you will see the rotor rotate slightly as the worm gear slips free. Place your old dizzy to the side, and if there is going to be some time before installing your new PerTronix Flamethrower distributor, place a shop rag over the distributor hole so no debris or unassuming bolts fall into your engine.
Step 2: Installing your PerTronix Flamethrower Distributor
Slip the distributor gasket over the shaft of your new PerTronix Flamethrower distributor and rotate the rotor close to where the factory unit was. When you drop the Flamethrower into the engine, you will feel the gear slipping into camshaft gear by which your rotor will rotate slightly. You will know when the distributor is seated all the way when there is no space between the block and the base of the distributor. Bolt down the Flamethrower with the factory hold-down clamp.
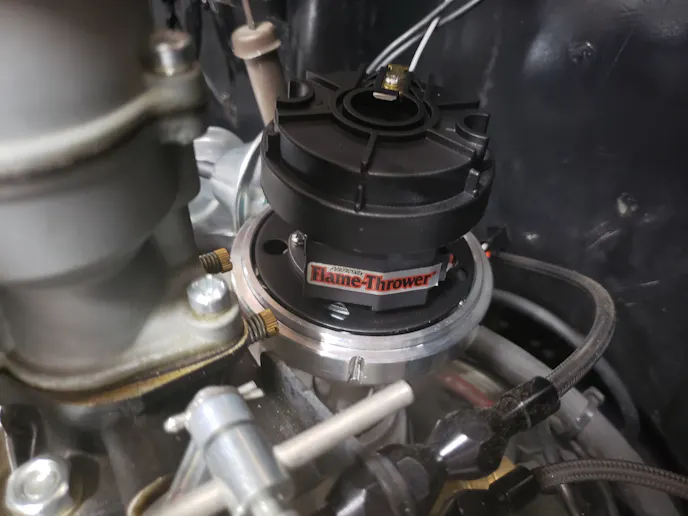
Install your distributor cap taking note of the direction of the rotor and vacuum canister. We replaced our spark plug wires with Petronix plug wires and ceramic boots. The wires have a low 500 ohms per foot of resistance and the ceramic boots can withstand up to 2000 degrees of temperature.
Pertronix ceramic plug ends are heavy duty and look good to boot!
Take the number one plug wire and plug it into the terminal in which the rotor is facing. Finally install the rest of your plug wires in the firing order your engine requires. The final plug wire is saved for the coil, which utilizes the center terminal on the distributor.


If you are keeping your vacuum advance, plug in your vacuum line, otherwise cap it off.
The wiring is simply two wires. Since we are using the PerTronix Digital HP, the red ignitor wire splices into your 12v ignition switch shared with the Digital HP, and the black ignitor wire goes to the white wire coming out of the Digital HP.
Tuning
This is when you bring out your trusty timing light and dial-in your Flamethrower distributor. If you got TDC correct, your vehicle should fire up, but may need a little tweaking. Depending on the application, timing can vary — especially with our tri-power mill — timing will also differ from naturally aspirated vs a supercharged engine. Always keep in mind your application and where to set your initial timing.
Driving
With a new hot spark, the Bel Air fired up quick, and the ignition wasn’t missing a beat even with the tri-power carbs sucking in fuel and puffing on the cylinder walls. The built-in, three-step rev-limiter now allows us to have burnout and launch control, along with over-rev protection tuned anyway we like. The engine RPM can now be used to trigger output to control shift lights, solenoids, and other RPM-controlled devices.

You might also like
Long Before It Starts, This '55 Chevy Bel Air Has Already Taken You For A Ride
A '55 Chevy Bel Air has a way of taking people places. For some, it's back to a hometown where Friday nights meant chrome and cruising.

