


Our friends at Eastwood have produced some amazing do-it-yourself projects for their various shop builds. One of their most interesting, and creative was the bomber seat fabrication for Matt’s project rod Pile House. According to Matt, “I picked just about the worst possible project vehicle I could when starting Project Pile House. My goal is to show what can be done on a budget with some key tools and a little bit of creative thinking.”

The original seat was trashed beyond belief and seemed almost unusable, but Matt was sure he wanted to do something custom with it. The easy way out would be to use a modern minivan or car bench seat, but that look wasn’t right for him. Deciding to reuse the original seat frame because it had some cool beadwork in the sides and corner braces –that actually matched the running boards he had built previously – he started by sketching out some rough designs on cardboard and cutting the main panels out first.
After coming up with a design he liked, Matt cut the shapes out of 18 gauge sheet metal to match the shape of the original seat frame using electric sheers. He lined the panels up, drilled holes, and installed Cleco panel clamps around the perimeter of the panels to hold them in place. Using Clecos was a smart choice because he would be taking the panels off and putting them back on frequently.

With the rear and bottom panels cut, Matt moved on to making the back support panels and center console for the seat. Measuring out two inch flanges with a 45 degree angle on the braces to get them to contact both main panels. He doubled up the metal thickness in the Versa-Bend sheet metal brake to give a nice rounded bend to the front of the center console. Again he used Clecos to hold the panels together.
Carefully drawing out his design on each panel, Matt laid out the guide pattern for rolling the beads into the sheet metal. Accurate measurements are a must when laying out a pattern for rolling beads as it will become your guide to roll the mandrels over. Using 1/2-inch mandrels in the bead roller, Matt rolled the beads in the metal and used a drill and the Punch and Bead dies to finish the design.

The seat was starting to take shape and Matt was ready to permanently attach each panel to the seat frame. The air and space industry have been using rivets to hold panels together since the beginning of aviation, and these are the key to making your industrial or bomber inspired accessory look the part.
Eastwood’s new solid rivet kit makes is easy and affordable to install solid aircraft rivets, which are much better looking than fake rivets or spot welds that simulate the effect. After he bucked a few solid rivets, Matt got into the groove of using the solid rivet hammer and bucking bar. Things went pretty smooth as he worked his way around the seat frame.
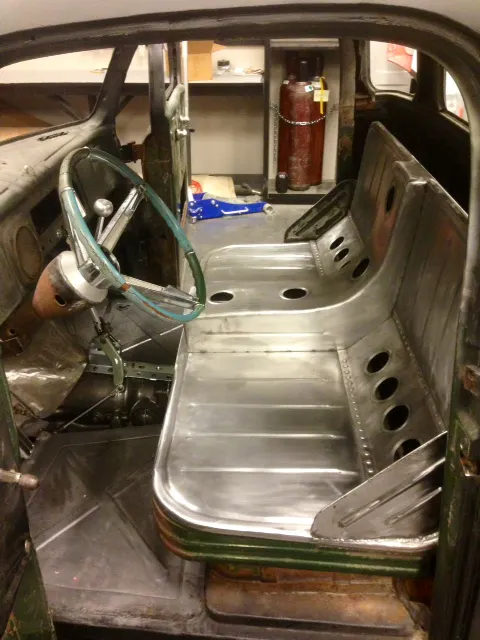
Matt finished putting the panels together by TIG welding the seat pans to the frame. Once the pans were solidly in place, he moved on to assembling the center console. Deciding to butt weld the top and side panels together so the finished work would look like one piece, he rounded the edges of the console with a straight T-Dolly, giving a seam that was flat and easier to weld. He used Eastwood’s MIG 175 to weld everything together.
Working the panels smooth, Matt blended the welds into the assembly with a flap disc and scuff pad for that professional finished look. With the fabrication finished, he bolted the seat back into the truck so he could continue work on setting up the rest of the interior. Following Matt’s lead, almost anyone should be able to achieve similar results.
You might also like
409 Impala Wagon: Can You Get Down With The Longroof?
It is a real-deal 409 car — so authentic it still has its original 340-horsepower engine and tons of paperwork to prove its provenance.

