

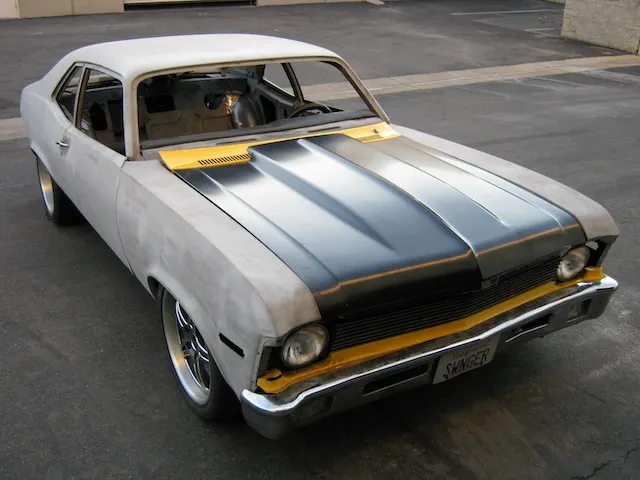
Our Project Swinger Nova has come a long way since it’s arrival at the Power Automedia shop over five years ago. It originally started out as a broken down ’71 Nova with a ragged body, a beat-up interior, and packed a non-running 350 small-block under its rusty hood. The Nova didn’t instill us with a whole lot of confidence in the beginning.
 Since then, the X-body hasn’t just been restored, but instead has been completely rebuilt from the ground up utilizing the best of everything the restoration and performance aftermarket currently offers. Every nut and bolt has been replaced inside and out; including the suspension, brakes, wheels, bodywork, glass, trim, and interior – all with a performance twist.
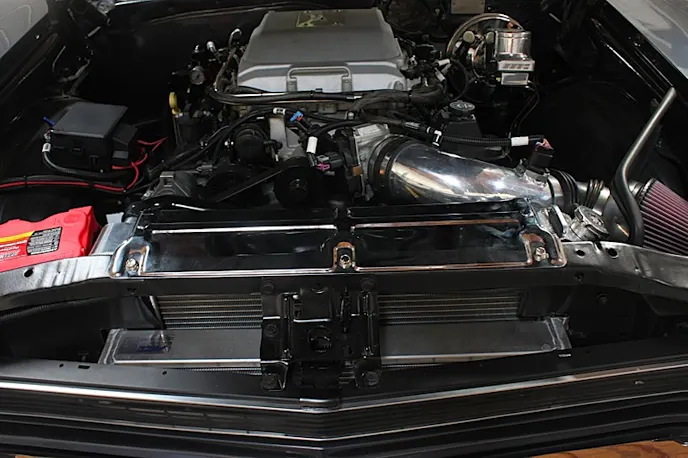
Swinger has now morphed into a full-on, pro-touring, LSA-powered monster prepped to do battle on the autocross circuit. With roughly 600 hp at its disposal, our Nova should be able to hold its own against most street cars on the dragstrip too.
One of the main suppliers in our build was Classic Industries, and they provided us all the interior and exterior trim that was needed to get this Nova looking sharp.
Once we received our new parts, we contacted Edgar Soler, experienced car builder and head of the R&D Department at Classic Industries for tips and tricks on the best way to go about the installation of our trim pieces.
Bringing You Up to Speed
Swinger has become a mainstay in our Power Automedia stable, and it holds a special place in all of our hearts. Having said that, we’re beyond anxious to wrap this project up and put this thing to the test, your author included. We’re so close to getting this car finished, we can taste it.
At the moment we’re currently working on the interior upholstery, and since the previous rear seat was missing upon our purchase, we had to source a replacement. We briefly thought about leaving it out for the sake of simplicity and less weight -sort of a “rear seat delete option” that the factory never offered on the vintage Chevy.
Those were our initial thoughts, anyway. However saner minds prevailed, and just in case we ever need to bring more than one friend along we have the option to do so with a freshly reupholstered replacement that you’ll get to read about at a later date.
The look we’ve chosen is quite mild compared to some others we’ve built in the past. We wouldn’t go as far as calling Swinger a sleeper, since it’s “in the weeds” lowered ride height, 18-inch Forgeline wheels, and immense rumble from the Flowmaster exhaust lets everyone know that we’ve arrived.
Maybe subtle is a better word. Our eagle-eyed readers will be quick to spot the fiberglass cowl-induction hood too, which not only reduces weight over the original steel piece, but gives a nod to the classic Camaro of yore.
In previous installments, we’ve discussed the paint procedure, engine swap, exhaust installation, fuel system, suspension upgrade and pretty much every other aspect of the car. Prior to this series, if you didn’t know how to swap an LS motor into a classic X-body and build it into a pro-touring car, we showed you how. It’s time we look to conclude the project, and move on to the next one.

Reinstalling Our Glass
At this stage of our seemingly never-ending build, we’re finally working out the details and buttoning the beast up. In this chapter, we’ll be showing you how we installed the all new glass in the front and sides, along with the complementing chrome pieces.
Using a high-quality chrome polish will prevent pitting on chromed metal finishes. -Edgar Soler
It wasn’t too difficult, but constant delays (including meddling with our other project cars) dragged out the progress longer than we would have liked. But as usual, we have the right men for the job, and our Power Automedia shop dawgs were happy to tackle the task at hand.
Save for the rear window, our old glass and trim was beat like the rest of the Nova. When you’re rebuilding a car of this caliber it only makes sense to inspect the original glass for integrity, and to check the chrome surrounding it.

Helping us with the installation of the windshield glass (PN NR691T) and sealer (PN K4122) was Ruben from Lowest Price Auto Glass. The process of installing the front and rear windows, plus the rear trim molding took Ruben and Sean, our resident shop dawg, about an hour.
When replacing the front windshield, it’s best to replace the molding clips since the originals have a tendency to rust.
Edgar suggested, “When replacing the front windshield, it’s best to replace the molding clips since the originals have a tendency to rust.” Often times clips can be broken or missing, and it’s not always easy to tell until the windshield is removed from the car.
Unfortunately, we didn’t have all of the molding clips needed for the front windshield trim (PN G1110) on the day Ruben was helping us, but we did get them installed at a later date after a call to Classic Industries had been made.
When the clips arrived, we promptly attached them where needed, being careful not to scratch the glass, chrome, or new paint. They mounted within in a few minutes without much effort, we had made sure that this could be done when we installed the windshield.
Since the rear window was in such good shape, we decided to use it, and Ruben took the time to reinstall it during his visit. We had cleaned it up and inspected it for quality and cracks, and removed some old window tint film that had become rather useless and ineffective.
Installing The Brightwork
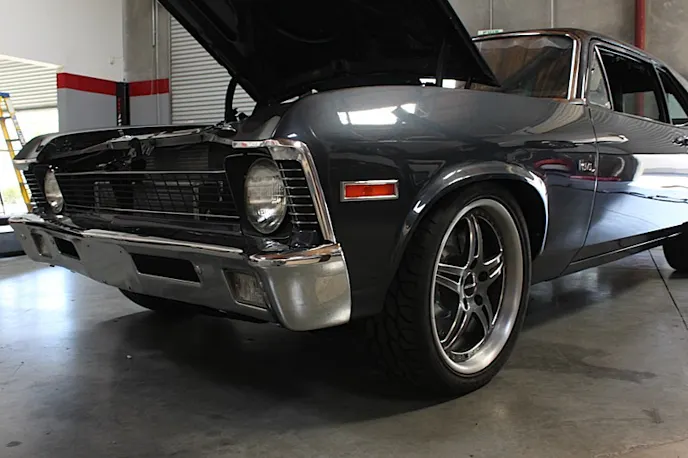
Wanting to start with the more difficult tasks first, we took on the reinstallation of Swinger’s front trim and worked our way back. First we reinstalled the headlights, headlight bezels (PN G8714, G8715) and SS-style front grille (PN 3962915). The grille features a blacked-out appearance that came equipped on all Nova Super Sport models of this vintage.
After the Nova’s “face” had been replaced, we installed our new front bumper (PN 3949785) to the bumper mounts, complimented by the reinforcement piece (PN C2392) and plastic filler unit that conceals all of the hardware underneath (PN 3919083). The process was a relatively easy assignment, and we had it together in less than an hour.
We took our time getting the bumper aligned properly, and left the mounting bolts loose enough to make any necessary adjustments before tightening them down for final fitment. As with installing anything on a freshly painted car, we masked off the edges of the bumper with painter’s tape to prevent any scratching.
Regarding bumper installation, Soler made a suggestion, “When installing a new chrome bumper, we recommend using a rust coating on the rear surface of the bumper to prevent corrosion. Water likes to hide behind these bumpers after a rainstorm or a car wash, and we like to think of it as cheap insurance.”
Part of the facelift for Swinger was to replace the front bumper-mounted parking lamp/turn signal lenses (PN CM3061) also. The lamps are good reproduction units that look better than the original parts installed back in 1971. There were no issues with installing them into the new bumper, fit and finish are important aspects when choosing replacement parts and Classic Industries didn’t disappoint in that regard.
When installing a new bumper, we recommend using a rust coating on the rear surface of the bumper to prevent corrosion.
Completing the front end was a hood lip molding (PN 3929730) and the bow tie hood lip emblem (PN 3953840). A chrome radiator support (PN T9426) was installed under hood to add a little shine to the core support. However, since we used a much larger AFCO radiator instead of a factory replacement unit, we welded an extra bracing tab to the top of the radiator to help secure both pieces into place.
The upper radiator support cover is chrome plated, and although it’s not a factory piece, it adds a bit of shine to the underhood compartment of the Nova. Plus it complements the rest of the chrome bits found under the hood, and sets our Nova apart from the rest at the race track or car show.
Once we had our front end handled we worked our way around the car, installing the new side marker light kit (PN N5028) into the front fenders and rear quarter panels. Included in the kit are the required surrounding chrome pieces that a ’71 Nova needs to be complete.
When you’re restoring a car, it’s always best to apply sealant conditioner to the seals to prevent cracking and dry-rotting.
Installing them is an easy process, but since our car has a fresh coat of paint on it, it was imperative to line up the lens housing carefully into the mounting area.
Again, we masked off the area with painters tape to prevent any damage to the paint. Once we had the lens housing lined up, we removed the tape before securing the lens down.
After which, we replaced our old vent window frame trim with the fresh replacements that Classic Industries offers (PN N1335, N1336).
The window frames mounted directly into place of the old units, and they went in with very little effort on our part. Again, we were careful not to scratch the painted surface. It might not seem like much, but little details like this go a long way in improving the overall look of the Nova.
During the window trim replacement, we swapped in the new rubber seals which is usually a necessity when replacing glass or window trim. The factory rubber insulation has a tendency to crack and dry rot, letting air and moisture into the cabin that shouldn’t otherwise be there. We love the rumble of a V8, but we’ll pass on the annoying wind noise.
Edgar stepped in by offering another piece of great advice; “When you’re restoring a car, it’s always best to apply sealant conditioner to the seals to prevent cracking and dry-rotting. This will also help prolong the life of your seals.” We agreed, and complied by applying the sealant conditioner to our window seals.

While we could have adopted the “shaved look,” deleting the door mirrors (PN CM3003, CM3004), door handles (PN R5001B), and “Nova” script emblems (PN 3953676) from the fenders, we’ve elected to replace them. With the Nova’s Gunmetal Grey hue, we wanted our project to have a clean factory look so the little details matter.
Once again, Classic Industries had what we needed to properly replace everything. Installation was a breeze, and in our opinion the car looks much better with them than without.
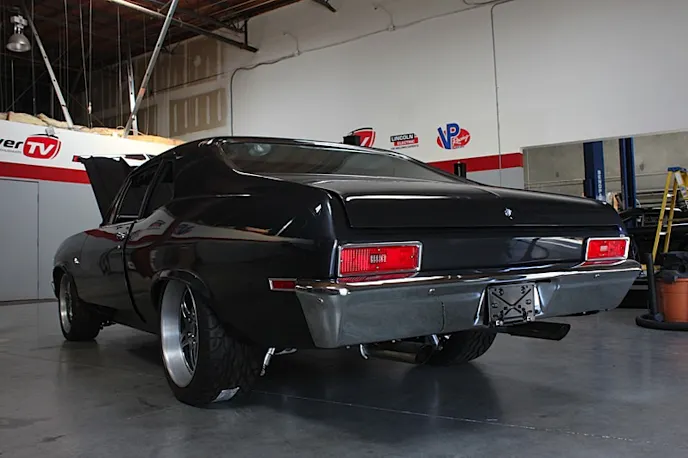
Stepping around to the rear of the Nova, you can see our newly-replaced chrome rear bumper (PN 3903515) has been mounted. Being the largest piece of chrome on the entire car, replacing our old rusty rear bumper was a no-brainer, and it made quite a vast improvement in Swinger’s overall appearance.
The rear bumper installed much like our front piece, and we were sure to mask off the edges of the bumper as to not scratch our rear quarter panels during installation. We highly recommend getting a buddy to help with the front and rear bumper installation as it makes the task much easier.
Don’t forget to hand tighten the bolts as you go so you can easily come back and align everything properly. We were sure to install a rear license plate bracket (PN 344330) on our street-going machine.
The taillight lenses installed just like our side marker lenses, with careful fitment and painter’s tape. Their accompanying chrome surrounds (PN 5964171) have been replaced as well, completing the overall outside makeover. Since they’re only held in by four screws, they are probably the easiest of the components to install and were installed into the rear panel in just a matter of minutes.
Edgar’s final suggestion was to use a high-quality chrome finish polish that will help prevent future pitting on the new chrome pieces we applied to the Nova. Not only is this preventive maintenance, but it brightens up the chrome to a mirror-like luster.

Parts List For Exterior Trim
- Front bumper – PN 3949785
- Front bumper reinforcement piece – PN C2392
- Front bumper filler – PN 3919083
- SS-style front grille – PN 3962915
- Headlight bezels – PN G8714, G8715
- Parking lamp/turn signal lenses – PN CM3061
- Hood lip molding – PN 3929730
- Bow tie hood lip emblem – PN 3953840
- Upper radiator support – PN T9426
- Side marker light kit – PN N5028
- “Nova” script emblems – PN 3953676
- Front windshield – PN NR691T
- Windshield trim – PN G1110
- Windshield sealer – PN K4122
- Vent window frames – PN N1335, N1336
- Door mirrors – PN CM3003, CM3004
- Door handles – PN R5001B
- Rear window – PN NR4010T
- License plate bracket – PN 344330
- Taillight lenses – PN 5964171
- Rear bumper – PN 3903515
That completes the exterior makeover on Project Swinger, and the difference between now and what we’ve originally started with is like night and day. Hopefully following along with the build on this car has inspired you to either complete your current project, or start one of your own.
This isn’t the final installment of our Swinger Nova, as we’ll be covering the installation of our new interior in the next chapter. Shortly after, we’ll do some final tuning to see how much horsepower our LSA-powered pro-touring car will be putting to the pavement.
You might also like
Pushing The Limits: Making Ultra-Durable V8 Engines For Retail
Ford engineers test powertrains to failure. This aggressive track abuse results in ultra-durable V8 engines for everyday drivers.

