

We’ve had this 1965 Plymouth Belvedere II in the shop a couple of times already, and with a fresh engine and transmission install that was done a year ago, we felt that something was missing. Actually, we could hear that something was missing every time our built TF 727 shifted. The clunking in the rearend told us that we had just a little too much play in the third member.
For this first installment of “GARAGE Series” we’re working from home to show that you, too, can perform this kind of an upgrade without the luxury of a hydraulic lift and a roll-away tool box the size of a storage room. We’re using basic tools that most home-mechanics possess, and a couple specialized tools that can be bought at almost any automotive parts store without breaking the bank.

With over 100k miles and 47 years on the car, it’s normal for parts to be worn out, and an upgrade was in order. A look online and you’ll find that an 8.75-inch third member with a Sure Grip is getting pricey. The Sure Grip is Mopar’s answer to the posi-traction found in other cars, fortunately we had picked up a decent unit a decade ago for about $325 with the 489 housing.
Since we already had the 489 case, we decided to stick with that. It’s a bit beefier with a 1-7/8-inch tapered pinion, and is generally sought after by those wanting to upgrade the rearend of their Mopar.
The nice thing about this particular swap is that the 741, 742 and 489 are all interchangeable as a unit in an 8.75-inch Mopar differential housing, you just have to make sure that you have the right axle spline count based on early/late axles.
For us, we simply needed a case because we had planned on installing a new limited-slip differential the we picked up from Eaton Performance. Since the 489 is the housing we needed, and we wanted to set up the complete third member for a swap with minimal down time, it was a no-brainer to use what we had. Replacing the axles and/or bearings should be a forethought whenever replacing the third member, and we decided to replace ours with a set of alloy axles from Moser Engineering.
Detroit Truetrac Limited-Slip
The Detroit Truetrac is one of the more popular replacement third members in the industry, and has been available since the mid 1970s. It’s also the first helical gear limited-slip introduced to the aftermarket automotive community as an Eaton brand. The helical gear design is what make this unit so unique as it is a true, maintenance free limited-slip differential.
Unlike a disposable cone-style limited-slip, the Truetrac has no wearing surfaces. Chances are, it will still be in the vehicle when it is passed down to the grandchildren. -Barney GwozdzWe contacted Eaton Technical Specialist Barney Gwozdz, and asked him about the Truetrac. He said, “The Truetrac’s durability makes it the ultimate traction tool. People run these for pro touring, street/strip, road racing as well as standard everyday usage. It also works incredibly well for the truck market, in dirt, mud, sand, and towing”
We were interested in the maintenance free aspect of the Truetrac, and Gwozdz said, “Unlike a disposable cone-style limited-slip, the Truetrac has no wearing surfaces. Chances are, it will still be in the vehicle when it is passed down to the grandchildren.”
While the Mopar Sure Grip had either a clutch pack or springs, they were not maintenance free. The spring-type was much more difficult to fix or repair, and the clutch-type required replacing the clutches when they began to wear. The solution for us was the Truetrac because of its strength and the lack of clutches or springs.
The Truetrac doesn’t use clutches or springs, and therefore it doesn’t wear out prematurely. It operates as a conventional differential until traction is lost, and then power is transferred to both wheels when it is needed. A true low-cost alternative to the Sure Grip, the Truetrac offers maintenance free use that will last, making it a great limited-slip differential for our Mopar. Its smooth, quiet operation and strength have made this the limited-slip of choice for those seeking something that’s both proven and reliable.
With regards to power handling capabilites, Gwozdz said, “The Truetrac is used in cars that are well into nine-second quarter-mile times, and the steel case allows for torque-heavy shock loads. The helical gears bias up to 75% of the torque to the wheel with the most traction.”
Unlike a locking rearend, the side pinion gears allow one wheel to slow down or speed up when required. If one wheel loses traction, the pinions wedge into pockets by separating slightly from the side gear, and as torque increases the force increases as well. Traction is provided to both wheels, with more force being given to the wheel with the best footing. When surface conditions warrant the need, power is automatically transferred to the wheel with better traction.
Setting Up The Truetrac
undefined
Eaton Detroit Truetrac Limited-Slip Differential(part # 913A572)

- Helical gears
- Maintenance free
- Smooth operation
- Performs open until needed
- Fully automatic limited-slip differential
Starting with a bare 489 housing, we purchased a complete rearend bearing kit from Moser Engineering (part #R875B). Rather than piecing together side and pinion bearings, a crush sleeve and the ring bolts, Moser had the exact kit that we needed. We had previously removed the ring and pinion from the 489 case and removed everything that wasn’t a part of the housing, retaining the bearing caps and adjuster nuts.
When disassembling the carrier, it’s best to mark the bearing caps prior to unbolting them, they are machined and will need to go back on the same side that they were removed from. It should also be noted that if you’re removing the ring gear from another third member, as we did here, keep in mind that the bolts are left-hand thread. You should not reuse these bolts since they need to be torqued to specs.
After removing all old bearing races, we started by installing the new bearing races from the kit. Since our Sure Grip was a rebuilt unit, the pinion bearings were new and after a quick inspection we could tell that there were no signs of corrosion or wear, so we decided to keep the large bearing to save time.
With the crush sleeve inserted over the pinion, we placed it into the housing, installed the new smaller pinion bearing and the seal for the housing. We used transmission assembly lube on the bearings, working it into the bearings completely before installing the pinion.
We supported the pinion underneath so that we could install the yoke and pinion nut. The crush sleeve will do as its name implies as you tighten the nut, and will crush until the yoke and pinion nut are tightened to a torque spec of 170 lb/ft for the tapered pinion. We checked to be sure that we didn’t overtighten the nut by measuring preload with a dial torque wrench. You should be able to turn the flange and pinion by hand, but there should be some resistance. The preload is measured in lbs/inch, and for our setup we used 20-25 lbs/inch of torque.

To prep the ring gear for installation, a wetstone was used to clean any burs or debris from the surface. We installed the ring gear to the new Detroit Truetrac (part # 913A572) with the ring gear bolts supplied in the kit and torqued them to 55 lbs/ft. If you don’t have the proper means for securing the differential, this is where the aid of an extra set of hands will help. We had solicited the assistance of Tim Obets for setting up the Truetrac because of his experience working with differentials. With the ring gear torqued to specs, the next process is where Tims expertise comes into play.
The Truetrac was placed into the housing, and the bearing caps were installed snug so that we could install the adjuster nuts and make the necessary adjustments to get the ring gear making proper contact with the pinion gear. As these adjusters are turned in, they push the carrier bearings inward until the proper feel is achieved. A spanner wrench should be used to turn the adjusters, but a screwdriver and soft mallet will also work. We tightened the bearing cap bolts to 90 lb/ft and turned the adjusters as necessary to get the proper preload against the bearings. This preload can also be checked and is measured in lbs/inch as well, we relied on Obets’ expertise to make this adjustment.
Using a dial indicator, we checked for proper backlash, which should be .005 – .008 inches. This setting is to make sure that the ring gear is making proper contact with the pinion gear, and there should be some play to allow proper movement and contact. We also applied the marking die included with the Moser kit with a small, disposable paint brush. This will help show the contact patch that the pinion gear makes with the ring gear, and you want this to be a full contact that is deep in the gears. As we turned the yoke several times we could see on other teeth in the ring gear that the die was transferred all the way across the teeth rather than just on the inner or outer edge, and that the depth was good.
If the die had only marked half of the teeth in the ring gear, then we would have had to make more adjustments which would require moving the carrier to either side by turning the adjuster nuts. We were happy with our set up and the contact patch, so the adjuster nut locks were put into place and bolted down. These locks keep the large adjuster nuts from turning in or out after installation, and must be reinstalled.
Moser Engineering Alloy Axles
The axles from Moser Engineering are their stock replacement alloy axles (part #A30-CST-B67). These axles are made to work with the factory tapered bearings or aftermarket sealed bearings, and are induction heat treated with a hardened bearing seat. The 1541M alloy is 25% stronger than the factory axles, according to Kent Smith, Moser Engineering Technician.

Since we haven’t done any modifications to our differential, the stock replacement axles from Moser were used. They have axles for the early and late Mopar housings, so be sure to get the proper spline-count when ordering.
But Moser can make custom axle lengths for those who have narrowed housing, or for differential swaps. They can also provide you with complete differentials with whatever axles and carrier you require.
When we contacted Moser about our replacement axles, we talked to Smith about the different bearings that they offer. We found mixed reviews over the types of bearings that can be used, so we were curious what Moser recommends.
For the serious autocrosser we recommend the tapered bearings, but for a street driven car we’ve sold the Green bearings for years and they won’t give you any problems. -Kent SmithSmith says, “For the serious autocrosser we recommend the tapered bearings, but for a street driven car we’ve sold the Green bearings for years and they won’t give you any problems.” He said that the adjusters are hard to find, so they no longer sell the tapered bearings with their axles.
Years ago, the Green bearings were a typical axle bearing, but many people had problems with them on the street, especially if they participated in autocross. The earlier bearings were simply known as the 9600 bearing and were recommended only for drag racing.
After the problems with the earlier bearings, the later bearings had either a flange tack welded to the bearing race (9600RP), or a snap ring to locate the bearing in the housing (9400M). The bearings we chose for our set up are the 9400M, we don’t plan on drag racing, and we have too many suspension upgrades that need to be done before we try the Belvedere out on the track.
Just like the debates over the 742 and the 489 differential cases, the tapered versus sealed Green bearings have been going on for years. Even Mopar sells the sealed bearings and there are plenty of people who have had years of worry-free use. The snap ring is fixed to the bearing race and when the flange is bolted into place it holds the bearing in place.
We also needed new wheel studs for the axles, and Moser offers them in stock 1/2-inch length that we used (part #8040), or in a 3-inch length (part #8020). Our axles arrived complete with the bearings and studs installed, and that made for a simple swap without a trip to the machine shop to remove old bearings – or to press the new ones into place. Smith said, “We offer the 3-inch studs for drag racers who need to show threads beyond the lug nut. They also allow for thicker wheels or disc brake conversions so that the lug nuts grip more of the stud.”
Final Installation
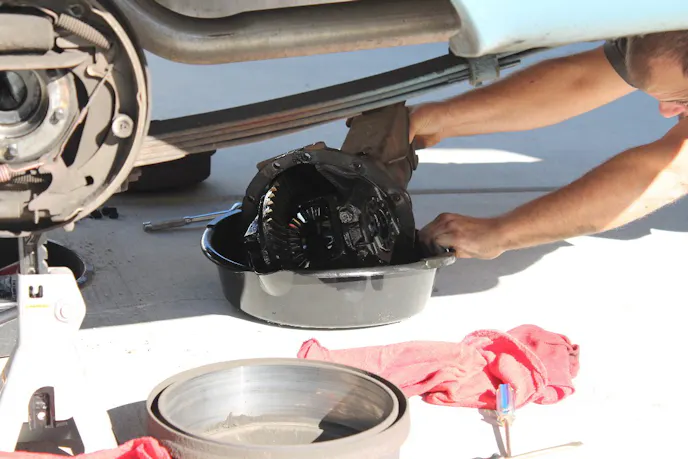
We raised the car for access to the differential and supported the axle housing with an additional pair of jack stands, always keeping safety in mind as a key element to any driveway installation. After draining the old fluid, we first removed the nuts holding the drop-out differential in place and worked it loose.
Keeping the axles in place is one way to assure that the pumpkin will stay put while we work it loose. Once it’s loose, the axles can come out by removing the drum and the five axle flange nuts.
Usually, an axle puller is needed to remove the axles, especially after 47 years on the road, but our axles came out quite easily with just a little bit of elbow grease and some tugging. There are different lengths to the axles so be sure to remember which one was on which side.
The heavy part of the swap required the help of shop dawgs Sean Goude and Dean Jigamian. They were both on hand to help, and the extra hands are worth it when it comes to removing a heavy unit like this 8.75-inch Mopar differential. They both lowered the differential into the drip pan to slide it out of the way, and Dean cleaned up the contact surface on the housing.
Some people use a gasket when reinstalling a differential, but we have found that a good bead of black RTV gasket sealer will do the trick. After making a bead all the way around the contact area and letting it set up, the new third member was put into place and the bolts were torqued down to 45 lb/ft. We also let this sit for a short while before we filled the differential, it’s best to let the silicone cure to ensure a good seal.
Since we swapped our 742 differential case for a 489, that meant that the pinion yoke is a different size than the stock yoke. But, as with any popular swap such as this, the aftermarket comes through with what is called a combination U-joint to accommodate our needs.
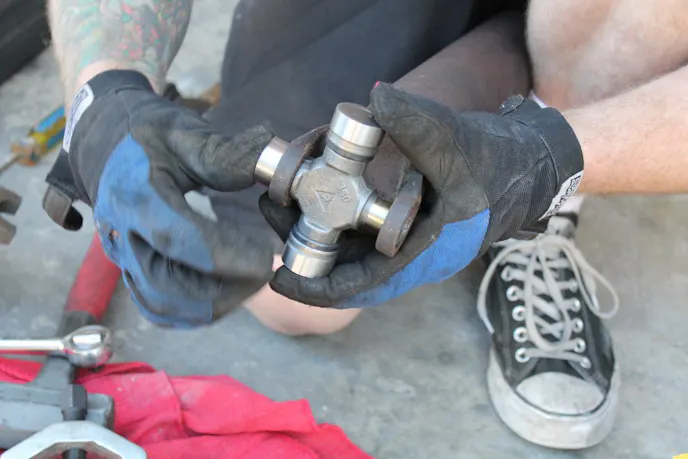
We removed the driveshaft and used basic tools to press the old joint out and press the new one in place. The caps are a different size, as are the c-clips, so be sure to use the proper ones for your installation.
The 7260/7290 combo joint has the smaller 2-1/8-inch (7260) spacing for the stock driveshaft end, and the larger 2-5/8-inch (7290) spacing for the larger yoke on the 489. Without this, a new driveshaft would have to be made to accommodate the 7290 U-joint. These combo joints can be purchased from nearly any aftermarket auto parts store.
With the U-joint replaced and the driveshaft reinstalled, the new axle assemblies were installed and the axle retainers were tightened down. We coated the splined ends of the axles and the outer bearing races with Royal Purple’s 75W-90 Max Gear high performance synthetic gear lube.
Using Royal Purple’s proprietary Synerlec additive technology, it allows the differential to run quieter and smoother, and uses a friction modifier additive that is needed for limited-slip differentials, so no additional additives are necessary. With conventional gear lube, a friction additive is required for all limited-slip differentials. Max Gear performs far superior to conventional gear oils, providing the best quality synthetics for maximum protection against wear and heat, and is non-corrosive to softer metals like brass, bronze or copper.
With the wheels back in place, we kind of like the Moser decal on the end of the axles and opted to leave the wheel covers off for a few days while we break-in the new Detroit Truetrac. Proper break-in should be 300-500 miles before you go out testing the functionality of the Truetrac.
It might be tempting to put the pedal down and see if you can lay out some twin patches on the pavement, but with this kind of investment it’s best to break it in properly during normal street driving. With a complete new drivetrain in the Belvedere, we look forward to many years of enjoyment, and in case you’re wondering – we’re anxious for the break-in period to conclude also!
You might also like
Live Version - F-Zilla, Part 3: No More Flintstones Floors Thanks To AMD
Made with OEM specific gauge steel, AMD's floorpans are high-quality replacements that meet or exceed the original specifications.

