

Vehicle performance has come quite a long way in the last decade, even in the last five years things have leaped forward at a staggering pace. Our own 2011 Mustang GT, Project Wild E Coyote is proof of that. With a planned 1,000 hp engine on tap, this car is should be a beast on the drag strip or autocross, while still keeping us comfy on the daily commute. No matter what type of driving we do, keeping that hungry beast fed is no small task.
While heavy duty fuel systems have been around for years, they’ve primarily been geared towards racers, some of whom might make an occasional street drive in their car, but mainly see track only duty. It wasn’t until recently that we started to see the trend of 750-plus to over 1,000 hp capable street cars taking to the boulevards on a regular basis. Since Wild E. Coyote is set to be one of those insane street cars, the fuel system needs to keep up with the demands of that new engine. So we turned to Aeromotive and Fragola to provide us with a fuel system that is not only capable of handling full throttle blasts, but can live comfortably in the daily grind of commuting.

Aeromotive’s Eliminator Fuel pump is now available in their Stealth line for 2010-2013 Mustangs. This pump is a drop in, requiring only transfer of the fuel level sending unit. With it, the fuel system must be converted to a return style.
Eliminator
Last fall we brought you the details on Aeromotive’s Stealth Fuel System for 2005-2009 Mustangs. The company has since released drop-in Stealth pumps for the 2010-2013 Mustangs, specifically with high output Coyote and GT500’s in mind.
The center piece for this system is the fuel hat, which allows Aeromotive to make the appropriate pump for the vehicle application an essentially drop in replacement that fits in the stock fuel tank, and allows for retention of the factory fuel level sending unit. This pump also necessitates the conversion to a more performance oriented return style fuel system. For Wild E Coyote we’ll be using one of Aeromotive’s Eliminator fuel pump, part number 18695.


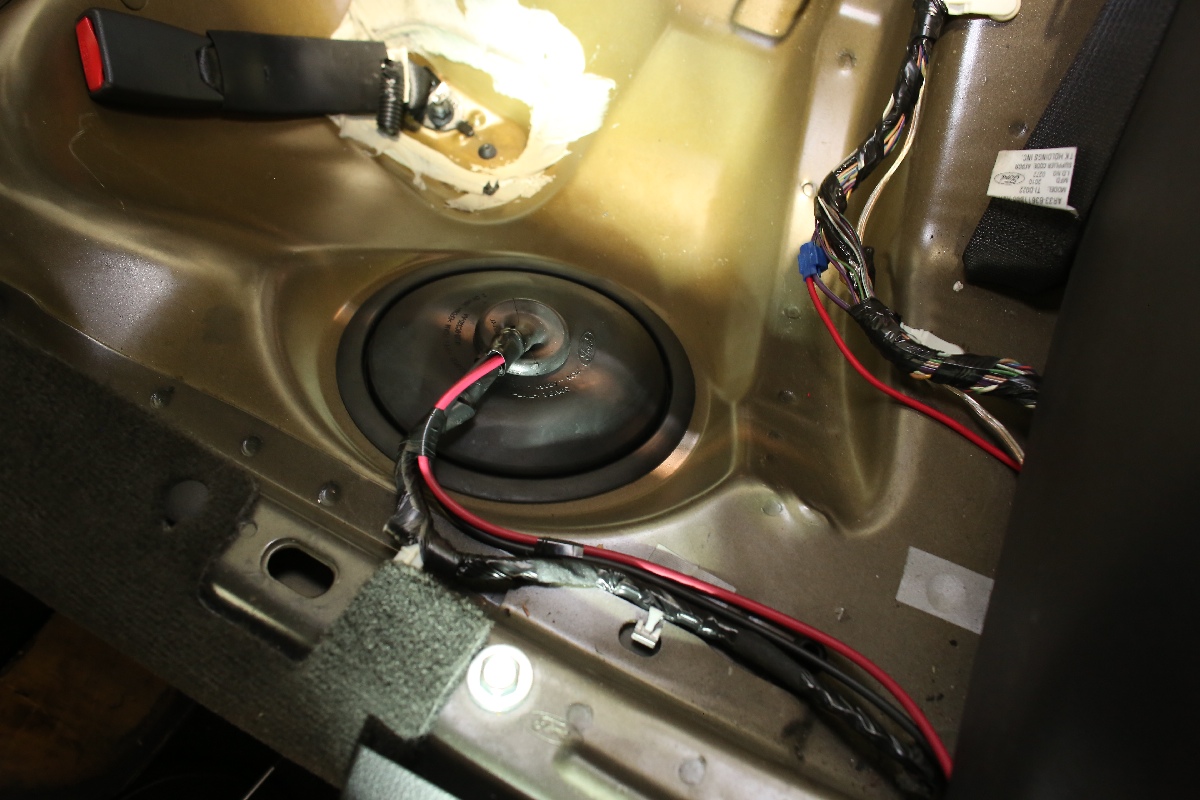
Left: With the rear seat removed we removed the stock fuel pump through the access hole located in the floor pan. Center: Be sure to check the O-ring for dirt, debris and damage. Right: We had to enlarge our fuel pump retaining ring opening by 1/8-inch to actually get the ring out of the hole. This did not affect how the pump cover seals back up.
The Eliminator is beast of a pump, designed to support up to 1,900 hp naturally aspirated or 1,400 hp in forced induction setups. We’ll be setting our fuel pressure at just over 58 psi, which means at 12+ volts, wide open, our Eliminator pump is capable of flowing right at 900 gallons per hour of fuel.
We’ll be using -08 AN supply and return hoses, so the Eliminator will easily feed the fuel demands of our new turbocharged engine. The transfer of the factory sending unit means we can still maintain use of the stock fuel gauge operation as if there was a stock pump in the tank.
This is the same Eliminator pump on the inside that Aeromotive sells for other applications. The difference here is the packaging, or more specifically the hat. The hat is what allows the Eliminator pump to drop directly into our 2011 Mustang fuel tank, and be compatible with the factory fuel level sending unit. This same hat is also available in a configuration for the popular Aeromotive A1000 pump.
You can see the differences between the stock plastic pump housing and the Eliminator pump body. The only part that needs to be transferred to the Eliminator pump from the old pump is the fuel level sending unit. Everything else is a direct plug-in inside the tank.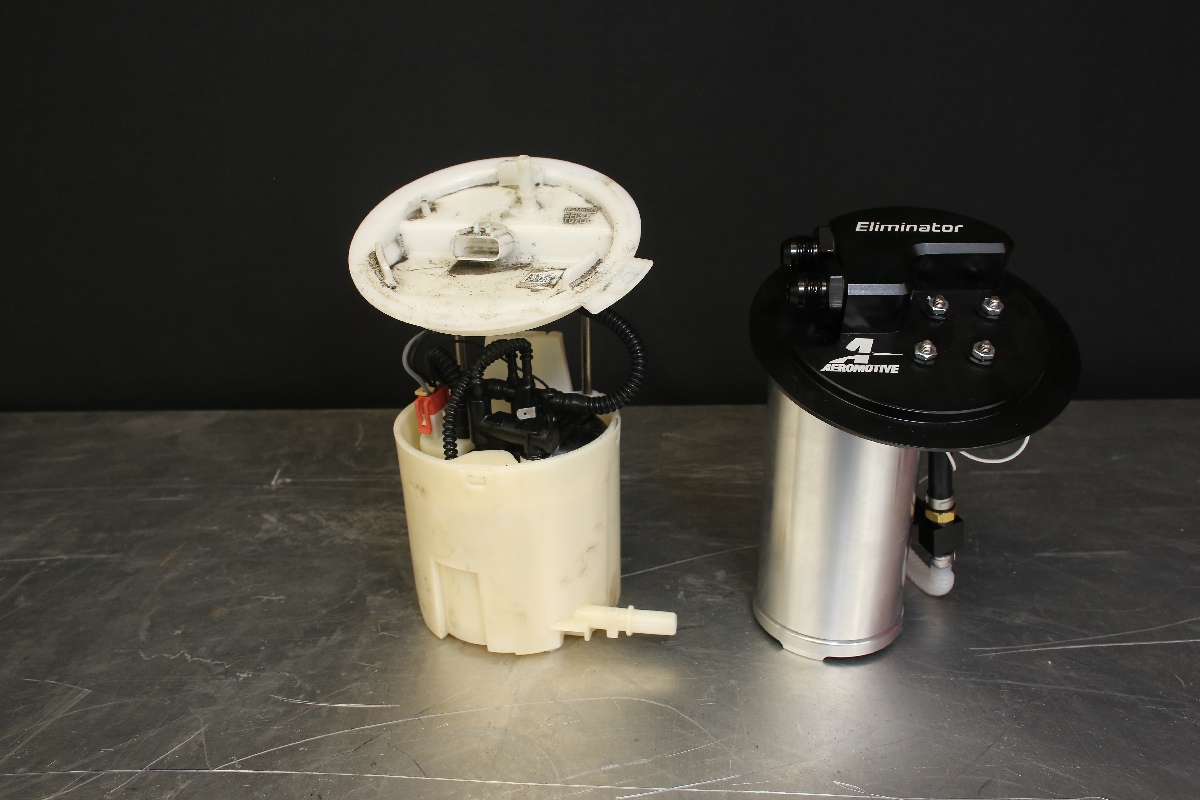


The Eliminator setup also utilizes the jet siphon system, which is part of the S197 chassis saddle tank design. This pump draws fuel from both sides of the tank, and connects to the OE lines in the tank.
The Eliminator pump converts our fuel system to a return style from the factory returnless design. Doing this allows us to use the Eliminator pump to ensure our new engine is supplied with adequate fuel. It also means we aren’t relying on multiple pumps, taking the guess work out of whether all of our pumps are working when we make a full throttle blast down the track. As Aeromotive’s Jesse Powell tells us, “You have to build a fuel system with enough capacity, to support every single horsepower your engine is going to make.” Powell stressed that when making an investment into an engine, like we are, it makes sense to invest in the proper fuel system to support it.


Left: Fragola sent us their Premium Black Nylon Race Hose in -08 size. Center Left: They also sent along all the fittings we'd need to plumb this system. The swivels will rotate in any direction, making them easily clocked during installation, and all of the fittings use a mechanical rather than a brazed joint. Center Right: We used a set of soft jaws to install the fittings on our hoses. Right: We routed our new hose following the factory fuel line paths and installed this Aeromotive 10 micron filter post pump using an Aermotive bracket.
Pump Control
“The rise of the 1,000 hp street car presents a few unique challenges in designing a fuel system,” says Powell. At a wide open flow rate of 900 gallons per hour in our application, we can do a little math and say that the Eliminator pump is capable of flowing 15 gallons per minute. Breaking that down further, our stock fuel tank holds 16 gallons, meaning that on a full tank of gas, the pump is capable of cycling the entire volume of fuel in just 64 seconds.


Left: we're also using an Aeromotive three port fuel pressure regulator and one of their EFI fuel pressure gauges. Center Left: We mounted the regulator to the driver side strut tower. Center Right and Right: We then ran the fuel return lines from the front of the Aeromotive fuel rails back to the regulator before sending the fuel back to the tank. Our fuel pressure is set at 58 psi and S197 Mustangs do not use a vacuum signal for the fuel pressure regulator.
With the pump controller we are slowing the fuel pump down, this puts less heat into the fuel system and helps to eliminate cavitation and vapor lock issues. – Jesse Powell, Aeromotive

This constant rapid cycling of fuel through the system translates to heat soaking as the engine demands less fuel volume most of the time in a street going car. Even at maximum boost, wide open, we’re not going to be stressing the Eliminator pump hard enough to run our lines dry. “This means all that fuel is getting exposed to heat from the engine compartment, which it then carries back to the fuel tank,” says Powell.
Inside of a fuel tank there is a negative pressure situation, since fuel is being drawn out of the tank by the pump. This negative pressure, combined with extreme heat that the fuel is exposed to in the engine compartment and then carried back through the return lines can lead to boiling and eventually vapor-lock, causing performance or starting problems for owners. This is due to the high underhood temperatures and conditions often associated with high output engines. Powell says Aeromotive has witnessed fuel boiling issues first hand, and says that in later model cars like our 2011 Mustang that utilize a plastic tank this problem is even more prevalent.
To prevent excessive fuel heat soak, and keep our pump happy we’re going to utilize Aeromotive’s Billet Fuel Pump Speed Controller, part number 16306. “With the pump controller we are slowing the fuel pump down, this puts less heat into the fuel system and helps to eliminate cavitation and vapor lock issues,” says Powell.

To reduce fuel heat soak, eliminate vapor lock, and keep things quieter inside the car, we’re using an Aeromotive Billet Fuel Pump Speed Controller. This controller is programmable so we can precisely tune it to our engine’s fuel demands.
The speed controller works very similar to how Ford’s own fuel system control operates, by varying the power to the pump through pulse width modulation. This system does not actually reduce voltage to the pump itself, as that would quickly wear out the DC motor in the pump. Instead, it uses a square-wave signal to essentially cycle the pump on and off rapidly. Doing this slows down the volume of fuel, while retaining pressure in the lines.
The Billet Fuel Pump Speed Controller is programmable. It uses either boost signal or a tach signal and ramps up pump operation based on the user’s preset inputs from those signals. If you viewed the pump operation on a voltage meter with the FPSC installed you would likely be fooled into thinking that it is operating the pump at less than 12 volts. This is because most meters will show the average voltage. Viewing the operation on a lab scope shows a square wave-form that expresses the pump’s on/off time more commonly known in the tuning world as duty cycle. The greater the fuel demand necessary the greater the duty cycle, or more rapidly the pump is cycled on and off, on a lab scope the the wave-forms would appear closer together. At 100-percent duty cycle the pump is on full run all the time, and rather than a square wave signal on a lab scope one would witness a flat line at 12-volts showing the constant on of the pump.


Left: To get our We are using an Auto Meter tach adapter as one method to signal our FPSC to increase output since coil on plug cars do not emit a square wave signal normally. Center: The cut wire in this bundle is the one for our tach signal, we need to splice in here to properly wire the tach adapter. Right: We mounted our FPSC in a safe location inside the car behind the driver seat where it can easily be accessed.
The FPSC can also be wired for an override switch that allows users to run the pump at 100-percent duty cycle constantly. This is ideal for cars that see street/strip or street/track duty. Those enthusiasts can take advantage of the benefits of the speed controller while on the street, and run the pump at maximum performance all the time at the track if they so desire.
The Right Hose
Flush It Out - PN 900557-BL
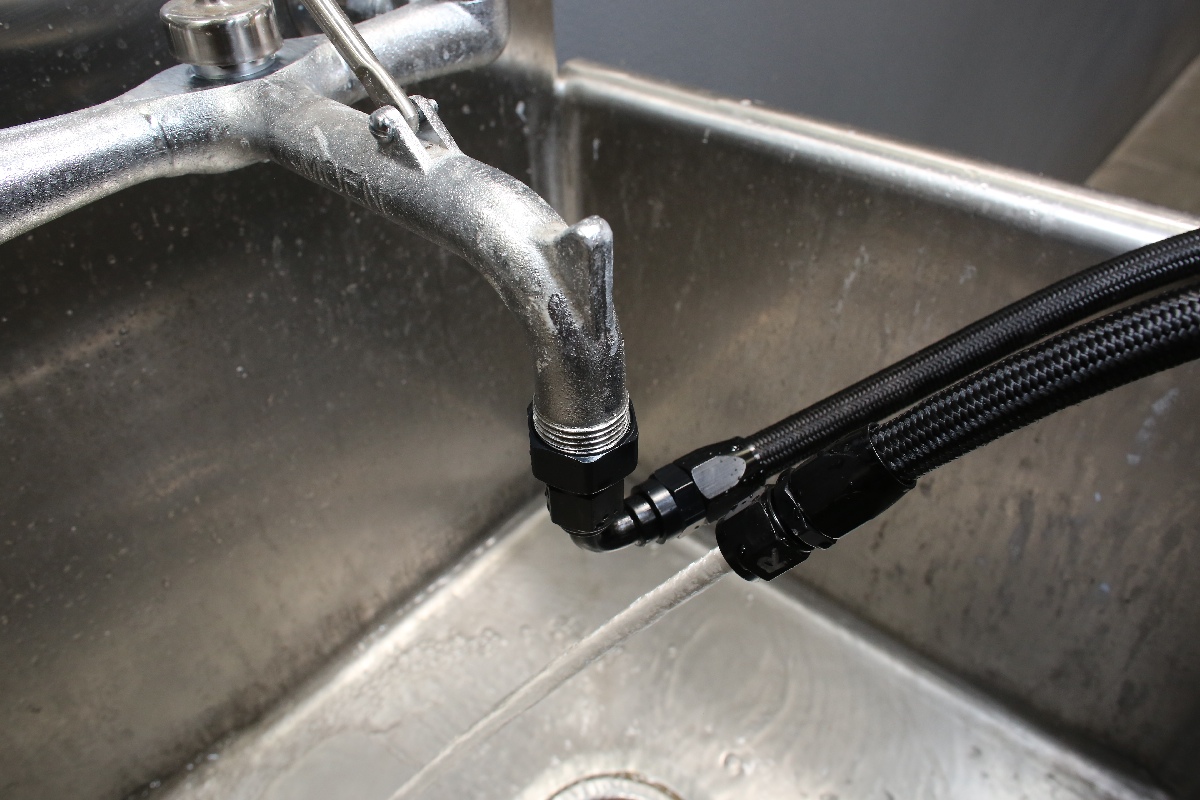
Fragola also sent us one of their new flushing kits. “We were looking for a way for the DIY guy at home to be able to easily flush out his hoses after assembling a new system,” says Stacy. The system is compatible with Fragola hoses from -04 all the way up to -16 AN sizes. After making numerous cuts, and assembling new braided hoses, the completed system needs to be flushed to remove debris. This kit allows us to attach a garden hose to our fuel line and flush the entire system with tap water prior to ever pushing fuel through it. It also can be capped to allow us to perform a leak check using tap water, rather than risking a check with fuel. The kit includes adapters to use it on the specified hoses sizes, and it can be used to flush any Fragola hose.
Our stock fuel lines of course aren’t going to be adequate for supplying fuel to this new engine. So we turned to Fragola for their Premium Black Nylon race hose, part number 842008, and the appropriate fittings. This lightweight hose features a nylon exterior braid instead of the typical stainless braid, making it somewhat easier to work with when cutting and attaching fittings.
At its core the Fragola hose is based around a high quality rubber hose. This is where the similarities to other hoses end though. Fragola’s hose is compatible with virtually any fuel, including many of the popular oxygenated types. It also features a stainless braid incorporated into the rubber hose for added strength, which will prevent it from collapsing or expanding under pressure. Like all Fragloa products, this hose is made in the USA at the company’s facility in Southington, Connecticut. Fragola’s hose is good enough that they’re used by Ford on the Cobra Jet Mustangs, and GM for the COPO Camaro.
Additionally Fragola sent us an assortment of their AN fittings for our project. Jeff Stacy of Fragola tells us, “The fittings are a unique one-piece design, there’s no brazing on them.” While brazing does work, and has worked for years, according to Stacy it creates a joint which can be stressed and leak. Stacy says eliminating this as a potential source for a leak improves both safety and quality of the product.
Ancillary Parts
Our fuel system wouldn’t be complete without a few ancillary components as well. Since our Eliminator pump already incorporates a 100-micron internal filter, we simply need to add an inline filter to our system. Aeromotive recommends a 10-micron filter inline, and they supplied us with part number 12321.
The fittings are a unique one-piece design, there’s no brazing on them. -Jeff Stacy, Fragola
We’re using an Aeromotive three-port fuel pressure regulator, part number 13101. To accompany our fuel pressure regulator and let us know that we’ve set our fuel pressure to 58 psi. we also installed an Aeromotive fuel pressure gauge We used an assortment of Fragola fittings as well in straight, 45, 90, and 180 degree variations. The fittings have a glossy black finish and will match the rest of the car’s motif, as well as blend nicely with everything else under the hood.
Aeromotive supplied a set of their fuel rails to feed our thirsty injectors. Part number 11430 is designed to specifically go on the 5.0 Coyote engine. These came with a red anodized finish, and mounted easily to our BOSS intake manifold.
We also need a tach adapter to provide a signal to the Fuel Pump Speed Controller. To get that signal we went to Auto Meter for a tach signal adapter, part number 9117.
The FPSC is wired to the fuel pump, and takes the place of any relays or other control systems as it is a stand alone controller for the pump. The factory connection for the fuel level sending unit does remain intact.
Installation
One of many of the great changes on the S197 chassis is the inclusion of an access panel for the fuel pump under the rear seat. With our old pump removed, we transferred our sending unit to the Stealth Eliminator pump. We did have to slightly enlarge the the retaining ring hole. Otherwise you will need to drop the tank to remove the pump.
We routed our fuel lines using the stock routing location. A Y-block feeds both sides of our fuel rails and is hidden behind the engine. On the return side, the driver’s side rail uses a simple 90 degree fitting. However, the passenger’s side rail required the use of a 180 degree fitting in order for it to clear the mounting tabs for the heater hoses. We had to trim those tabs slightly as well as it’s tight fit getting everything to clear. The return lines run to our fuel pressure regulator, then back in a single line to the Eliminator pump. With everything together we flushed the lines with tap water using our kit from Fragola, and then pressure tested the system to ensure there were no leaks.


Left; There are only a few connections necessary to make the FPSC work, and we mounted ours inside the car to keep it away from heat, dirt and moisture. We connected the Tach terminal of the FPSC to our Auto Meter tach adapter and we also connected the Override terminal to a signal wire from our TurboSmart EBoost2 boost controller. The Tach adapter triggers the FPSC to run the pump at constant on at 5,200 rpm, which is where our engine makes peak torque. The EBoost2 commands full power from the pump at 8 psi of boost. Either way should avoid a lean condition. Right: If you view the voltage on a typical voltage meter, it looks like the FPSC is providing less than 12 volts to the pump, this is due to the pulse width modulation which is a rapid cycling of power to the pump, the reading on the meter is because most meters, including ours only read the average not the live voltage. Still, you can use this reading to set your minimum voltage setting that should be around 9 volts. Make sure the motor maintains the proper fuel pressure at idle on the low speed setting.
We programmed our FPSC for two ways to trigger. The first is off of boost via our Turbosmart EBoost2 controller. At 8 psi of boost, the EBoost2 will signal the FPSC to go to full flow. We also set up a tach signal trigger via the Auto Meter tach adapter we installed. Per Aeromotive’s instructions this was set at peak torque which right now is at 5,200 rpm. By doing this we have two ways to trigger our fuel system to run at maximum when we need it, ensuring that the car should never run lean due to a lack of fuel, and the fuel should never get too hot due to heat soaking.
We have to say that we’re impressed with how quiet the Eliminator pump is now that it’s being controlled by the FPSC, when it goes wide-open, you can hear the pump get louder, but for idle and cruising around town you’d barely know it was back there. We now have peace of mind that our fuel system will not only adequately supply the car’s new engine, but that we can make fine tuning adjustments as needed, and that our Eliminator pump will live a long, happy life inside our fuel tank, reliably supplying fuel to our engine every day.


