

My last install story was about upgrading the OEM turbocharger on my 2016 Ford Mustang Ecoboost to the Turbonetics NX2 turbocharger provided by Full-Race Motorsports. For every action, there is an equal and opposite reaction, so when I added more power to my vehicle, it put a lot more stress on other components.

With the stock MS109 clutch, my 2.3-liter EcoBoost was pumping out over 450 wheel torque, which is far above the SAE OEM rating that the factory clutch could hold. I felt it on every clutch and clutch kick.
I drive my Ecoboost Mustang extremely hard and knowing that I constantly launch, clutch kick, road race and drift my car I turned to Competition Clutch for an aggressive clutch kit that would be able to withstand the abuse that comes with my driving style.
Little did I know they were actively searching for a test vehicle to provide feedback on their prototype twin disc clutch. Since I was a kid, I had always dreamed of having a twin or triple disc clutch, the sound and chatter from YouTube videos provided those car-raising-goosebumps.

Before you consider this clutch for your car, there are a few things you need to be aware of. This is in no way to deter you from your purchase or decision, but what you are getting yourself into if you are not familiar with this component of the car.
First, the pedal is extremely heavy. During my testing, I found you need nearly 100 pounds of leg pressure to push the clutch pedal to the floor. The engagement is violent, it shakes, it chatters, and it is loud. Don’t worry, this is all completely normal.
Additionally, the clutch does not last long. Most people see about 50,000 miles out from a set of replaceable disc plates. If you drive your car to its limits, you get about 30,000 miles of usage.
With each service, you need to replace the throw-out bearing and internal slave. This clutch requires frequent service because it is so violent, as it’s designed to hold over 1000 wheel torque. All comfort and luxury go out the window with those constant clutch kicks and launches.
If all of this is okay with you, then this is the clutch for you.
Installation Overview
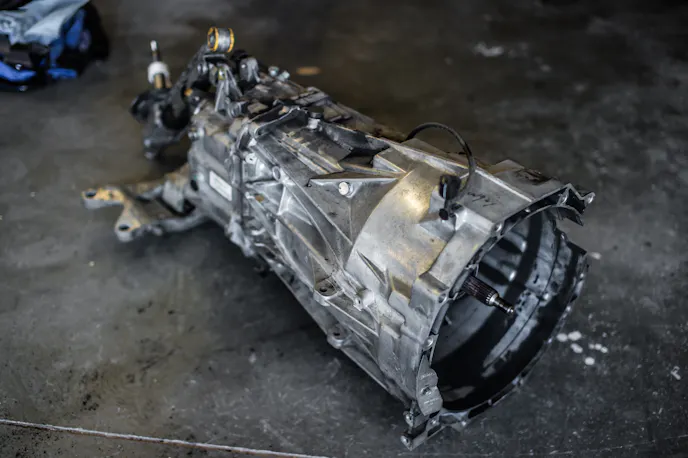
Do you have your jamming tunes on yet? Cause’ this job is going be time-consuming and needs to be done with caution. You also need a 2 or 4 post lift to complete this job, and I do not recommend doing this on the ground for your safety. The stock MT-82 transmission is a fat pig, and you need a transmission jack for this job. The hardest part of the install is removing the heavy exhaust and driveshaft.
The installation difficulty is approximately 6.5 out of 10.
Time: 3 to 8 hours depending on skill level, we can accomplish this job in 3 hours
Cost: Clutch Packages can range from $500 to $1500
Here are the tools, chemicals, and equipment required to complete this job:
- OEM Genuine Ford Parts Clutch Slave Cylinder
- Motul DOT 4 Brake Fluid or any DOT 4 Brake Fluid
- Full set of metric sockets
- 3/8 ratchet
- Extra long extensions
- 3/8 impact wrench and gun
- Screw Jack (if you do not have a friend)
- Transmission Jack (absolutely necessary)
- Brake cleaner
- Blue Loctite
- Set of strong arms
Like the turbo install, the car needs to be cold as you remove the entire exhaust system. Pull the car on to the lift, position your lift points – located at the front and rear of the pinch welds. Lift the car up with the wheels just above the ground, pop the hood, disconnect your negative terminal and go watch a few episodes of “Worth It” if you’re a foodie like me. The car should be cooled down enough for us to start our surgery finally.
Step One: Remove Shift Knob, Boot and Reverse Lockout

Before we go all the way up in the air, make sure to remove your shift knob, leather boot and reverse lockout collar. Failing to do so first does not allow the transmission to come out.


Step Two: Remove your Downpipe & Exhaust

After you’ve completed removing those items, raise your Mustang all the way into the air and begin to remove the exhaust from the downpipe connection.

You do not need to remove the downpipe from the turbine, only the bracket holding it to the transmission.

Depending on what exhaust you have, these steps are different. As a generic reference, there are hangers on the center of the vehicle, rear differential and rear of the car. These are moderately easy to release.

If you do not have a helping hand, make sure to take the exhaust off in sections, so it does not come slamming down on the ground or worse, yourself.
Step Three: Driveline Removal

After you safely remove the exhaust, start removing your driving line components. Start with your entire driveshaft.

Remove the bolts holding the carrier bearing, work your way to the back and remove the bolts holding the rear section of the shaft to the differential. Don’t let the driveshaft drop and hit the ground because they are worthless after suffering the high impact.

Pro tip: remove the driveshaft carefully, it has labels to help.
I highly recommend putting the bolts back in the places they belong. If you lose anything, you’ll be hating life on reassembly!


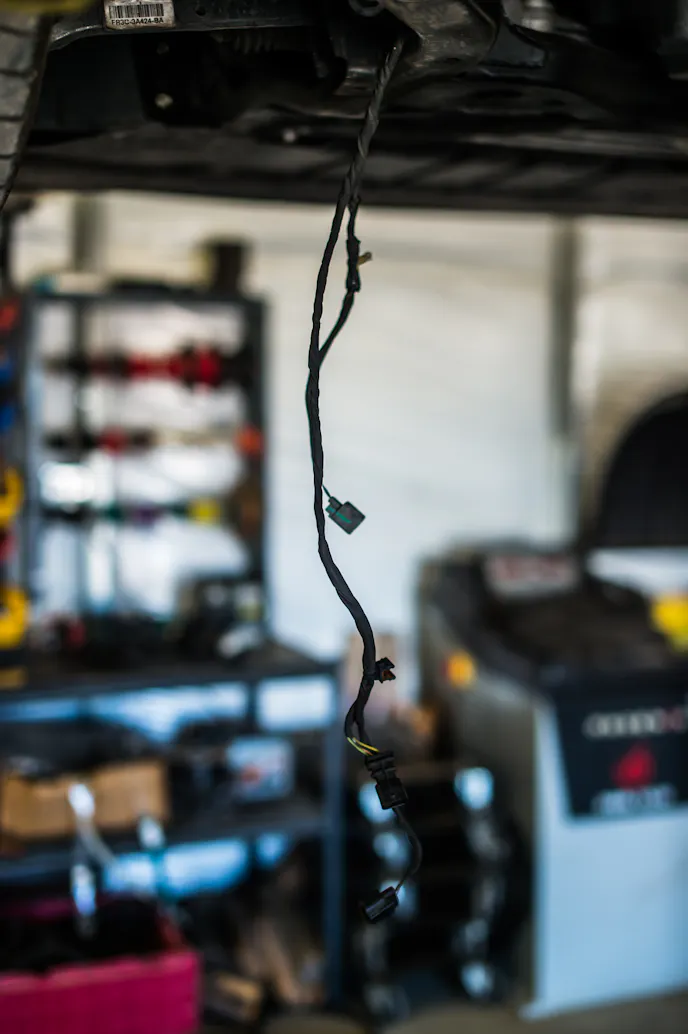
Back to the front, disconnect the lead going to the starter and remove the starter unit. Grab a glove, rubber band and remove the clutch fluid line connected to the left side of the bellhousing, photo above for reference.

Following the wire harness on the transmission, begin to unhook the following sensors pictured above.
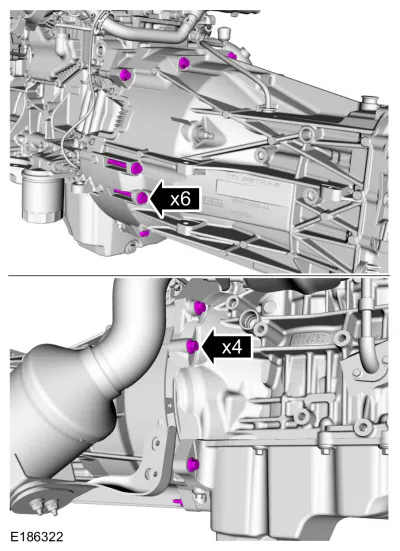
Still at the front of the transmission, remove the following bolts that hold the transmission to the block pictured above.
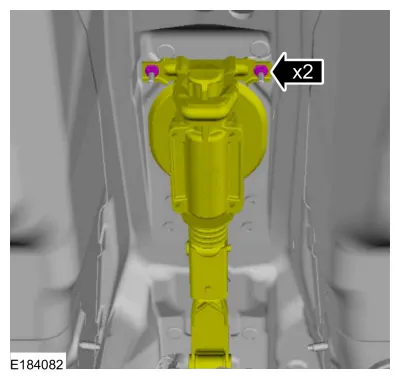
Moving to the back of the transmission, support the transmission with a transmission jack and ratchet strap. Remove the 4 bolts holding the crossmember to the chassis. Remove the 2 bolts holding the linkage to the body pictured above.
At this point, make sure that you have all of your wire harnesses disconnected, if you are 100-percent positive, begin to pry the transmission from the block.

Use a medium pry bar and wedge it between the bottom of your bellhousing and block while your friend pulls back on the transmission itself. It should come out relatively easy. Carefully reposition your transmission and jack out of the way to begin removal of your OEM clutch.
Step Four: Flywheel & Clutch Removal

This process is very straightforward, remove the six bolts holding the pressure plate to the flywheel. Discard these bolts as you are using new hardware. Carefully remove your pressure plate and disc. Remove the 6 bolts holding the flywheel to the crankshaft. Discard these as well as new hardware is highly recommended. We are now ready for reassembly!
Step Five: Reassembly

Begin by preparing all your parts. If you have purchased this exact clutch or one similar to it, these steps apply.
Start by assembling these parts in the following order:
- Pressure plate
- Clutch disc (check markings for direction)
- Friction plate (check markings for direction)
- Clutch disc (check markings for direction)
- Clutch tool
- New slave / throw out bearing
Start by removing your old clutch slave cylinder and replace it with the new one, failing to do so could lead to premature failure.
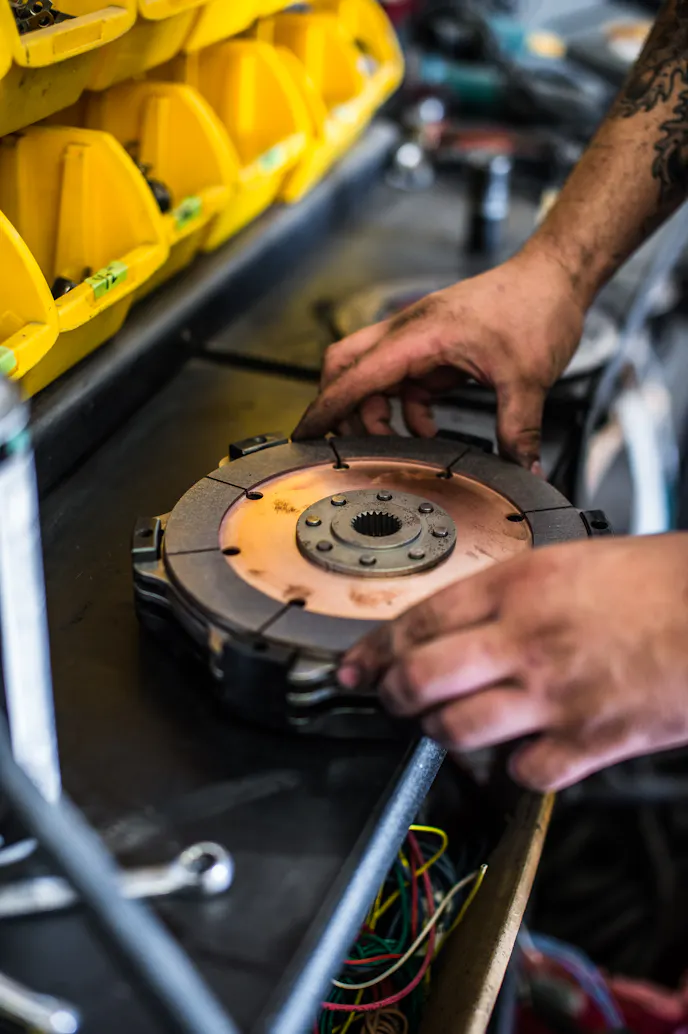
Next, assemble your pressure plate and discs. If you’ve done this successfully, it will look like the photo above. Failing to put the disc in correctly could lead to extreme chatter, disc failure, or ultimately a catastrophic failure of the unit under load. Be sure you have checked the disc markings on which way they face.

Take your pretty new flywheel and position it on the crankshaft and line it up the holes. With your new hardware, put a dab of blue Loctite on the end and screw them in hand tight.
You need a friend to either hold the front of the crank pulley or use a pry bar in between the teeth of the flywheel to hold the engine from spinning.

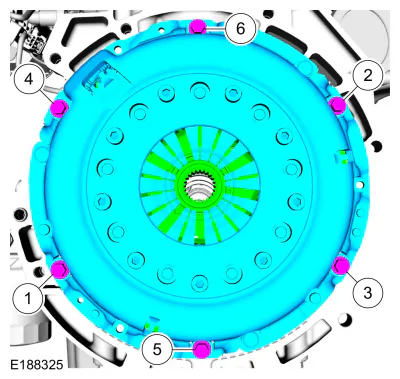
There is a factory service tool you can purchase to hold the flywheel in place. Taken directly from the Ford Factory Service Manual, take your torque wrench and follow these steps to install your flywheel bolts in a star pattern.
- Stage 1: 37 lb.ft (50 Nm)
- Stage 2: 59 lb.ft (80 Nm)
- Stage 3: 83 lb.ft (112 Nm)
Now that your flywheel is installed spray brake cleaner on the surface and wipe off any dirt or oil that was left on there from install.

Now grab your clutch assembly and mount it into place. It should sit flush with the mounting points. Shove the clutch tool in to make sure it touches the back of the pilot bushing ensuring everything is centered. Take your new hardware and dab them with blue Loctite and install in the following order below. Factory torque spec is 26 lbs. It is highly recommended to use a digital torque wrench for the procedure.

Once everything is nice and tight, remove your clutch alignment tool, and you are ready to reassemble. Repeat all steps backward in the following order:
We recommend that every bolt has blue Loctite used to ensure safety.
- Install transmission – this is a little bit of a pain to get the input shaft to center. Do not draw it in with bolts.
- Install all bolts to the block
- Install 4 bolts crossmember to chassis
- Position your shift linkage to go back into the shifter hole
- Install 2 bolts shift linkage to chassis
- Install starter and leads
- Reconnect wire harness
- Reconnect clutch fluid line
- Install driveshaft
- Install downpipe
- Install exhaust
- Lower the car
- Reassemble your shift boot and knob
Without any extra hardware and the car on the ground, top off the clutch reservoir with either the recommend Motul DOT 4 brake fluid, or any DOT 4 fluid.
My favorite thing about this car is the self-bleeding slave, start by pressing the pedal to the floor and picking it up with your foot until there is some pressure. From there, you need to pump the pedal until you have substantial pressure – this could take over 100 pumps to 10 minutes.
Once you have established full pressure, go ahead and reconnect your battery terminals, set your clock and let’s start the car.
First Impressions: The Feel of a Twin Disc
It makes noise, do not be alarmed. The noise is a result of the clutch disc spinning between the friction plates. There is play between them, and that is normal. It makes noise when you press and release the pedal. The pressure plate is designed to hold over 1000 lbs of torque.
Press the clutch and release it very slowly as it is incredibly snappy. It will take you a few days to get used it, and you’ll want to give it about 100 miles of break in meaning, use it as much as you can but do not rip on the car. We are trying to seat the clutch disc to the friction plates.
You might also like
Detail Fest Set For Petersen Automotive Museum
Visitors can expect a day filled with live product demonstrations and expert-led education during one of the museum's busiest weekends.

